Navigation
SEARCH
This form does not yet contain any fields.

    Entries in baking (62)

    Friday
    May062016

    Blueberry muffins: Rose's Bread Bible Bakers

    going, going, gone.  blueberry muffins. 


    Going, going, gone!!   Well, I've just eaten my first ever blueberry muffin which coincides with my first blog post for the brand new bread baking group... 'Rose's Bread Bible Bakers'.

    Same format as previously; once a month baking from Rose Levy Beranbaum's 'The Bread Bible'. However, this time there is a few new bakers and we are starting earlier in the book.  I'm so happy to be involved, and looking forward to sharing my experiences. 

    Oh and the rest of 'The Lone Baker' blog will continue as per usual with chocolate, fondant and the like. 

    "It's a quick bread" 

    In Australia I don't believe we generally think of muffins as quick breads or something to have for breakfast... it's more "like cakes, but not as good"... or at least that's how I think of them. I could count the muffins I've eaten in my life on one hand, until today that is when I've started the "other hand" with these ....

    Blueberry Muffins

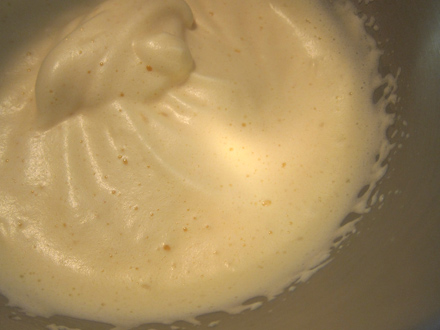
    It began with butter, sugar and lemon zest being beaten together until light and fuffy. Egg and vanilla were added. 

    Then flour was whisked together with baking soda (bi-carb to Australians) and salt. 

    Oooo I know people that don't do the whisk or sift step (you know who you are!). Whisking makes for an even bake if the raising agent is evenly incorporated. 

    The flour mixture plus some sour cream were then folded alternatively into the whipped butter mixture.

    The resulting batter is thick.

    Blueberries Ok they were supposed to be tiny in season Maine blueberries, instead in Australia as blueberries are out of season I've used large frozen blueberries. 

    Once I folded through my "land of the giants" blueberries in their frozen state as to not stain the batter too much. I then used to an ice cream scoop to portion the batter into muffin cases. 

    Nutmeg laced sugar was scattered over the top of the muffins. 

    Rose called for fresh nutmeg, I used my microplane to grate a little nutmeg.

    Nutmeg fruit photo courtesy of wikipedia.

    Nutmeg fruit, contains this seed... the red you can see is "mace", under the mace is a seed similar to a stone fruit... that's the part that is dried and sold as nutmeg. 

    Here just starting to fill the empty cake pan holes with water as Rose suggests. 

    Then they were baked, five minutes longer for mine because they contained frozen berries.


    Eating time, bite through the buttery sugar crust into the open textured but soft and moist interior, where you pick up hint of lemon and a burst of warm blueberry (mine were giant bursts of blueberry!!). The nutmeg flavour is more of a whisper than a shout but adds a bit of the "oh what is that flavour?"

    Loved the blueberry muffins warm, not so much cold, so I'd eat them quick or reheat later on. Rose has reheat instructions in the book.

    The Bread Bible  by Rose Levy Beranbaum is available from Amazon and all discerning book stores.

    Happy Baking :)  

    You might also be interested in individual chocolate pavlovas

    or no bake Speculoos (Biscoff) tarts

    Sunday
    Apr032016

    Sacaduros 'The Bread Bible' Alpha Bakers

    Sacaduros:  crisp crusted, soft interior dinner roll with a burst of salty butter. 

    Join me on Facebook

    “But he who dares not grasp the thorn Should never crave the rose.” -Anne Brontë

    Dang, I had a "dinner roll shaping problem" this week. These little dinner rolls are Rose Levy Beranbaum's favourites from restaurant 'Daniel' New York. Thanks to the 'Bread Bible' I got to make them, firstly lets see what they are supposed to look like ....

    Serious eats has a fabulous gallery of bread baskets in New York, including the bread basket from restaurant 'Daniel'. You can see the sacaduros front left, those round rolls were what I was aiming for. Mine didn't have the "petal like" pulled up sides you see pictured here. Even though I experienced "folding fail" the resulting dinner rolls are so incredibly delicious I can live with my misshapen little fellas.  

    Here we go...

    Three quarters of a dough batch from Rose's 'Basic Hearth Bread' was called for so I started by whisking together bread flour, wholemeal flour, instant yeast, honey and warm water for the sponge (dough starter). 

    Bread flour combined with instant yeast was sifted over the sponge and left to ferment. 

    Sponge bubbling through the flour topping. 

    I used my Kitchen Aid to beat the sponge, flour and added salt into a dough then off to rise once more.

    Cubed butter and salt are needed for the filling.

    Fleur de Sel French salt: distinctly moist and often used as a finishing salt. 

    I also made a flavoured butter by adding fresh coriander, garlic, chilli and grated ginger to softened butter. The butter wasn't whipped as in the standard compound butter technique but rather the flavourings were beaten in with a wooden spoon as to not incorporate excess air. Form the butter into a square and refrigerate before cutting into cubes. 

    Time for pinching off 33 gram balls of dough (Rose recommended one at a time, I did four at a time... maybe my downfall part) and gently flattened balls into discs.  A half inch cube of butter and a pinch of fleur de sel on top of the butter are placed in the centre of each flattened ball.

    And then I started talking about napkins:  I'm presuming the folds in the rolls were inspired by Escoffier's famous "rose" fold napkin technique, including "pulling" up pieces to form petals. 

    Shaping the rolls; pull two sides of dough out and fold bringing them to the centre to cover the butter without squashing it down, then pull out the other two sides and bring to centre. Rotating the dough so a pointed end is facing you, repeat the folds.  Then in the written instructions there is "for the last two pulls, take only pinches of dough". The diagrams don't have this bit in my Kindle version. I was confused and also my dough did not want to stretch for those final two pulls. I tried to force it (yep, ok shouldn't do that) and ended up with my misshapen rolls that were placed upside down in a tray of flour. 

    About a third of the rolls burst in the oven and the butter leaked, these were my "I bet I could stretch that dough with brute force" ones.     

    At the end I had sacaduros with super thin hard and crunchy crusts that gave way to light and fluffy interiors with bursts of salty butter. Shaping aside these are the best bread rolls I have baked, so pleased with crust and interior texture. The long oven pre-heat and other tips within the book are yielding excellent results. 

    Would I bake again? Yes, loved them. You could do so many different butters/flavours by changing herbs and seasonings. From a straight garlic butter to a lime zest black pepper butter, lemon and dill, black olive, or vanilla salt and butter to go with your scallops and white fish. 

    Would I change anything? Yes, I wouldn't do the flour on top step, messy stuck in lipstick eating. Ha, ha if I folded them correctly next time that would be nice.  

    How it works... joining the fabulous existing alpha bakers, once a month I will post about what I have baked from Rose Levy Beranbaum's 'The Bread Bible'. I will be posting how it went and photos of making/baking the gorgeous baked goods.

    Rose Levy Beranbaum's The Bread Bible available from Amazon and all discerning book sellers. 

    Happy Baking :) 

    You might also be interested in Toblerone dessert in 30 minutes

    Sunday
    Aug232015

    Woody's Black and White Brownies Rose's Alpha Bakers

    Woody's Black and White Brownies (with a touch of green) 'The Baking Bible'

    Join me on Facebook or view my Flickr gallery 

    Stuart's Brownie Review Stuart's video brownie review Flickr. 

    Little Stuart is eight years old and has autism, each week he asks me "is it chocolate yet?" This week it is chocolate!! Woody's Black and White Brownies. 

    Stuart wanted to take the brownies to school tomorrow, so the we had to veto the bourbon in the ganache topping and no nuts (nut free school).  This caused an hour or three problem as Stuart kept repeating "the recipe says bourbon" but we settled on mint largely due to Stuart loving 'Peppermint crisp' chocolate bars. :)

    peppermint crisp bar a popular chocolate bar in Australia, New Zealand and South Africa... often used in desserts. 

    Chocolate and butter were melted in a double boiler and scraped into the mixing bowl of the stand mixer.

    Cocoa and sugar were added and mixed until incorporated.

    Eggs and vanilla were beaten in, the mixture became thick and glossy.

    Cream cheese was added and beaten until small bits remained and the mixture was spread evenly in the lined baking pan. I added a handful of choc chips, well just to surprise Stuart really. 

    Hmm, I wondered at this stage were you supposed to be seeing the little bits of cream cheese?

    Brownies were baked until the batter was set one inch from the edge.

    Next was making the white chocolate custard base that would be a compontent of the white chocolate buttercream. I used small callettes so I didn't have to cut chocolate into pieces.

    I had never made a custard from melted white chocolate and butter until this recipe, interesting technique. 

    White chocolate and butter are melted over a double boiler.

    Whisked eggs are added and cooked until slightly thickened (you have custard), it's then strained and cooled.

    white chocolate custard ready to be cooled

    Butter is whipped until creamy, custard gradually mixed in. Beaten to stiff peaks form and covered and popped away for a couple of hours. 

    Frosting is them rebeaten briefly and vanilla added.

    Time to spread frosting on cooled brownie base. 

    Next up "dark chocolate ganache glaze", cream and chocolate are melted together (there is bourbon in this bit if you are using) and ganache is spread on frosting. I sprinkled the crushed peppermint crisp chocolate bars on top at this stage. 

    The brownies are back to fridge now to chill at least one hour before unmoulding and slicing.

    Straight from the fridge the texture is like this. The brownies are much easier to slice. Once returned to room temperature the white chocolate frosting is extremely soft and will squelch out as you bite. I'd like a firmer white layer more in line with denseness that is "a brownie". The brownie base is great, fudgy without being cloying. You can still see the little pieces of cream cheese, not sure what that is about but hey "it's good'.  

    Stuart studying his brownie, he absoloutely loved them... as did his Dad.

    How it works... now I've joined the fabulous existing alpha bakers, once a week I will post about what I have baked from Rose Levy Beranbaum's 'The Baking Bible'. This won't include the recipe due to copyright and publisher restrictions however, I will be posting how it went and photos of making/baking the gorgeous baked goods.

    Would I bake again? All the elements yes, but not together. Great tasting brownie. Great tasting white chocolate custard frosting. Just not the two together.  

    Would I change anything? Yes, I would make the brownie base alone and top with ganache. Maybe incorporate the cream cheese fully because it's not visually appealing.

    The Baking Bible available from Amazon and all discerning book retailers. 

    You might also be interested in chocolate twirly swirly decorations 

    Monday
    Aug172015

    Tiesen Sinamon (Welsh cinnamon cake) cupcakes

    Tiesen Sinamon (Welsh cinnamon cake) cupcakes

    Join me on Facebook

    Ahhh ha ha, I love this metal Welsh dragon my step son Daniel gave me from his recent travels to Wales. 

    Wales; with a dragon on their flag, it's the birth place of my Uncle John, home of Dr. Who and according to fairy expert Janet Bord (is too such a person!!) the little folk abound in Wales.   Welsh flag

    Tiesen Sinamon is traditionally a round cinnamon cake topped with raspberry or apricot jam and spread with meringue. The cake is returned to the oven to brown the meringue. Here favourite my little one bowl cake recipe is spiced with cinnamon, filled with raspberry jam and topped with fluffy meringue (7 minute type) frosting before torching.  

    Tiesen Sinamon (Welsh cinnamon cake) cupcakes ... the one bowl method used here results in cake similar to the original Tiesen Sinamon texture. By all means substitute your go to buttercake cupcake recipe and add cinnamon if desired.  

    Preheat oven to 180C/350F 

    Line two 12 cup trays with paper liners (the small patty/fairy cake size... this a UK size, old Australia size and smaller than US cupcake)

    Ingredients

    125g butter (4.4oz) softened

    1 teaspoon vanilla extract

    2/3 cup (150g) castor sugar (superfine)

    3 eggs  room temperature

    1 1/2  cups (225g) self-raising flour

    1 1/2 tsp cinnamon 

    1/4 cup milk (60ml) room temperature

    Method

    In your mixer bowl with flat beater blade attached, beat butter, extract, sugar, eggs, sifted flour, cinnamon together & milk on low speed with an electric mixer until ingredients are just combined. Increase speed to medium & beat for 3 minutes until smooth and pale in colour.

    Drop spoonfuls of mixture into the paper liners. Bake about 20 minutes. Allow to cool in tins for 5 minutes removing to a wire rack to cool.

    Fluffy Frosting
    Makes 3 cups
    • 1 cup white sugar (granulated)
    • 4 large egg whites

    Directions
    1. In the heat-proof bowl of an electric mixer, combine sugar and egg whites. Place the bowl over a pot of gently simmering water, and whisk until the mixture feels warm to the touch and the sugar has dissolved, about 5 minutes.
    2. Return the bowl to the mixer stand. With the whisk attachment, whip on high 
    3. until cooled, about 8 minutes. Use immediately.

    *If the weather is humid, you may need to beat the frosting for an additional minute in each step to stiffen it.

    Use a good store bought raspberry jam or make your own.... Raspberry Jam recipe Traditionally raspberry jam is "loose" (wetter) than say ummm "apricot". If you prefer a firm set jam use pectin sugar as per instructions. 

    To Serve

    Cut a small hole in to the top of each cooled cake. Fill the cavities with about one teaspoon of raspberry jam, top with a blob of meringue frosting (use a star piping tip if you prefer a less rustic looking cupcake) torch with a kitchen blow torch.  

    Happy Baking :) 

    You might also be interested in Raspberry and Orange Gluten Free Friands

    Sunday
    Jul192015

    Kourambiethes Rose's Alpha Bakers

    Kourambiethes (Greek Biscuits) 'The Baking Bible'

    Join me on Facebook

    Aristotle wore an icing sugar moustache. 

    With a portly build and chubby hands, I was trying not to stare at the child sized more like a four year old than the eighteen month year old his parents professed him to be. That's how it began, my first after school job babysitting Aristotle in the back of the Greek delicatessen. 

    It was pre Christmas rush, time for freshly baked Kourambiethes. Trays of snowy white crescents and clove dotted balls drifted past, aromas of spiced oranges and roses trailing in the air... then again, it could have been Aristotle's breath!

    Today's bake from 'The Baking Bible' is Kourambiethes (Greek biscuits/cookies), a light shorbread usually made with the Greek brandy Metaxa in the recipe (orange juice if going alcohol free), with or without nuts these are always delicious and never more so than Rose's recipe that uses whipped clarified butter.  

    The recipe starts with clarifying the butter. Lots of butter!!

    Cubed butter is melted.

    Foam can be skimmed off the top of melted butter as your going if desired, using a spoon or a small slotted spoon being careful not to remove too much of the butter.

    Butter is strained through the muslin to remove all milk solids. 

    Chilled clarified butter is unmoulded ready to be chopped, transferred to a mixing bowl with icing sugar.

    My butter weight was short, perhaps due the ummm, zillion (or at least six) folds I made in the muslin. I had to melt more butter to strain to make up weight. I used food safe muslin, using food safe muslin rather than fabric from a fabric store ensures no chemicals unsafe for human consumption are used.

    Oh, better toast the almonds... these are what Australian's call slivered almonds this may differ in other countries, but it's what I toasted and then chopped.

    toasted chopped almonds

    Ten minutes mixing and you have a white fluffy butter mixture, egg yolks, brandy, vanilla are added before the chopped toasted almonds are mixed in and finally the flour and baking powder.

    After chilling the biscuit mixture is shaped into balls (I made the traditional crescent shapes too).

    Often garnished with a whole clove, you see these cookies at Christmas time and Pascha (Greek Easter), though I have had them at Greek Weddings too. 

    Keeping with tradition, I added a whole clove to the center of the round cookies. Despite the "tooth ache drops" smell when you open your cloves pack it won't taste like that once baked, what you get is a lovely touch of spice and a gentle spice aroma. 

    Wish you could taste these, the texture is so light and airy! Don't forget to remove your clove :)

    Would I bake again? Yes, love the light airy texture the clarified butter brings.

    Would I change anything? Yes, I like stronger flavours so I would add either rose water, orange water and orange zest. Salt... I'd add salt, all a bit sweet. Spices; would be nice with nutmeg, cardamom or experiment with teas and coffee. Break with tradition and change the nuts, have a peanut Greek biscuit, pipe on chocolate or perhaps top warm pistachio biscuits with freeze dried cherry dust. 

    How it works... now I've joined the fabulous existing alpha bakers, once a month I will post about what I have baked from Rose Levy Beranbaum's 'The Baking Bible'. This won't include the recipe due to copyright and publisher restrictions however, I will be posting how it went and photos of making/baking the gorgeous baked goods.

    The Baking Bible available from Amazon and all discerning book retailers. 

    You never know when you will need to make a fondant toe... a Cinderella stepsister toe cupcake

    Monday
    Jul062015

    Fourth of July Cheesecake Rose's Alpha Bakers 

    Today's post is Fourth of July Cheescake 'The Baking Bible' or "how I can wreck an amazing cheesecake with bad blueberries'

    Join me on Facebook

    Ahhh I know better, I do, I do, don't use fruit/veg out of season.  And yet I went ahead and used the most expensive and awful winter blueberries with glass half full "oh, maybe it will be ok" mentality. It wasn't, ok that is.

    But, but, but it was the Fourth of July bake and kind of had to be (well did) have to be red, white and blue.

    I tasted the fresh blueberries, a locally grown winter crop. I was sad, they were bad (so I say apparently chanelling my inner Dr. Suess), that's when I decided to halve the recipe. Because we all know half a bad tasting blueberry topping is better than a full size???? Yep, I know doesn't make sense but at the time...

    "Hmmm" (this was me thinking), I don't have a half sized cheesecake pan, ok I would go with the mini cheesecake size like what I used for the Stilton Cheesecakes a few weeks ago... then I'd have the cooking time too.

    Divided (with a calculator, don't judge!!)

    Half the recipe makes exactly twelve mini cheesecakes. I prepared the pan, shortening on bases, disc of non stick baking paper and cooking spray the sides.

    exactly 12

    Half the red velvet cake batter ready to spread/baked in a flattish pan.

    I used a cookie cutter to cut cheesecake bases.

    Followed the rest of the recipe as in the full sized cheesecake by brushing bases with raspberry jam. Joined the base to the cake, made the dreamy creamy white chocolate frosting.

    Blueberries were bitter, yet tasteless with an "accidentally ate a garden weed" after taste. I made a compote with some of the blueberries hoping for sugar magic, there was no magic :( Now had blueberry compote that matched the fresh berries, it was bitter, yet tasteless with an "accidentally ate a garden weed" after taste.

    I spooned some compote onto frosted cheesecakes and topped with three whole berries (I only had 12 berries left whole) and got a friend to taste (keeping in mind I already knew berries were bad but there is always hope taste tester will love it!!!!)... yep, they didn't love it. A smiley face when they tasted the cheesecake and a "pulled face" when they got to berries.  

    Good news only enough berries for four cheesecakes and taste tester was appeased by taking the "naked" remaining cheesecakes home.  

    The cheesecake it's self is amazing, rich yet light in texture. The recipe is unusual with a higher proportion of sour cream to cream cheese and it's many egg yolks what you have is a "custard" a "cheesecake custard". A definite do again, ummm when it's summer here and blueberries are in season. 

    Australia Day is January 24th and our flag is red, white and blue too... perfect cheesecake for our summer celebration. 

    To see the full sized cheesecake with it's lovely blueberry topping 'Faithy' one of the other alpha bakers version here 

    Happy Baking :)

    How it works... now I've joined the fabulous existing alpha bakers, once a month I will post about what bread I have baked from Rose Levy Beranbaum's 'The Baking Bible'. This won't include the recipe due to copyright and publisher restrictions however, I will be posting how it went and photos of making/baking the gorgeous baked goods.

    The Baking Bible  is available from Amazon and all discerning book stores.

    Would I bake again? Yes, I want my step son (a passionate cheesecake lover) to try it. Definetly for Australia day too, the light texture is surprising and sure to be a hit. 

    Would I change anything? I will invest in a half sized cheesecake pan... American cheesecakes are huge compared to what we usually have here.  

    You might also be interested in making a fondant raven or crow for Poe

    Monday
    Jun222015

    Double Damage Oblivion chocolate cake Rose's Alpha Bakers

                Double Damage Oblivion chocolate cake 'The Baking Bible'

    Join me on Facebook

    Renowned chocolate cake lovers, the single dad with his eight year old autistic son picked up the Double Damage Oblivion cake that I baked from Rose Levy Beranbaum's 'The Baking Bible' today ... I just got the review back "You've got a good cake here".

    The guys review contradicts my opinion of the cake and once again illustrates different people have different likes and dislikes and it all comes down to personal preference and knowing your audience. 

    Today's bake calls for baking two different cakes, starting with the Chocolate Oblivion by first melting chocolate and butter together over a pot of hot water.

    Then with a long handled whisk, eggs were beaten over a pan of simmering until warm, before being beaten in a mixer until light and billowy. 

    The whipped eggs are folded into the chocolate mixture. 

    The tin was a springform, greased a third of the way up and base lined with baking paper. 

    The sides and base of tin were double wrapped in aluminum foil and the cake baked in a water bath until set but still wobbly in the centre. Then the cake was covered and popped in the refrigerator overnight.

    Cake two is the Deep Chocolate Passion. You can tell we are up to the second part of a recipe because I forgot to take photos :P

    A cake tin with greased bottom only, is then lined with baking paper. Cocoa and boiling water is beaten until smooth the cooled. Oil and eggs are added to the cooled mixture and beaten until smooth and shiny. Flour is added an resulting batter spread evenly into the tin and baked.

    Oh my... this next part made me nervous, after running a flat knife around the edge of the hot baked cake you have to turn out the hot cake!! Yep, nervous for no reason the cake came out easily and it was time to peel the away the baking paper and reverse cake so the top is ummm, on the "top".  

    Dang, don't take photos of the paper liner when your hot cake is the wrong way around on the rack... you will get this effect "a cross hatch cake".

    There is ganache; yes you make ganache and spread it on your chocolate oblivion, which is topped with the bottom layer of deep chocolate passion cake... then reversed... more ganache on the now top of oblivion and then the final layer of cake is laid on top.  

    Now you will see your chocolate oblivion layer needs trimming to be the same size as your cake... once you have trimmed, a hot knife is run around cake until you have a smooth and shiny finish. 

    Sprinkle sifted cocoa powder and eat!

    Here is the inside texture of cake, all the layers look super moist but what I found was it ate "dry", after a mouthful you felt like you needed a drink, second mouthful more drink, third mouthful maybe I'll just drink my coffee. The chocolate oblivion layer tasted like a ganache truffle but doesn't have the melt in mouth truffle feel.  

    Would I bake again? Not sure, there is other Rose's chocolate cakes I like more. 

    Would I change anything?  There was an option to use jam rather than ganache to join the layers but either way if I baked again I would have preferred the cake to be syruped. A coffee liqueur syrup, or orange or perhaps chambord would have been nice. A thin water gel or berry gel layer would be good too. 

    How it works... now I've joined the fabulous existing alpha bakers, once a week I will post about what I have baked from Rose Levy Beranbaum's 'The Baking Bible'. This won't include the recipe due to copyright and publisher restrictions however, I will be posting how it went and photos of making/baking the gorgeous baked goods.

    Happy Baking :) 


    Award winning author Rose Levy Beranbaum's The Baking Bible is available from Amazon and other good book stores worldwide.  

    You might also be interested in Baci chocolate Ice-cream recipe

    Sunday
    May312015

    French Orange Cream Tart Rose's Alpha Bakers

                                    french orange cream tart 

    Dad is running wild: always look forward to the 10pm phone call from the nursing home saying "your Dad is using his walker as a weapon". Dad's kept me busy this week with a trip to hospital plus two falls at the nursing home (he is fine... though I suspect his leaving a trail of staff and residents in his wake), soooo, I'm behind with my usual blog posts but I have finished my bake for Rose's Alpha Bakers. :) 

    I'm sure many of you are familiar with (or have eaten 402 slices) of the classic French Tarte Au Citron (Lemon Tart)... today's tart is a lovely alternative to lemon tart using oranges. 

    Started by making a template as per instructed by Rose to use as my pastry cutting guide. Hmm, The Simpson's ruler probably belies the sophistication of the tart... but I needed "inch" measurements. 

    Thought I should make it food safe, so wrapped in foil. 

    Pastry time started with processing the cold butter cubes with raw sugar until the sugar disappeared. 

    Flour, cream and egg are added and you have a crumbly mix ready to be turned out and pressed together.

    Pastry making always has a touch of alchemy to it, the crumbs from the food processor become "pate sucree pastry" with a few simple presses. 

    Ready to roll, between two pieces of lightly floured plastic wrap.

    Here comes the bit I have never done before, the pastry with the bottom layer of plastic wrap is draped over the back of a cake tin. 

    Then your loose bottomed tart tin is fitted on top and the whole thing is flipped. 

    I was wondering why I was doing this instead of chucking the pastry in the tin like I usually do (ok, not chucking, don't chuck... gently placing in the tin) but I "got it", the reason for doing it that is. What you end up with is a perfectly shaped pastry case, with flat bottom and neat corners.

    Case is blind baked as per normal. 

    The filling is a breeze to make and if you do get little air bubbles on top of your unbaked poured mix, use your gas torch to lightly go over the surface, it will pop all bubbles before it goes in the oven.   Ha, my filling is almost neon orange thanks to local free range eggs that had the brightest yolks I have ever seen!

    After baking and chilling it's time to fire up the torch it's time to brûlée. A local cafe uses the term "burnished" when they are talking about their lemon tart "burnished lemon tart" and that's really what the finish is like on this tart. Only a few teaspoons of icing sugar is used/brûléed to become a whisper thin burnished sugar finish.

    A small amount of icing sugar is applied and torched, after a brief chilling a second small amount is sifted over torched. I thought at first it the sugar wasn't going to caramelise, but it's just a matter of holding the torch a little closer and a little longer in one spot than you think.   

    I choose not the neatest tart slice today, but rather a shot of where the icing sugar was a little thick... you can see on slicing the sugar lifting. You don't want the pretty, delicate appearance of the tart spoilt ... although I did crave the "burnt sugar" crust that the word brûlée evokes. 

    The accidental misfire photograph of the tart shows the light shining through the pastry. Dang, this is the thinnest prettiest pastry case I have ever made!!! 

    Would I bake again? Yes, I'm going to bake for Christmas this year I do love "Christmas/oranges". I'll skip the torching and go for snow sugar and red currants to decorate. 

    Would I make any changes? perhaps check the bitterness or not of the zest before I used it. The recipe has a little lemon zest and I forgot how bitter my backyard lemons are! A little bit of bitter aftertaste in an otherwise perfect tart. 

    How it works... now I've joined the fabulous existing alpha bakers, once a week I will post about what I have baked from Rose Levy Beranbaum's 'The Baking Bible'. This won't include the recipe due to copyright and publisher restrictions however, I will be posting how it went and photos of making/baking the gorgeous baked goods.

    The Baking Bible

    Happy Baking :)

    You might also like Fruit Curd recipes 


    Monday
    Jul082013

    A quick look at the Game of Thrones Official Cookbook

                                                                                          Turkish flat bread with black sesame.

    Join me on Facebook

    Fan or Fandom cookbooks is that what you call them? I was attempting to block out all the bad fan cookbooks from my mind and think of the happy "Wookiee Cookies" memories... truly in the past we had the most fan fun cooking from the 'Wookiee Cookies: A Star Wars Cookbook'. 

    On picking up my stepson Daniels copy of A Feast of Ice and Fire: The Official Game of Thrones Companion Cookbook I was surprised and delighted to see a "real actual cookbook" between the covers.

    The contents are broken into the following categories; stocking your Medieval Kitchen, The Basics, Recipes by Region plus tips for putting together your feast and even dressing the table.

    I like that there is an old version of a recipe, followed by a modern day version of a recipe, honeyfingers anyone?

    Tryoshi Honeyfingers page 202-203

    Modern Honeyfingers page 204-205

    If you're a fan of George R. R. Martin's bestselling fantasy saga 'A Song of Fire and Ice', HBO's Game of Thrones or both... you'll whipping up a Westeros inspired dinner party in no time. Which is what Daniel had in mind when he said "I've bookmarked recipes for you to make".

    The Surprise:

    Hmmm, silly of me but I actually thought my stepson had read the recipes before he asked me to make them. Daniel requested Medieval Cheese-and-Onion Pie (page 143-144)

    I loyally (this is in my voice, Daniels version might differ slightly) went fourth to whip up a batch of *medieval pastry dough (page 9) and baked a pie worthy of Kings Landing. 

    Here comes the surprise bit... Daniel looks at finished pie and says "whoa what are the black bits?"

    I replied "dried currants".

    Daniel "I think I said leave the currants out".

    Me "no you didn't".

    Dan "yes I did".

    I win the dispute because I boiled onions for pie and anyone that stands in the kitchen to boil onions wins.

     cheese-and-onion pie ... I was going for a rustic edge, but think it just looks like I forgot it trim it.

    So the pie filled with onions, eggs, cheese, currants with basil and just a bit of saffron was served. Ok, this probably isn't sounding great, but you know what? The real surprise was that it was delicious, Daniel and lovely Lauren had two servings. This pie would make a great picnic pie served at room temperature. The combination of sweet and savoury sparked discussion which is always good and although most loved the pie a couple of people at the table didn't like the sweetness paired with what is essentially an early form of quiche. 

    I also baked a loaves of traditional flat bread (page 175-176), which was easy and "it's fresh warm bread", enough said. 

    All in all in the book is lots of fun to bake from and I will be baking the old version of lemon cakes and the new version of honey cakes for Daniel when he returns from overseas.

    Authors Chelsea Monroe-Cassel and Sariann Lehrer run the succesful blog Inn at the Crossroads. Lots of interesting recipes and ideas there so pop over and a have a look. 

    *the medieval pastry recipe is wonderful, easy to work with, sturdy but not tough. The pie recipe did not include blind baking the crust, however I would blind bake next time. Blind baking instructions are included at the beginning of the book. 

    *there is meat and mulled wine and the like in the book too

    Stockists: A Feast of Ice and Fire: The Official Game of Thrones Companion Cookbookvailable from all good bookstores... it's printed in Spanish as well.

    Happy Baking :) 

     you might also like rainbow serpent 

    Wednesday
    Jun192013

    Squid Ink Cupcakes and Squid Ink Grissini 

                                         squid ink cupcake with fondant squid arm 

     Join me on Facebook

    During my absence I bet you have wondered "should I or shouldn't I bake squid ink cupcakes?"

    Umm ok maybe not, but just in case next time you're savouring your squid ink risotto it crosses your mind "oh, black velvet cupcakes" you can scratch that idea out and have another glass of vino.

    Guess I should mention the squid ink at this stage; squid ink is available in sachets, jars or by harvesting the ink sac from fresh squid. You can buy prepackaged squid ink from fish mongers, specialty food purveyors and online. Essential Ingredients online store has it if you are in Australia. Amazon has lots of different brands including Spanish Squid Ink Packets. Most of the prepackaged squid ink, such as the Spanish Cebesa brand I used have added salt so you will need to allow for that and reduce the salt in your recipes. 

    Baking squid ink cupcakes; technically you can do it, but do you want to? 

    I baked two batches of the squid ink cupcakes, batch one didn't rise, batch two with extra added baking powder had a better rise... but no doming. 

    Flavour wise; in a rich dark chocolate batter no taste testers picked up any squid ink or fishy flavour at all. 

    Five sachets of squid ink were needed to get a true black in a standard dozen chocolate cupcake batter. Overall, an expensive way to add colour. 

    But you could make a fondant squid arm or eight. Roll a piece of fondant into a squid arm shape, then roll small balls of fondant. Using the end of a small paint brush press the balls in pairs along the squid arm to form tentacles, dampen the base of the balls with water if need be. I frilled the larger suction cups. Leave the arm/s to dry before adding markings with a food marker and colour as desired with food paint and dusts. 

                                       squid ink grissini

    Baking squid ink bread dough; the addition of squid ink to your favourite dough recipe imparts a subtle seafood flavour and results in a stark black dough with no detriment to the finished bake.

    Perfect for your pizza bases, loaves or grissini pictured today. Make sure you play with  the contrast of colour... a black pizza base with the white of buffalo mozzarella and roasted cherry tomatoes or perhaps open sandwiches of crab, mayo and micro greens on a slice of black sour dough. The grissini are fun as part of dressing your table and pair well with seafood pasta, antipasto, tapas, or just to nibble with drinks.

    So grab your favourite bread dough recipe and make the following changes: 


    • Omit the salt entirely. 
    • Omit added parmasen, cheeses in recipes.
    • Omit herbs, you want the squid flavour to stand alone. 
    • For every three cups of flour in the recipe you will need approximately five of the 4gram squid ink sachets. 
    • Remove the equivalent liquids from the recipe. I usually hold back around one tablespoon to two tablespoons of the water or milk in the recipe. 
    • Instead of flouring your bench, oil your bench and oil your hands to work with your dough... you don't want white flour streaks on the finished dough. 


    Your dough will look a little lighter in colour after rising, but don't worry once it's shaped it's back to looking black. 

    There is no "golden brown"with the squid colour so rely on tapping/listening for a hollow sound if you're not sure your bread is done. 

    Squid ink is also great to use in your homemade pasta dough using the the same proportions as above, 5 sachets to 3 cups of flour. 

    That's it for today... any questions pop over to facebook for a faster reply. 

    Happy Baking :) 

    you might be in the mood now for eating some salt and pepper squid

    or something pretty... blossum cupcake toppers