Navigation
SEARCH
This form does not yet contain any fields.

    Entries in recipe (47)

    Monday
    Sep052011

    Amore Frangelico Truffles

                                        amore frangelico truffle

    Golden truffles laced with Frangelico are a decadent ending for a sumptuous Italian banquet or that bowl of spag bol that you plan to zap in the microwave. 

    Pile them high on a collared full sized cake, use single truffles as cupcake toppers, eat them as they are with an accompanying expresso or better still a glass of Frangelico. 

    Frangelico the Italian Hazelnut liqueur with it's hints of cocoa and vanilla is like liquid Nutella for grownups. Best bit, Frangelico is produced in miniatures so you don't have to buy a giant bottle; I do, buy the giant bottle particularly for the Christmas season when I use it for cakes, puddings and the like.Frangelico with it's distinctive friar in his habit shaped bottle

    Gold Lustre Dust is metallic edible food decorating powder, available from cake decorating suppliers.

    various metallic gold lustre dusts

    Amore Frangelico Truffles

    makes 20 to 24 truffles

    Ingredients

    250g (8.8 oz) dark eating chocolate

    2 tsp Frangelico liqueur 

    125 grams (4.4 oz) mascarpone cheese

    cocoa powder to coat

    gold lustre dust

    Method

    In a heat proof bowl over saucepan quarter filled with simmering water, melt the chocolate. Stir in the liqueur. Remove from heat, allow to cool until just warm. Stir in the mascarpone.

    Refrigerate 20 minutes or until firm enough to roll into truffle sized balls. Roll balls and toss them in cocoa powder to coat. Once all the balls are coated, dust top half with gold lustre dust. Refrigerate until needed, let them come to room temperature before serving. 

    Variations; swap the liqueur... chocolate and coffee liqueurs work well, but don't forget orange or even mint.

    Thursday
    Jan202011

    Bundy Banana Grog Cupcake and toffee toppers

                bundy banana grog cupcake

    Grog; refers to a variety of alcoholic beverages. The word originally referred to a drink made with water or "small beer" (a weak beer) and rum, which was introduced into the Royal Navy by British Vice Admiral Edward Vernon on 21 August 1740. Vernon wore a coat of Grogham cloth and was nicknamed "Old Grogham" or "Old Grog". In Australia and New Zealand, the word has come to mean any alcoholic drink. wikipedia

    Bundaberg rum; a dark rum first produced in Australia in 1888 to make use of the left over molasses from processing sugar cane, often just referred to as "Bundy".

    All our minds in Australia have been on the floods that have devastated Queensland, the Bundaberg region has been hit particularly hard, half the millions of dollars of sugar crops have been destroyed. Banana crops are fine but with the other fruit crops that have damaged the demand for bananas will push prices up. 

    Today's cupcakes pay homage to Queensland with banana's, Bundaberg rum and sugar. 

    Use overripe bananas, you know... the ones you swear weren't ripe yesterday but all of a sudden they're black and brown. the riper the banana the more intensely "banana" flavoured your cakes will be

    Bundy Banana Grog Cupcakes

    makes 12 cupcakes (I baked small ones today and made 18, baking time was reduced by 6 minutes)

    Ingredients

    1 1/4       cups plain flour (all purpose)
    1 tsp        baking powder
    Pinch       salt
    1 cup       white sugar
    1/2 cup    vegetable oil
    2             large eggs
    3/4 cup    overripe mashed bananas (about 2 medium)
    2 tbls       Bundaberg rum (dark rum)

    12 cup muffin tin lined with paper cases

    Preheat oven 180c (360F)

    Method
    In a small bowl, mix together flour, baking soda and salt.

    In another bowl, whisk together the sugar, oil, and eggs until smooth. Add banana, whisking well, whisk in rum. Swap to a wooden spoon and add flour mixture, stir until smooth... take care not to over mix as it will toughen the mix.

              rum will preserve the yellow colour

    Scoop batter into prepared cupcake pan. Bake in preheated oven for 22 to 26 minutes or until tops of cupcakes spring back when lightly touched Let cool in pan on rack for 10 minutes. Remove from pan and let cool completely on rack.

                 resulting cakes are super moist

            Toffee Nuts and Fruits

    I used 'banana chips', honey dried/baked banana pieces today but any oven roasted nut, freeze dried fruit piece will work. Sugar pieces will last a couple of hours before starting to dissolve. You can also use fresh strawberries or dried apricots, figs etc with spectacular results... however the moisture content means you will have to use the sugar pieces within 30 minutes.

    I didn't want too much of an amber colour today as I wanted the banana chip to shine through, so I removed the toffee from the stove top as soon as I saw the colour starting to change. 

    The bubble in the toffee was caused by my impatience as I started to dip before all the bubbles has subsided ;) You can change the direction of the toffee, create curves etc., by manipulating the direction of the skewer when first dipped.

    This is the bit where I say "it's HOT" so take care and make sure small children and pets are out of the room before you begin.

    Ingredients

    18 banana chips or hazelnuts etc., 

    2 cups sugar

    1/2 cup water

    18 wooden skewers 

    old newspaper to cover your floor

    kitchen sink half filled with ice water

    heavy chopping board or object to way down the end of the skewers

    Method

    Cover your floor area under where you will dip the toffee pieces with newspaper.

    Insert skewers into banana chips.

    Place the sugar and the water in a heavy based medium sized saucepan. Over medium heat, stir until sugar is dissolved. Stop stirring now and continue to cook until the toffee becomes a light amber colour. Remove from heat and dip base of saucepan into the cold water to stop the cooking process. Set aside for 6 to 8 minutes to cool slightly, then dip a banana chip into the toffee, lift out and secure the end of the skewer under your weight.

     excess toffee will fall onto newspaper covered floor

    Let gravity do the rest, the excess toffee will fall onto your newspaper leaving you with a "toffee tail" attached to your banana chip. Leave a few minutes to set. I dipped the end of the banana chips in tempered dark chocolate to finish.

    Pipe a swirl of your favourite chocolate frosting (spiked with rum of course!) onto your cupcakes and top with toffee banana topper.

    * note is you are using hazelnuts or any hard nut, make a hole with a darning needle and then insert your wooden skewer. 

    Donate to the Queensland governments flood relief appeal

    How to clean your (hopefully not burnt) toffee pot;

        Ooops I burnt the toffee again!

    Wednesday
    Jan192011

    Kangaroo Meat 

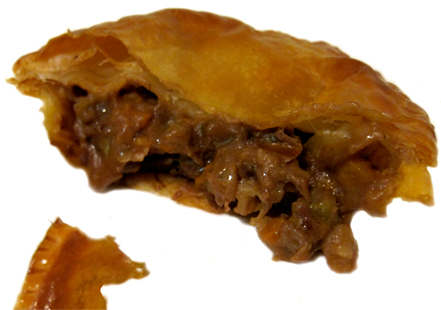
    Australian Kangaroo Meat Pie... next time I'll make extra hot food to photograph this was actually "moving" with the tugging of the plate... hungry people are so impatient!!!!!! 

    Quote of week from my husband Mark as he sat down to his kangaroo meat pie... "I love Kangaroo, it's my 7th favourite meat".

    A. who has a "seventh" favourite anything?? Do you open a box of chocolates and point to top right hand corner and say to yourself "there's my seventh favourite caramel fudge".  

    B. If it's your seventh favourite, doesn't that mean you don't like it? Daniel and I both asked this but Mark insisted "he loves Kangaroo" ;)

    Kangaroo meat is low fat & low calorie; because it is extremely lean, Kangaroo is ideally served rare to medium rare when barbecued, pan fried or grilled. The tougher cuts are diced in a casserole. 

    Mark bought kebab Kangaroo meat from the supermarket, kebab meat from Kangaroo should be from the striploin, tenderloin or rump... however the supermarket kangaroo meat was a bit of a mystery and definitely wasn't a prime cut. The resulting barbecued meat had that "elastic" snap of sinew, so the meat was transferred to the kitchen to be slow cooked. 


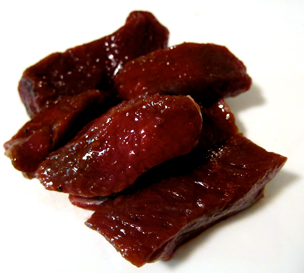
    diced mystery cut Kangaroo meat from the supermarket

    Cooking Kangaroo on the BBQ; Red wine and port pair well with roo meat, try marinading Kangaroo tenderloin for a couple of hours in a 1/2 cup of red wine, fresh lemon thyme, cracked black pepper, a couple of cloves of crushed garlic & one tablespoon of oil. Pre heat your BBQ, sprinkle roo fillets with coarse sea salt (you'll get that yummy salt crust) and cook on a well oiled grill, rare to medium rare. Rest the meat before serving/slicing. 

    Basic Australian Kangaroo Pies

    Australian pies traditionally have a shortcrust base and puff pastry top, I'm using commercial pastry today.

    makes 6 small hand held pies

    Ingredients

    1 kilo (2.2lbs) of kangaroo meat (tail, shank or roasting cuts) cut into bit sized pieces

    2 tablespoons of oil

    1 large onion, 1 carrot and 1 stick of celery all cut into a small dice

    2 cups low salt beef stock

    1 cup of water

    1/4 cup of red wine (I like more wine than this but my hubby doesn't, reduce stock to add more wine)

    1 tablespoon tomato paste

    1 tablespoon Worcestershire sauce

    good pinch of nutmeg

    2 tablespoons of flour

    salt and black pepper to taste

    3 sheets each of rolled puff pastry and short crust pastry 

    oil 

    6 pie tins

    Method

    Heat the oil in a large pot, brown the meat in two batches, remove the meat into a bowl and set to one side. 

    Add the vegetables to the pot, cook without browning for a few minutes, turn up the heat and add flour & nutmeg, stir for a two to three minutes to cook the flour. 

    Add water, wine, stock, Worcestershire sauce & tomato paste to the pot. Add meat back to the pot. Bring to the boil, reduce heat and simmer for 2 1/2 hours, remove lid and simmer for another 30-45 minutes to reduce liquid. Season with salt and pepper to taste.

    Refrigerate cooked filling until needed.

    Pre-heat oven to 200C (180 fan forced) - 400 F (360F with fan)

    Line pie tins with shortcrust pastry, *blind bake for 10 minutes. Set aside to cool.

    Divide meat mixture between the 6 pie shells, top with puff pastry and crimp edges with a fork. Glaze with milk or egg wash. Make a few small slashes in the top of the pastry to let steam escape.

    Bake pies for 35 to 45 minutes or until golden brown. Let cool a few minutes in tins before turning out and serving. Cooled pies can be individually wrapped and frozen for one month. 

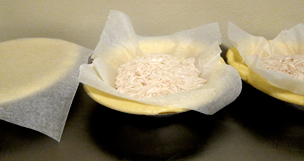
     * blind bake pie shells by weighing down the raw pastry with beans, rice or baking weights. Non stick paper squares make it easy to remove weights after baking. Store your baked rice or beans in a jar and use again next time you are baking pastry.

    Do try replacing the lamb or beef in your favourite curry recipe with Kangaroo too, it really does make for an excellent curry.

    Kangaroo mince can be used in any of your mince recipes such as lasagne, meat balls or burgers. If your using the meat in burgers it must be cooked thoroughly. 

    For an excellent 'cuts of Kangaroo chart' see Southern Game Meats

    You might also be interested in...

    a review of crocodile and kangaroo pies

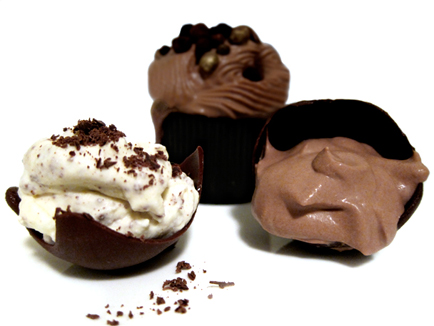
    or if it's all too much for you then how about pink frosting...

                                          Frosting

    Back to baking cupcakes now. Oh and for the record Mark's favourite meats are: duck, turkey, chicken, lamb, pork, beef &... kangaroo!

    Happy Baking :)

    Monday
    Jan172011

    Star Wars Cookbooks and Salt and Pepper Squid

    many mini wookie cookies & one mad Star Wars fan


    Off the shelf

    baking book reviews

    Bringing you food from a galaxy far, far away today with 'Wookie Cookies and other galactic recipes: A Star Wars Cookbook' and 'The Star Wars Cookbook 2 - Darth Malt and More Galactic Recipes' 

    Both these books are loads of fun and make perfect gifts for Star Wars fans from 4 to 40! Both books are hard bound spiral books with laminated pages. 

    spiral bound, the food is photographed with accompanying star wars toy figures

    To you and me this might look like a standard cinnamon choc chip cookie, but Star Wars fans will tell you "NO!!" it's a "WOOKIE COOKIE!!"

    Nearly all the recipes in the book are standard servicable recipes for pasta, soup, brownies, shakes, cookies and the like renamed with a Star Wars theme. There is Darth Maul Dip (stencilled with the enclosed Darth Maul stencil), Anikin's Apple Crisp, Jedi Juice Pops and some even take Star Wars shapes like TIE Fighter Ties. 

    TIE Fighter Ties page 45 'Wookie Cookies and other galactic recipes'

    book one comes with metallic stickers to label your food gifts

    book two comes with a Darth Maul hard plastic stencil

    Of course you will now need something to eat your Star Wars cooking with, apparently Star Wars chopsticks, (oops sorry that should be "chop saber's") can be used with everything including cookies ;)

    the tops of Darth Vader and Luke Skywalker chopsticks

    Red Darth Vader blue Luke Skywalker Chop Saber's (chopsticks) also available in Darth Maul, Yoda and Mace Windu from Think Geek. 

    According to my step-son Dan (pictured at top) these cookbooks are a "must have" for any Star Wars fan... so are the chopsticks, and lets face it I think we could throw any Stars Wars merchandise here and a Star Wars fan is going to list it as a "must have" ;)

    Books from Amazon...


    And now on to the totally unrelated post of Salt and Pepper Squid..... 


      salt and pepper squid


    Well, there is was an upside to blackouts we have been experiencing with the storms, I had to cook up what was in the freezer over the weekend so we got to eat lots of delicious foods!! Of course we will all have to fast for 4 days to "pay for" the over indulgence, but hey we got to eat salt and pepper squid!  

    There is many, many versions of salt and pepper squid available... this is ours;

    I had squid tubes in the freezer, but fresh is always better so if you can get your hands on fresh squid use that instead. I'm using black pepper and Chinese five spice instead of Sichuan peppercorns. 

    Ingredients

    5 small or 3 three large squid tubes

    1 litre (4 cups) of vegetable oil (I use grapeseed oil for it's high smoke point and mild flavour)

    1 tsp coarsely ground black pepper

    1 tsp sea salt

    1 tsp Chinese five spice 

    1/4 cup flour 

    Optional; small red chilli, spring onions and shao xing wine for finishing

    Method

    In a medium bowl whisk flour, salt, pepper and Chinese five spice together and set to one side.

    Pat your squid dry with paper towel.

    split squid tube length ways and then flip over

    With a sharp knife split your tubes length ways, flip the pieces over so the interior of the squid piece is facing you. Score diagonally, turn the squid and score again to create diamonds. 

    Heat your oil to 180c (360F) 

    Toss your squid in the seasoned flour making sure all pieces are coated. 

    Dry fry in batches until golden brown... drain on paper towel. 

    Serve with lemon wedges or sweet chilli sauce.

    Optional; heat one tsp of oil in a small pan, add chopped chilli and sliced spring onion plus two tsps of Shao Xing wine. Sprinkle dressing over squid just before serving. Note the Shao Xing wine is salty, you may reduce salt in main recipe to 1/2 tsp if preferred. 

    Variations; omit the black pepper & Chinese five spice and replace with 1 tsp each of ground black and white Sichuan peppercorns. Flour can replaced with corn-flour (corn starch) or mix of rice flour/corn flour for a gluten free salt and pepper squid.               

    May the force always be with your baking :)

    Monday
    Jan102011

    Dreams of Chocolate Cream

    'dreams of chocolate cream cupcake' featuring chocolate shells with three chocolate creams

    Often overlooked for more complex frostings & fillings, Chocolate cream is versatile & easy, whether it's beaten to stiff peaks, piped or plopped, flavoured or boozy. Try topping your next pavlova with clouds of chocolate cream & chocolate dipped strawberries, as a filling for your layer cakes, a plop of chocolate liqueur cream in your cup of hot chocolate or just as a quick piped topping on your favourite chocolate cupcake. 

    All the chocolate creams start with chilling your large mixing bowl and beaters for 15 minutes prior to commencing. I use caster sugar to sweeten the cream, but by all means just use regular granulated sugar if you prefer. Whipping cream in Australia is sold in 300ml (approx. 10 fluid oz) bottles as "thickened cream". 

    1. CHOCOLATE CREAM with grated chocolate

    300ml (10 fluid oz) thickened/whipping cream 

    1/2 tsp pure vanilla essence/extract

    1 tablespoon of caster sugar (or to taste)

    50g (1.7oz) Milk or Dark eating chocolate, grated

    Place cream, vanilla & sugar into your mixing bowl. Stir to combine. Whip until soft peaks form, add grated chocolate and continue beating to desired stiffness.

    2. CHOCOLATE CREAM with cocoa

    300ml (10 fluid oz) thickened/whipping cream

    1 to 1 1/2 tablespoons cocoa powder (preferably dutch processed cocoa)

    2 1/2 tablespoons caster sugar (superfine)

    1/2 tsp pure vanilla essence/extract

    boiling water

    In a small bowl mix cocoa powder and enough boiling water to create a smooth paste, set aside. Place cream, vanilla & sugar into your mixing bowl. Stir to combine. Whip until soft peaks form, add cooled cocoa paste and continue beating to desired stiffness.

    3. CHOCOLATE CREAM with melted chocolate (my favourite for piping)

    300ml (10 fluid oz) thickened whipping cream

    60 grams (2oz) dark, milk or white eating chocolate, melted

    1 tablespoon caster sugar or to taste

    1/2 tsp pure vanilla essence/extract

    Place cream, vanilla & sugar into your mixing bowl. Stir to combine. Whip until soft peaks form, add cooled melted chocolate and continue beating to desired stiffness.

    Variations;

    For boozy chocolate cream omit vanilla from recipe add one to two tablespoon of chocolate, mint or orange liqueur, rum or brandy to the above recipes... beating in after the cream reaches the soft peak stage.  

    Flavours... omit vanilla from recipe,  replace with essence/extract flavour of choice or replace melted plain melted chocolate with a flavoured variety.

    So fill those cupcakes, pipe those pastries, top those strawberries, layer it up or make that sundae and start dreaming up more ideas for your chocolate cream. 

    Happy baking :)

    Now your thinking of chocolate you might also like...

     Baci Chocolate ice-cream

    Thursday
    Jan062011

    Strawberry agar agar jelly pearls

    strawberries and cream cupcake topped with strawberry agar agar jelly pearls

    Join me on Facebook or view more cakes in my Flickr Gallery

    Goodness, I had a fabulous finish to 2010 when I was invited in December to give an interview on the gorgeous blog Haniela's, then on Christmas Eve I was featured on my all time favourite cupcake blog Cupcakes Take The Cake which caused me to burn the turkey I'm sure as I was so distracted and happy!! 

    On to the first cupcake of 2011, which ties into answering the first email of year (ok, technically this a December 2010 mail but you know I'm always running behind) which comes from Issy in Auckland NZ and read.....

    hi love your blog and I wanted to know if you can make fruit pearls without the chemicals. I'm a vegetarian so gelatine isn't an option. i wanted fruit pearls to go on cupcakes. 

    Thanks for the mail Issy. The chemicals Issy is referring to are from an earlier post I did on making fruit caviar/pearls with the molecular gastronomy method favoured by many chefs. 

    Ok, Issy you can make fruit pearls or caviar with just agar agar, however you have to use them immediately if you are using them for cupcake toppers as they shrink dramatically when exposed to air. They do taste exactly of the juice you use & are easy to handle. Unlike the molecular gastronomy version that are a gel "case" with fluid inside the agar agar version are a solid soft gel. 

    Making Strawberry Agar Agar Pearls

    you will need accurate scales and a plastic syringe

    Recipe

    100 ml (3.4 fluid oz) of strawberry juice or juice of choice

    1 gram (0.035 oz) of agar agar powder

    1 cup of flavourless vegetable oil

    Apple juice for storing the pearls in. 

    Method

    In a small saucepan whisk together the juice and the agar agar powder. Over medium heat, whisking constantly bring the mixture to a boil. Reduce heat and simmer until the agar agar is completely dissolved. Remove from heat and let the mixture stand for 4 to 5 minutes.

    Fill your syringe with the juice mixture and add to the oil... drop by drop.

    Strain the pearls from the oil and transfer to apple juice until ready to use. The apple juice washes away the oil residue and the leftover cup of oil can be reused for baking.


    Now you will have perfect small fruit pearls ready to top your cupcakes.

    And here comes the "but"... these guys shrink dramatically when exposed to air.

    On the left is one of the fruit pearls after being exposed to air for 3 hours, on the right is a nonpareil (a hundred and thousand sprinkle). 

    As you can see the shrinkage is extreme, but if you're serving them straight away they are pretty, taste great and easy to make. 

    Hope that helped Issy, let me know if you decide to  make them. 

    Happy Baking :)

    Related posts...

    Plum fruit caviar/pearls the molecular gastronomy method

    A hybrid gel that moulds easily and is extremely stable, made from gelatine/agar agar is used to create gel shapes for topping peanut butter frosting.

    Wednesday
    Jan052011

    Marks BBQ Beer Butt Chook

                                         beer can bbq chicken

    Back to cupcakes tomorrow, but my husband Mark is so proud of his barbequed beer butt *chook I thought I should share it with you.

    I must admit I was dubious the first time Mark wanted to barbeque a beer can chicken, I thought it was just a "gimmick". I was wrong and it actually makes perfect sense; the chicken is being steamed from the inside resulting in moist chicken meat and the exterior heat gives you a crisp skin finish. With the combined heat cutting down the cooking time, bbq beer butt chicken becomes week night doable... plus no kitchen clean up!

    It doesn't have to be beer... though Mark would disagree. It could be coca cola, rum & coke, lemonade etc... it just has to be a half full can.

    Or you can skip the can altogether and buy a non-stick beer can chicken roaster like this one from Hark.

    Hark non-stick beer can chicken roaster

    Lets cook a chook...

    Pour out half the contents of your can, you can use the beer to soak wood chips (chips need to be soaked overnight), save it to make sauce or just drink it. Now you're going to add flavour by adding straight to the can, it can be any combo you like; lemon or orange zest, squashed garlic cloves, fresh ginger, lemon grass, fresh or dried herbs, chilli and don't forget to add a bit of your chicken rub mix too. Punch a few extra holes in the top of your can using an old fashioned triangle bottle opener... or Marks method of stabbing a screwdriver or nail to form the holes.

    If you are using a beer can roaster, add the flavouring combinations to water, wine or juice. 

    Rub the skin of your room temperature raw chicken (Mark used a free range 1.8 kilo/4 pound chicken) with your favourite BBQ rub. This chicken used a basic mix of equal parts smoked paprika, brown sugar and coarse sea salt... rubbed into the cavity of the chicken first then rubbed into the skin of a lightly oiled chicken. Sprinkle with freshly ground black pepper. 

    Other flavour profiles include, Chinese five spice, cumin, italian seasoning mix, coriander powder, chilli, mustard powder, pre mix rubs, garlic salt, onion powder, etc.

    add flavour to your can

    The half full can is inserted into the chicken creating a tripod, resulting in this rather undignified position!  

    The chicken is cooked by the indirect heat method so in our case we have a hooded 4 burner gas BBQ (sorry BBQ purists); add wood chips to your smoking box or use foil sachets then the BBQ is preheated on high with all burners turned on. Once preheated turn 2 of the burners off, lets say the right hand side. Turn the other two burners on the left hand side down to medium. You should have a temperature of 180 cel or 360 F. 

    Position your chicken (drip tray in place) on the right hand side where the burners are turned off. Close the hood. For this sized chicken it took one hour and 20 minutes, this is included turning the chicken once as our heat is a little uneven. Use a meat thermometer if you are unsure about doneness. 

    That's it all done. You can go with the drama of serving it on the can, I prefer to remove the can (be careful it's hot, use tongs or heat proof gloves) then rest the chicken before carving. 

    Resulting chicken is super succulent

    It's summer here at the moment so we served the chicken with simple salads. 

    * 'Chook' colloquial term used in Australia and New Zealand for chickens. 

    Happy BBQing :) 

    You might also be interested in Bacon & Egg, Prawn Noodle Omelette 

    Tuesday
    Jan042011

    Quick and Easy Hollandaise 

    eggs benedict; half an english muffin topped with ham, poached egg and hollandaise sauce.

    Hope everyone had a fabulous Christmas and New Year!

    First post back for the year is a quick and easy version of hollandaise sauce. With the copious amount of butter in the recipe it's not an everyday food,  but for a special occasion brunch or to team with new season steamed asparagus you can't go past the silky smooth indulgence of hollandaise... not bad for a "morning after" breakfast either ;) 

    Plus it's uses egg yolks and if you are a mad keen macaron or pavlova baker you're always looking for ways to use those leftover yolks. 

    Ham; this was the last of our gorgeous Christmas ham too, kindly given to us by my Step son Dan's Step father Anton. Anton and Dan's Mum Debbie own a butcher shop in Melbourne's Eastern Suburbs where they cook their own hams. Soooo much better than any leg hams sold in your local supermarket, if you live in the area pop in or give them a call at.... 

    Mc Adam Meats

    Tel: 03 9723 3322

    Specialising in: 

    Quality Bio Dynamic Meats

    Free Range Poultry 

    OTWAY Pork

    Home made Cabana, Smoked Chicken and Ham

    Shop 18 McAdam Square, North Croydon 3136

    Now, lets get on with making the hollandaise...

    Ingredients

    3 egg yolks

    1 tablespoon water

    6 tablespoons softened unsalted butter

    1 tablespoon of lemon juice or verjuice 

    salt and white pepper to taste 

    Verjuice is the juice from unfermented grapes; not as acidic or bold in flavour as lemon juice, preferred by my hubby Mark. 

    Method 

    Put your 3 egg yolks and water in a heatproof bowl, place your bowl over a quarter filled saucepan of barely simmering water on your stove top; keep the heat as low as possible & you keep the water at "barely simmering" you don't want to end up with scrambled eggs.

    Whisk until light and a ribbon trail is formed when you lift your whisk up. Slowly add the softened butter, one tablespoon at a time, whisking until fully incorporated between additions.

    Season with salt and white pepper and stir in lemon or verjuice. Serve immediately. 

    Notes; if your sauce curdles as long as it's not grainy it can be saved by either adding an ice cube and whisking until it comes back together or by removing one tablespoon of the curdled sauce to a small bowl, add a squeeze of lemon juice, whisk this until emulsified and slowly add this back to the curdled mixture whisking as you go. 

    If your sauce is too thick, whisk in warm water a teaspoon at a time until thinned. 

    Need another recipe to use those left over egg yolks?

    Try your hand at fruit curd and butters.

    Or what about making pastry cream ... yum!! 

    Tuesday
    Oct262010

    Slay Vampires and Bake Lemon Lime Poppy seed Cakes

                                lemon & lime poppy seed mini loaves

    Is your silver cross a fake? Can't find your stake? Forgot to pick up the holy water and used the last of the garlic in last nights aioli? Never fear, poppy seeds are here to stop that eminent vampire attack this Halloween.

    According to folkloric tales....

    'methods commonly practised in Europe included severing the tendons at the knees or placing poppy seeds, millet, or sand on the ground at the grave site of a presumed vampire; this was intended to keep the vampire occupied all night by counting the fallen grains, indicating an association of vampires with arithmomania' Wikipedia

    Well, 'severing the tendons' seems a bit messy so I'd recommend sprinkling poppy seeds around the entrance of your home; the vampires are forced to count them, over and over again. Eventually the sun will rise or the vampire will have fled before dawn, either way poppy seeds play an important part in your vampire slaying kit. Plus you can always make cakes with the leftovers. 

    Love this cupcake recipe adapted from two recipes one from Julie Hasson and one from Donna Hay; it's a versatile recipe, packed with flavour with a moist pound cake like texture & can be frosted or iced if desired. You don't need a stand mixer for this recipe it's hand mixed with a wooden spoon. Variants, including a reduced fat higher fibre version are below the recipe. Of course they are perfect served with a hot of tea after a hard nights vampire slaying. 

    Lemon and Lime Poppy Seed cakes

    Preheat oven to 180c (350F) line cupcake tin/s with paper liners

    Makes 24 mini sized or 12 standard sized cupcakes 

    I actually used a silicone mini financier mould & the produced 50 mini loaves from the batter.

    Ingredients

    1 1/4 cups plain flour (all purpose)

    1 tsp baking powder

    1/4 tsp salt

    1 cup sugar 

    1 tbs poppy seeds

    1/2 cup unsalted butter melted & cooled

    1 egg

    1/2 cup plain yoghurt

    1 tsp grated lemon zest

    1 tsp lime zest

    2 tbs lemon juice

    1 tbls lime juice

    Method

    Whisk together flour, baking powder and salt in a small bowl, add poppy seeds.

    In a large bowl whisk together sugar, butter and egg until smooth. Swap to a wooden spoon and add yoghurt, zest's and juices, beat until smooth. Add flour mix and beat until just smooth.

    Spoon into your prepared cupcake pan/s. Bake for 12 to 15 minutes for mini sized,  22 to 25 standard sized, 10 to 12 for mini financiers; until there centres are just set and spring when lightly touched. Cool in tin for 5 minutes before transferring to cooling rack until completely cold.

    From here you can ice them with your favourite lemon glaze, frost them a cream cheese frosting or leave plain.

    Variants; 

    Reduced fat... I make a reduced fat version of these for my husbands lunch box by replacing the butter with margarine, full fat yoghurt with fat free and I omit the poppy seeds and instead add one tablespoon of oat bran. 

    Choc chip... omit the poppy seeds and replace with a half a cup of dark or milk choc chips

    Orange... swap around the zests used the recipe, orange is lovely & paired with milk chocolate they taste a bit like Terry's Chocolate Oranges. Try tangelo, grapefruit or mandarin zest for something different.

    Sour Cream... for sour cream lovers out there replace yoghurt with an equal amount of sour cream. 

                             Vampires don't sparkle but a dead fairy does

    I've found myself with many extra dead fairies from last Halloween, so I've made more cupcakes. Don't be surprised if you see dead fairies topping cupcakes next Halloween too, I may have made up a few too many!!!!

    Happy Baking :)

    Monday
    Jun212010

    Honeycomb, Hokey Pokey, Sponge Candy...

    mini peanut cupcake, piped bitter chocolate ganache, white chocolate peanut honeycomb with vanilla salt

    The Friday night Masterclass episode of the reality TV show MasterChef Australia saw George create a plated dessert that was a tribute to a popular chocolate coated toffee & biscuit coated Australian ice-cream the "Golden Gaytime".

    George's pretty plated dessert MasterChef Friday night masterclass

    Today's post I used two elements from George's recipe the piped ganache and the honeycomb as cupcake toppings. I omitted the parsley garnish and swapped the salted peanuts for unsalted because I also wanted to include a touch of vanilla salt. Honeycomb is lots of fun to make, here are the step by step instructions...

    In Australia we call this 'honeycomb', but depending where you are from you might know it as 'hokey pokey', 'sponge candy', 'sea foam', 'cinder toffee', 'puff candy', 'yellow man', 'fairy food' or 'angel food candy'. 

    Honeycomb recipe

    Ingredients
    365g (13oz) caster sugar
    140g (5oz) glucose syrup
    110ml (3.72 fluid oz) water
    1 tsp bicarbonate of soda (baking soda)
    Optional garnishes;
    300g (10.5oz) white chocolate, chopped or couverture buds
    2 cups unsalted roasted peanuts
    coarse salt (I used vanilla salt) to garnish
    Method
    Place sugar in a saucepan with glucose (use damp spoon to scoop it into the pan) and the water, then place the pan over high heat until the sugar dissolves.
    Brush down the sides of the pan with a wet pastry brush to prevent sugar crystals forming. Swirl pan to dissolve sugar.
    Once sugar has dissolved, wait for the bubbles to slow down and for the mixture to take on a faint golden tinge.
    slight golden tinge around the edges of the pan

    Line a large bowl with baking paper and have a whisk ready. Add the bicarb and quickly whisk vigorously, then immediately pour into the lined bowl. Set aside to set for 45 minutes.
    pour honeycomb in lined bowl
    Bring a small saucepan with 3-4cm of water to the boil, then reduce heat to low and place a heatproof bowl over the saucepan (don’t let the bowl touch the water). Place chocolate in the bowl and allow to melt gently until smooth.
    Remove the honeycomb from the bowl, peel off the baking paper, then break honeycomb into chunks to become cupcake toppers.
    remove from bowl and peel off baking paper

    With a pastry brush, liberally brush honeycomb chunks with melted chocolate, then sprinkle immediately with peanuts & vanilla salt. Leave to set for 10 minutes. Just before serving press chunks into the ganache piped cupcakes. 
    Want the piped ganache or perhaps the peanut butter ice-cream that made up George's dessert then pop right over to the MasterChef Australia website.
    You might also be interested in;

    Back  tomorrow with what to do with "leftovers"; leftover sugar cookie dough and that leftover 'honeycomb'!!
    Happy Baking :)