Navigation
SEARCH
This form does not yet contain any fields.

    Entries in baking (62)

    Tuesday
    Apr172018

    Lemon Myrtle and Golden Syrup mini Friands

                                  lemon myrtle and golden syrup mini friands

    Join me on Facebook

    Anzac Day 25th April:  a national day of remembrance for Australia and New Zealand

    Feel like baking something different this ANZAC Day but still want that aussie theme? Then mini lemon myrtle and golden syrup friands tick all the boxes. Friands are the Australian version of French financiers... ours are baked in an oval shape, flavoured and often with fruit. Lemon myrtle is Australian plant and golden syrup whilst not originating in oz is the traditional flavour of an Anzac biscuit. 

    These little tea cakes taste like "a cuddle from nanna", all sweet and familiar. Plus it's a one bowl, no mixer and 10 minutes or under bake. 

    With less than a cup of flour it's an easy swap to gluten free, just change out the flour for plain gluten free and make sure your baking powder is gluten free too. 

    Lemon Myrtle 

    Botanical name Backhousia citriodora, Lemon Myrtle has long been used in culinary and medicinal ways by Indigenous Australians and is a popular "bush food" flavour. Grows wild in parts of Queensland. 

    Dang just I love Lemon Myrtle with it's delicious lemon/bordering on lemon grass aroma and flavour plus a little goes a long way!

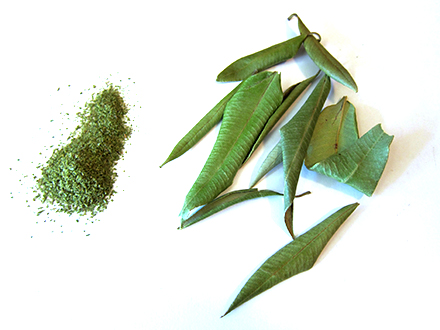
    You buy it in leaves or ground. 

    Use the ground in your cakes, biscuits/cookies, breads. Try it mixed in mayo and dips, add it to rice and noodle dishes taking advantage of the lemon grass like flavour... go easy it's strong. 

    lemon myrtle mayo dip for seafood

    The leaves are used for teas, infused into milk or cream for ice-cream, custards or white chocolate ganache to fill your macarons. 

    I'd like to tell you I make my own tea, nah I buy green tea lemon myrtle tea bags for afternoon drinking. 

    Lemon Myrtle and Golden Syrup mini friands 

    Pans:  these are a friand pans, I'm using the mini with the embossed base today but you could use a mini muffin tin. 

    Ingredients

    *I cup of almond meal (almond flour)

    1 1/4 cups of sifted icing sugar  (confectioners) 

    3/4 cup of sifted plain flour (want gluten free? Swap out for gluten free flour) 

    1/2 tsp baking powder

    1/2 teaspoon of ground lemon myrtle

    5 egg whites

    125g salted butter, melted

    1/4 cup of golden syrup (oil your cup for easy removal) 

    Preheat oven to 180 cel (170 cel fan forced)

    *I'm using Australian measuring cups, a cup is 250ml

    Method

    sift straight into your bowl to save dishes and time

    Put the almond meal, icing sugar, flour, baking powder, lemon myrtle, egg whites, melted butter and golden syrup into a mixing bowl. 

    Stir or whisk until just combined, don't over mix. 

    Divide mixture into two mini greased friand tins, or if you just have one you bake in batches.

    Bake for 8 to 10 minutes, being careful not to over bake... they will look like this, a bit golden around edges, slightly puffed. 

    All done that's it .... they are best eaten warm or at least the same day, but they do freeze extremely well once cooled.

    Scented with lemon myrtle they have a slight sugar crust and are super moist and light.

    Notes: if you've used a mini muffin pan instead of friand pan, the baking time will be slightly different... check from 8 minute mark to avoid over baking. 

    Happy Baking :) 

    and since I was thinking of nanna's, it was far more likely your nan would give you lollies so in that spirit make starburst fruit chew flowers for your cupcakes. 

    Thursday
    Mar152018

    Beetroot Orange Chocolate Chip Hot Cross Buns

                           beetroot orange chocolate chip hot cross buns

    Join me on Facebook 


    Make me smile they do (say I sounding a bit too much like Yoda), I love a chenille chick almost as much as I love a warm hot cross bun on Good Friday. 

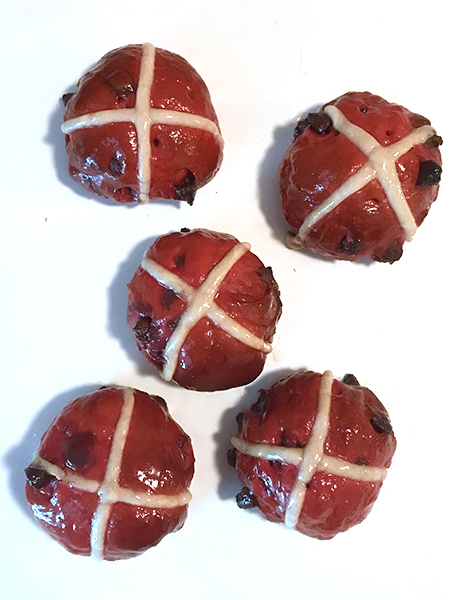
    This years hot cross bun flavour is beetroot (beet) with a touch of orange and lots of chocolate chips!! Served warm with a scoop of chocolate ice-cream and you have a delicious fun Easter dessert. 

    I've been trying to preserve the colour in beetroot baking for years, here is a failed example from 2010 where brightly coloured cookie dough is piped, ending up with non descript brown. 

    Beetroot fresh or dried in baking is highly susceptible to rising ph levels caused by baking powder or heat, ph level over 7 and you will get a beige to brown result. I had previously got a slight colour with yeast baking but not pink/beet reddish shade I was after. 

    I remembered that the Vitamin C used in high school as a bread improver also preserved colour so I gave it a whirl and "success" I got pink buns!

    I used *dried beetroot powder for the flavour and colour and *ascorbic acid powder for the vitamin C element. 

    The resulting beet flavour isn't "beetroot-y", but rather it tastes more like berry and pairs beautifully with chocolate. 

    Beetroot Orange Chocolate Chip Hot Cross Buns (makes 14 buns)

    Ingredients 

    for the bun dough

    350ml full fat milk

    50g  butter 

    1 lightly beaten room temperature egg

    470g white bread flour

    30g  dried beetroot powder

    75g caster sugar (superfine)

    7g sachet of instant yeast

    1/2 tsp Ascorbic Acid

    1tsp salt

    zest of one orange

    150g choc chips

    for the cross

    75g plain flour (all purpose)

    for the sugar glaze 

    1/3 cup water

    2 tablespoons of sugar

    Method

    In a small saucepan bring the milk to the boil, remove from heat and add the butter. Leave until just warm.

    Put the bread flour, beetroot powder, caster sugar, yeast, ascorbic acid and orange zest in a bowl. Whisk to combine, add salt and whisk again. 

    Transfer bowl to you mixer with dough hook attached. 

    Pour in you warm milk mixture, then add beaten egg. Mix on on low (setting 2 on KitchenAid) for 5 minutes or until dough is smooth and elastic.

    Transfer dough to an oiled bowl and cover. Pop the dough in a warm place for an hour to rise until it's doubled in size.

    Take your dough out of bowl and lay in on a non stick mat, roll or pat out to form a rectangle.

    Sprinkle half the choc chips over one half of the dough, fold the other half of dough over to cover choc chips and roll again. 

    Repeat with remaining choc chips. 

    Form the dough into a ball or roll and put it back in your oiled bowl to rise another hour in a warm place. 

    Have a baking tray ready lined with non stick paper. 

    Working with a few pieces at a time break pieces of dough the off, keeping the rest covered. I weighed my pieces to be 75 grams each. 

    Squash each piece into a round with the palm of your hand, fold the edges to the centre, flip over and smooth into a ball. 

    Repeat until you have buns evenly spaced on your tray, cover tray loosely with oiled plastic wrap. Allow to rise for the final time for one hour. 

    Preheat oven to 220C (210 fan).

    Make your cross mixture by placing flour in small bowl and adding enough water to form a pipeable paste. Transfer mixture to a piping bag fitted with a round writing tip or fill ziplock bag and snip one of the bottom corners.

    Once the final rise is done, pipe a cross on each bun. 

    Bake in preheated oven for 20 mins on the middle shelf. As you won't be able to see if they are golden due to pink colouring, I have allowed for tester buns and you will still end up with a complete dozen...a bakers "snack" we could say. 

    For the glaze, stir the sugar and water together heat stirring until it starts to simmer, simmer a couple of minutes and then remove from heat. 

    Brush the hot glaze over the buns. 

    Buns are best served warm on the day. 

    I served mine filled with scoops of chocolate ice-cream but do try toasted with a smear of chocolate hazelnut spread too. 

    *Ascorbic Acid (Vitamin C) from chef supply stores, health food stores and pharmacies. 

    *Beetroot powder is available from chef supply stores and selected supermarkets. In Australia I use Melbourne Food Depot or Herbie's brands. 

    Other uses for beetroot powder: apart from changing up a plain hummus or tzatziki you can...

    add it straight to white chocolate... I love this for the berry/tingly flavour it brings, balancing the sweetness of the white. Stir in 1 teaspoon of sifted beetroot powder for every 100g (3.5oz) of tempered white chocolate, mould, make bark/shards as per usual. 

    Use as a natural colourant for you icing and frosting. 

    Or love a bit of drama? Try adding beetroot powder to your mayo. 

    Happy Baking :) 

    You might also be interested in Candied Beetroot Slices 

    Or prefer and bunny shaped egg

    Tuesday
    Mar132018

    Black Carbon Bread

    black carbon powder used in black atta flour flat bread and black multi grain bread

    Join me on Facebook 

    A spoonful of carbon makes the bread go black and the brioche, cocktail, pastry, english muffin, brownie, mayo, crackers, sauces, cupcakes, butter, potato, ice-cream, waffle and caramel too!

    You've seen the black brioche burger buns, it's not just for Halloween, Darth Vader day or goth get together... adding carbon powder gives a sophisticated and modern twist to your sweet and savoury cooking. 

    What is carbon powder? It's vegetable matter combusted at high heat, producing an insoluble activated super fine carbon that doesn't have health risks, is vegan and no seafood squid ink allergies.

    You can buy carbon powder at health food stores, organic purveyors, chef supply stores and maybe your local supermarket.

    Flavour wise it's barely there in the couple of brands I've tried, a slight char flavour that is easily overridden by stronger flavours. So it's mainly for aesthetics, I do like the drama of the visual impact.

    Each brand will have it's own depth of pigment, today I tried 'Vader Black' from a local store 'Melbourne Food Depot' because of it's promised ultra blackness and ok and because it was named "Vader".

    Tried it out in whole egg mayonnaise first. Haha a tiny bit stirred in and you have a super black mayo for piping, painting or plonking with your chosen contrasting food. 

    Next tried butter, you can see the powder mixes totally into the softened butter. 

    We've probably all seen the black glossy brioche burger buns but I was wondering could you use it with whole grain? Yes, you can successfully use it with whole grain like in this multi grain feta/cucumber number, I like seeing the flicks of grain through the black. 

    Here I used wholemeal Atta flour with carbon to make flatbreads for tofu and peanut salad wraps, you can see the flicks of bran in the finished wraps here too. 

    I used recipes that I make often because you loose the "seeing the item brown" once it's coloured black. This is the same flatbread dough not coloured black. But if your going to make black brioche buns for the first time just allow a tester bun to check for doneness.

    The flat bread wraps.

    Ingredients 

    2 cups of Atta flour 

    150ml warm water to start (more as needed to form a ball of dough)

    1 tablespoon of peanut oil (I was making Malaysian wraps with peanuts so matched the oil... match your oil to what you are making)

    1/2 tsp of salt 

    2 to 3 tsps of carbon powder (you may need more or less depending on the colour density you require)

    Pop the flour in a food processor along with the salt and carbon powder, give it a whizz to combine.

    Starting with your 150ml of warm water pour enough water down the chute to form a soft dough. For hand method and to see video of it being made see the past post of Indian flat bread here

    Wrap you resulting black dough and allow to rest for 30 minutes.

    Pre heat your cooking appliance I used an electric crepe maker to cook mine but any flat bottomed pan/griddle would work.

    Divide your dough into four and roll out one piece, leave the other pieces loosely covered whist you are cooking your first piece. I used a non stick mat so I didn't need to add extra flour. 

    Lightly oil the pan you are using, add your bread disc, cooking until the top is bubbly, flip and cook another minute. Remove bread to plate and cover with clean cloth to keep warm and pliable for rolling. Repeat steps for other pieces. Fill with salads and protein of choice, roll up and eat!

    Other quick ideas for your black breads are making pita or flat bread chips. 

    Don't let your left over black loaves go to waste, make a jar of croutons up and server them with your sweet potato, pumpkin or potato soups. 

    Pros...

    I love the drama of the black. Perfect for many Asian inspired dishes, adding punch to vegan offerings, reinforcing the char of a burger and of course Halloween.  

    Works well with sweet and savoury. 

    A little goes a long way.

    Cons...

    If your after char flavour it is barely there with the carbon powder... a piece of charred veg or BBQ chop has far more carbon flavour.  

    Cost, it's not inexpensive especially the good quality high pigment powders. 

    It can stain/be messy working with the black, but honestly coming from a cake decorating background it didn't stain like mixing up a batch of black fondant. Carbon washed easily off with water, that said take care with porous surfaces. 

    Happy baking :) I had fun playing with carbon powder, if you decide to give it a try in your brownies to tacos shells hope you have fun too.

    *Extra flat bread cooking instructions on the past Lime paneer and paneer parantha post.

    Try "the other natural black" with squid ink grissini.  

    Friday
    Dec292017

    Posh Vegemite and Cheese Scrolls

                     posh vegemite and cheese scrolls

    Join me on Facebook 

    "Buying bread from a man in Brussels
    He was six foot four and full of muscle
    I said, "Do you speak my language?"
    He just smiled and gave me a Vegemite sandwich"

     Land Down Under Colin Hay and Ron Strykert


    We love vegemite in Australia, in all it's black, tarry and salty glory... so when a special edition 'Blend 17' was released this Christmas I not only bought a jar of it for myself, it became the stocking filler of the year. 


    From Port Melbourne in my home state 'Blend 17' and the beloved yellow and red standard spread.

    Vegemite even has it's own street 

    I'm baking todays scrolls as snacks for the summer cricket season here, no not Jiminy but rather the game with bat, ball and stumps. 


    It's these guys... plus others that look the same as these guys. 

    The Guardian:  Steve Smith goes through for a run during a Tom Curran over on day four at the MCG. Photograph: Jason O'Brien/PA 

    It's the fourth day of the fourth test today, it's pouring with rain and they have probably stopped play, maybe they have gone to bed. That's it for all my cricket knowledge except for the "being Australian" comes with compulsory (forced, against your will or at least mine) playing of said game at family get togethers. 

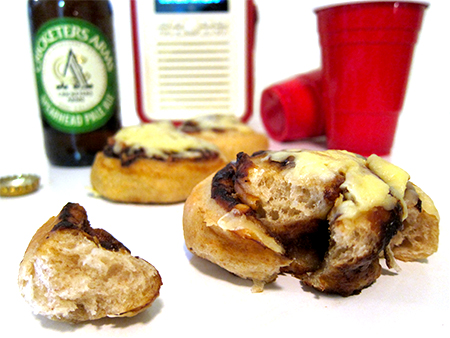
    Time for the little bit posh (or at least the vegemite is) scrolls that pair perfectly with beer to eat during the cricket or anytime you are craving a salty hit.

    I've used a little wholemeal *spelt for extra flavour and differentiate from the bakery bought varieties here. 

    Posh Vegemite and Cheese Scrolls (more commonly known as cheesymite scrolls)

    Ingredients 

     2 tsp instant yeast (7g sachet)

    280ml of luke warm water (that's barely warm guys)

    1 medium egg (room temperature and lightly beaten to break up yolk/white)

    350g white bread flour

    100g wholemeal spelt four

    25g of caster sugar (superfine)

    1/2 tsp salt

    50g unsalted butter melted and cooled

    Oil for covering rising dough

    1 cup of *grated mature cheddar

    optional extra 2/3 cup of grated cheese for the tops

    1 and 1/2 to 2 tablespoons of *vegemite Blend 17 (some recipes on net use FIVE tablespoons of vegemite... much stronger Australians than I am!!) 

    Method

    preheat oven to 220cel or 200cel fan-forced

    Line two baking trays with non stick baking paper if making separate buns or line one tray if making pull apart buns. 

    Place the white bread flour, spelt flour, instant yeast and sugar in a bowl. 

    Whisk lightly to combine and then add salt, whisk again and then attach bowl to stand mixer...I'm using an electric mixer with dough hook attached to do the work, you can make by hand if preferred. With the mixer on low add the warm water slowly, then the beaten egg, then add the melted butter. You are just mixing to the rough dough stage, it will look like this.

    Cover the bowl loosely and leave for 10 minutes, after ten minutes turn the mixer back on low (never over 2 on KitcheAid) and continue to knead for 7 minutes on 2 or until you have smooth ball of dough. Remove bowl from mixer and lightly oil the ball of dough keeping it in the bowl. Cover and leave until risen by half. 

    With oiled hands punch the dough down and bring together in the bowl before turning out on lightly floured surface.

    Roll out to approx 42cm x 30 cm, spread on Vegemite leaving a the border free. The first thing I noticed about the Blend 17 Vegemite was that it is more spreadable, perfect for spreading on raw bread dough with hardly any pull.  I used 2 tablespoons of vegemite. Yep, it's not the most attractive stuff.

    Sprinkle on one cup of cheese.

    Roll up dough tightly to produce a large scroll, cut slices ... I cut mine fairly thin around 2cm but you can go up to three for larger scrolls.

    Most people will put them close together on tray and they will join together for a pull apart tray of scrolls... you can do that if you prefer, I wanted smaller separated scrolls so put them on two trays well spaced apart. For final rise lightly cover and put aside somewhere warm to they are doubled in size. 

    here a third through the final rise

    Ok here comes the optional cheese choice ... you can take the scrolls out of the oven and 3-4 minutes before they have finished baking and add grated cheese. Cons: it covers the scroll pattern Pros: you can acutally taste the cheese, otherwise the vegemite has overwhelmed the flavour. 

    Bake for around 15 minutes for two or one tray... check then if golden brown and cooked... if using two trays you may have to swap trays around for the last few minutes. 

    Eat warm the same day. 

    The 2 tsp's of yeast ensures a no fail light interior texture. 


    Vegemite ownership was returned to Australia this year after Bega purchased the Vegemite brand from international giant Mondelez. Grated cheese in scrolls is a *strong vintage Bega cheddar. 

    I couldn't fit all the vegemite recipes today so there will be sweet and a Japanese inspired savoury in months to come... but first another Australian odd thing coming up soon that is sweet with a sauce everyone can use. 

    Happy Baking :)

    *marmite, standard vegemite or other similar yeast extract can be used. 

    *substitute 50% reduced fat vintage cheddar if preferred. 

    *you can substitute plain wholemeal (whole wheat) flour for wholemeal spelt. 

    Wednesday
    Apr262017

    Alsatian Onion Pizza

                                    Mini Alsatian Onion Pizzas

    Join me on Facebook

    Winter is coming!! Or at least Autumn is here. The skies have darkened and the driveway is strewn with leaves, a perfect time to catch up with friends for Alasatian pizza and a glass of red before winter arrives! 

    Alsatian pizza also known as tarte flambée, French pizza, or flammekueche depending which side of the border you're on. It's an onion topped flatbread/pizza, not common with caramelised onion but doubly tasty because of it. The Alsatian pizza often has bacon on top, sometimes with sour cream, fromage blanc or crème fraîche underneath the onion. A pizza known for it's wood oven charred edges, it's just as delicious made in a home oven. 

    Using Rose's Alsatian pizza recipe from the excellent "The Bread Bible", Rose varies from the standard by using black olives instead of the usual bacon or lardons.  I doubled the dough batch today and swapped half the white flour for wholemeal spelt flour, plus I added a few tablespoons of red chia seeds. I also added a splash of brandy and a splosh of crème fraîche in the toppings.

    Without doubling, Rose's recipe makes one 10 inch (approx 25 cm) pizza, or in my doubled case 10 mini pizzas. 

    The dough starts with white flour, wholemeal spelt, red chia seeds, instant yeast and sugar are whisked together. Salt is then whisked in. 

    A well is made in the centre of the flour and water added. I added a few teaspoons of water extra due to wholemeal spelt flour being included. 


    Then mixed together until a rough shaggy dough forms. 

    Off for a rise in an oiled container, overnight is best if you have time. 

    I made the onion topping at this stage, it's like onion jam ... delicious, caramelised onions. 

    Butter is melted in olive oil.

    Onions thinly sliced.

    The onions, sugar, salt and pepper are added to the pan. Cover the pan with a tightly fitted lid and then sweat the onions down for 45 minutes. 

    They look like this, fluid has been released, the onions are cooked but have no colour yet. 

    Heat is turned up, I added just a few teaspoons of brandy at this stage... it was reminding me so much of French onion soup I thought I'd try it. You could use a splash of your favourite balsamic. The onions are cooked until the liquid has evaporated and they are golden brown.

    Crushed garlic and thyme are added at this stage, I used fresh lemon thyme because it's all I had. I cooled then chopped the onions to a suitable mini pizza topping consistency, covered and then popped in fridge ready for the next day. 

    Next day the dough is brought back to room temperature and I weighed out ten 40 grams balls. There was a little bit left over for a tester pizza. They sat loosely covered to "relax" for fifteen minutes. 

    I have mini pizza pans but I wanted a less formal friendly shape and not too thin for hand held individual pizzas. So I just stretched the balls out a bit, put them on a silpat topping a baking tray. Loosely covered in oiled plastic wrap they rise for 30 to 45 minutes. I took my prepared onions out of the fridge to return to room temperature at this stage too. 

    Your oven is pre heated, your pizza stone or extra baking tray is in there too getting nice and hot. Slide your tray of risen pizza/s into the oven on top of pizza stone. Yes, that's right they don't have any topping yet but wait...

    5 minutes later remove your tray from the oven.  

    The partially baked bases are now topped, I spread on a little crème fraîche to add an acid component.

    Then topped with the caramelised onions and black olives.

    A little gruyere cheese completed the topping and it was back in the oven to bake for another 5 minutes until cheese is melted and crust golden. 

    Base crust is evenly golden brown and super crisp. 

    The interior is light, almost fluffy, with the crunch of chia, surrounded by the thin crisp crust for the "bite" you expect from a good pizza. 

    I served the pizzas with baby fresh lemon thyme leaves.

    Happy Baking :) 

    Today has been one of the 'Rose's Bread Bible Bakers' bakes where a group of fabulous bakers get together and bake from the pages of 'The Bread Bible'.

    The Bread Bible is available from Amazon and all good book stores. 

    Friday
    Mar242017

    Flax seed loaf: Rose's Bread Bible Bakers

                                 flax seed loaf baked as rolls, with chia and sesame. 

    Join me on Facebook

    Baking from 'The Bread Bible', a 'Flax seed loaf' but I baked rolls with the dough and swapped out some of the flax seed for chia and sesame.  Fantastic recipe for a healthy bread that isn't heavy thanks to the mix of flours Rose lays out for use. Easy too! 

                          Flax seed is known as 'Linseed' in Australia. 

    Flax stems are used to produce linen fabric. In ancient times Egyptians wore the shenti (a kilt like garment) made from flax stems woven into linen and flax flowers are often seen in ancient Egyptian murals. 

    Today we are using the seeds from the flax plant, 58 grams were called for... I used 25 grams of flax seed (linseed), 10 grams each of white and black chia seeds with the rest of the weight being made up of black and white sesame seeds. 

    White, wholewheat (wholemeal), pumpernickel (rye meal) flours are whisked together in a bowl along with instant yeast and the seed (mix).  

    A well is made in the centre of the whisked flour and *honey added, followed by warm water and mixed until a rough dough is formed. 

    After a short rest salt is added and mixing continued with the dough hook in the KitchenAid (hand method is also in book) for 7 minutes until you have a moist smooth dough. 

    Off for rise now. 

    After rising dough is shaped into a loaf or as I did shaped into rolls, top with seeds if desired. 

    Ice cubes and preheated baking stone or tray are used produce Rose's home oven bread baking magic, and shortly you have a flax seed loaf or rolls that are substantial with a nutty wholesomeness, but still a light springiness to the texture.

    Fresh baked rolls make a fabulous centre piece for your Easter table, baking different shapes from the same dough gives you visual impact... and you have delicious fresh bread to eat!! 

    Notes:

    *I didn't crush the linseed, I prefer them whole letting "chewing" do some crushing. 

    *Substitute the honey for golden syrup for a vegan option to serve this Easter. 

    I served mine with hard boiled egg slices, lettuce, fresh pickled carrot spirals and whole egg dill mayo. This is an easy bread for all the family and a great everyday healthful addition to your diet for sandwiches to toast to burger buns.   

    Happy Baking :) 

    Today has been one of the 'Rose's Bread Bible Bakers' bakes where a group of fabulous bakers get together and bake from the pages of 'The Bread Bible'.

    The Bread Bibleby Rose Levy Beranbaum is available from Amazon and all discerning book stores.

    You may also be interested in Chocolate Hot Cross Buns  recipe. 

    Wednesday
    Jan042017

    "Levy's" Real Jewish Rye Bread: Rose's Bread Bible Bakers

    "Levy's" Real Jewish Rye Bread 'The Bread Bible'

    Join me on Facebook

    Rose speaks of in 'The Bread Bible' that she likes rye bread 'studded with constellations of caraway seeds' and apparently I do too!! 

    Ahh that moment your loaf of bread is so awesomely "perfect" and you are so excited and then realise it's hard to get people enthusiastic over a loaf of bread, but "dang" this was my perfect loaf, turning the corner, light bulb type moment in bread making.  

    It started with me making a sponge (a starter), bread flour, rye flour, instant yeast, sugar, barley malt syrup and warm water all go in bowl.

    Then it's mixed until it forms a smooth batter bubbly with air.

    Ok, we are up to whisking the remainder of the bread flour with more instant yeast, caraway seeds and salt. The flour mixture was gently spooned over the sponge and covered with plastic wrap for night in the fridge.

    Next morning there was much bubbling coming through the flour blank and after coming back to room temperature I used the kitchen aid (there is instructions for hand mixing) to knead.  

    The resulting dough was placed in a raising container and allowed to rise for a couple of hours. Once risen the dough was shaped into a rectangle and given a business letter turn before going off for another rise.

    I'd already decided I wouldn't use the cloche to bake the bread as another bread bible baker mentioned the loaf was large and I too wanted smaller slices so a batard loaf seemed right. 

    Almost all went wrong at this point as I was following Rose's excellent video on how to shape a batard (torpedo) loaf when I realised my loaf was too long for the baking sheet. I did the thing known as "emergency squashing the ends", which you shouldn't do, but do pre measure your baking sheet.  

    *note my dough was dimpled because it's a rye bread, ditto I didn't spritz with water... and I have started with squashing the ends in this photo ha ha!

    Into my preheated (hot) oven, I placed my loaf on a silpat lined baking tray onto the already heated baking tray in the oven. Ice cubes were added to another tray in the bottom of the oven to create steam. 

    TAAA DAAA!! Ok don't judge it's acutally a dodgy phone pic.. with a ruler next to it to show the length, this is my life I'm sending out photos of my bread to friends.

    And the interior, it wouldn't be a message to my friends if I didn't include "and look at the inside!!" pic.

    I am seriously happy with this texture and flavour of this bread, well seasoned it's a just eat alone bread and made wonderful sandwiches but I thought I'd show you one of the things I do with the "close to the end" bits.

    I make "salad crisps" from bits of homemade bread. Slice as thinly as you can, it's ok if you get odd shaped pieces. Lay out your thin bread slicees on a lined baking tray and either brush lightly with a neutral oil (didn't want to interfere with caraway flavour) or spray with cooking oil and bake in a hot oven for 10 to 15 minutes until golden brown and crisp. Sprinkle with sea salt is desired. Perfect to add a textural element to a salad of fresh pickled red radishes, smoked salmon, avocado and some assorted "leaves". 

    Happy Baking :) 

    Today has been one of the 'Rose's Bread Bible Bakers' bakes where a group of fabulous bakers get together and bake from the pages of 'The Bread Bible'.

    The Bread Bibleby Rose Levy Beranbaum is available from Amazon and all discerning book stores. 

    You might also be interested in a little bit of retro with Honey Joy Cupcakes

    Tuesday
    Nov292016

    Pumpkin buns with salted maple butter -ABC 

    pumpkin buns with salted maple butter

    Join me on Facebook

    I was invited this month to bake along with a talented group of bakers that are a part of ABC (Avid Baker's Challenge) and how could I resist when I saw it was pumpkin dinner rolls shaped as pumpkins!! 

    almost as magical as turning a pumpkin into a carriage, these pumpkin buns today are adorable.

    You could be thinking Halloween or Thanksgiving for these cuties but my first thought was "fairytales"...more than a little Bippity Boppity Boo.  Imagine these as part of a fairy tale wedding or a princess party for the little ones. 

    The buns are a little sweet, but not too sweet to be considered savoury or sweeten them further by sprinkling with sugar before baking.

    Ainse or aniseed flavours the buns or there is an option to use pumpkin pie spice with it's pronounced cinnamon overtone. 

    grinding the aniseed

    We don't have tinned pumpkin puree in Australia so I had to cook my pumpkin and puree, I used a traditional Queensland variety though I suspect butternut pumpkin (squash) would have sufficed. 

    Then bread flour, instant yeast, salt, water, pumpkin puree, egg, honey and spice are combined with a little extra water added if needed... I didn't need any, wet pumpkin I guess.  Softened butter is now beaten in. *Full recipe link at end of page*

    The resulting dough is soft, smooth and easy to work with... a tiny bit sticky but not in a troublesome way the dough goes away to rest and rise.

    Shaped into 12 round rolls (you could bake them just like this if mini pumpkins aren't your thing), and eight cuts are made around the rolls not going all the way to the center. The centre you make a hole all the way through so there is place for your "stem" at the end. Off for another rise now. 

    I didn't add the extra sugar topping, nor the egg wash, I prefer breads a little less sweet.  Pecan halves are cut length ways to create the stems and are inserted after baking.

    Baking time is relatively short and then you have the most light, fluffy yet moist buns.  

    I loved these buns, you don't pick up much in the way of pumpkin flavour but the aniseed lends a sweetish note reminiscent of childhood aniseed lollies more than the night you downed all those black Sambuca shots.

    Salted maple butter: there is salted maple butter to serve with buns, ok a bit too delicious this mixture of salted butter and maple syrup. 

    The full recipe from the ABC bake can be found on Weekend Bakery .com 

    Happy Baking :) 

    You might also be interested an original Brothers Grimm version of Cinderella and make yourself a "fondant toe" cupcake. 

    Or how about four and twenty blackbirds baked in a pie. 

    Sunday
    Aug282016

    Cinnamon Raisin Loaf: Rose's Bread Bible Bakers

    Cinnamon Raisin Loaf 'The Bread Bible' 

    Join me on Facebook    Fondant and chocolate work coming up in September.   

    It's almost Christmas, or so said a facebook count down post this week and this cinnamon raisin loaf from Rose Levy Beranbaum would be just the thing for Christmas or an anytime brunch.   

    It started with making a sponge... flour, water, honey and yeast were whisked until a thick airy batter was achieved. 

    The "sponge" is a yeast starter. I did mine in the mixer. 

    Next flour, dry milk powder and yeast were whisked together and sprinkled over the sponge. 

    Off it goes now to ferment, for 1 to 4 hours. 

    Bubbles broke through the flour blanket at the end of the fermenting stage.

    Onto the mixer now where softened butter is added to the fermented flour mixture and beaten until a rough dough forms. 

    A short rest follows, for that dough that is, but you do have time to get a cup of tea now. 

    Back to the mixer, salt is added and the dough beaten to it forms a smooth and shiny ball. 

    Yup, another short rest here. 

    And back to the mixer to add the raisins. I used a mixture of sultanas and currants. 

    After the raisins are added your dough goes off for a couple of hours to do the rising thing. Time for much tea or maybe a yoga class now. 

    Back from yoga and it's time turn out the dough, form a rectangle, business letter fold the dough whilst maintaining as much air a possible.  

    Covered, the dough goes into the fridge for now for an hour to firm up. I left mine for 24 hours at this stage to develop flavour. 

    Make your cinnamon sugar mixture.

    The dough is rolled out to the specified size in the book, Rose's recipe makes two loaves I made many mini loaves because we know I just like "mini food". 

    Beaten egg is brushed onto the rolled dough, cinnamon sugar is sprinkled on leaving a border unsugared. 

    Roll up you dough, just like we did for the sticky caramel buns last month. Place your rolled dough into greased tins to rise for one to two hours. 

    Time to bake!

    When the loaves are removed from oven and still in tins, melted butter is brushed on. 

    Sssshhhh! You aren't supposed to cut your hot bread but here is the a hot mini loaf with the cut crust off, wanted to see if the spiral worked. 

    Fantastic texture in this bread! Toasts beautifully, however it does burn quickly so keep an eye on it.

    I served mine toasted with fresh cheese, berries and maple syrup but it was equally delicious toasted with butter. I liked it fresh and unadorned too reminded me of panettone, a nice one not the slightly dodgy ones the supermarket sells at Christmas. 

    Would I change anything? No, perfect how it was.  

    Want another flavour? Rose has a savoury version in the book and suggests you can leave out the dried fruit if preferred.  A friend suggested candied peel could be added, yes if you like peel go for it. I think chopped dried dates, orange zest and swapping out the cinnamon for cardamom would result in lovely loaf. A versatile enriched base dough suits many flavour combinations.  

    Happy Baking :)  

    Today has been one of the 'Rose's Bread Bible Bakers' bakes where a group of fabulous bakers get together and bake from the pages of 'The Bread Bible'.

    The Bread Bible by Rose Levy Beranbaum is available from Amazon and all discerning book stores. 

    You might also be interested in  A Trip to the Moon (French: Voyage dans la Lune) cupcake

    Sunday
    Jun122016

    Flaky Scones: Rose's Bread Bible Bakers

    Flaky Scones 'The Bread Bible' 

    Blame it on the Vegemite?? I'm feeling particularly like I'm from a foreign land, with these rich, flaky and moist (American) scones. The scones are nothing like the scones we, or the Country Women's Association bake in Australia.

    I found these scones far, far too rich with cream and butter for my palate. A country to country difference perhaps, after all I start my day with black salty yeast paste spread liberally on toasted bread.  

    The flaky scones began with whisking together flour, sugar, baking powder, bicarb (baking soda), salt. I added the zest of a lemon too.  

    Chilled cubed butter was added by pressing with my fingertips to form large flakes. Cream was stirred in until the mixture was moistened and starting to come together in large clumps.

    Currants were then added and after a brief knead the dough was turned out onto a board.

    1. Sultanas 2. currants 3. raisins... the three mainstay dried grapes in Australia. Currants are my favourites! The first written record of the thin skinned tiny grapes was in 75 AD, making them one of the oldest raisin varieties. The currants I used today are from the Carina varietal, a tangy plump currant perfect for currant buns and scones.

    Back to the scone dough which is rolled out into a 8x12 inch rectangle.  

    The dough is folded in thirds, rotated, rolled out again this step is repeated three more times. Refrigerating between turns for 15 minute intervals if your pastry is becoming too soft and sticking. 

    My friends daughter Emma told me this week that high school Food technology does not let you make scones or muffins due to the processes being too simple, I would presume the lamination of these scones would make them the exception to that rule. What you are doing here is similar to making rough puff, trapping those steam producing cold butter flakes in the dough.  

    Now it's time for cutting, your pastry is trimmed and cut into 2 pieces measuring 4 inches by 12 inches. Rose calls for triangles, four in total to be cut from each piece. Scraps are re-rolled and cut. 

    I cut two round scones from the scrapes (the traditional shape of scones in Australia) with my vintage, well and truly vintage cutter. It wasn't only cooking I learnt at technical trade (alternative high school), I also had shop classes like woodwork and sheet metal... been using this scone cutter every since. 

    Bake!! The scones are baked on baking trays placed on a pre heated baking stone or tray in a hot oven until golden. The resulting scones are moist, flaky but yet "substantial", my Mum would have said "rib sticking". Deep golden bottoms and lightly golden flaky top with a moist and flaky interior, these scones are best eaten warm or reheated following Rose's instructions.

    Flaky scones might not be my cup of tea but they could be yours! That is the great thing about Rose's 'The Bread Bible' and the subsequent Bread Bible Bakers group, trying out new recipes and you're sure to find something for everyone.  

    The Bread Bible by Rose Levy Beranbaum is available from Amazon and all discerning book stores.

    Happy Baking :)  

    You might also be interested in a food processor White Chocolate Plastique recipe

    You might also be interested in something savoury with Shark Nuggets