Navigation
SEARCH
This form does not yet contain any fields.

    Entries in chocolate (46)

    Sunday
    Jul092017

    Golden and Maple Syrup Honeycomb

                                            chocolate dipped golden and maple syrup "honeycomb"

    Join me on Facebook

    Confectionery: lollies, candies and sweets

    Now we're talking! I've been trying off and on, to get homemade honeycomb to taste like a Crunchie bar. Cadburys Crunchie is a milk chocolate coated honeycomb bar and is lighter in texture and tastier than the shattering type alternatives. 

    cadburys crunchie bar

    I got pretty close last week with this version; adapted from Australian Chef Luke Mangan's salted chocolate honey comb, I've omitted the honey, instead using a golden syrup/maple syrup combo for a vegan version and bumped up the bi carbonate of soda (baking soda), I did try the salt sprinkle but with the upped bi carb it's better without it.

    This is a lolly, candy, confectionery so obviously not for the 'I quit sugar' crowd, but for those who like partaking in a sugary treat it's a fabulous one to pull out of the freezer when needed for quick entertaining. 

    Ingredients

    125 grams Glucose Syrup

    350 grams Caster Sugar

    2 tbsp Golden Syrup

    1 tbsp Maple Syrup

    3 tsps of Bicarbonate of Soda (Baking Soda)

    75 mls water

    Dipping

    200 grams of dark chocolate (animal product free if you want vegan "honeycomb")

    choice of granola, freeze dried berries, coconut, crushed pretzels, nuts, cocoa nibs etc.  

    make sure you sift your bicarbonate of soda, otherwise you risk those lumps in your finished candy. 

    You'll need either to line a heat proof bowl with non stick baking paper or lightly oil a silicone cake pan and place it on top of baking sheet. 

    I used a silly shaped silicone cake pan just to show a friend "it always pops out", a round or square silicone cake pan would be easier. 

    Now you just place your sugar and all the syrups into a medium saucepan, the mixture will rise quite a lot once the bicarbonate of soda is added so make sure the sides of the saucepan are high enough, no one wants boiled over sugar on their stove top.  

    Add the water to the saucepan too and stir the lot over medium heat just until the caster sugar is dissolved. Bring the mixture to the boil and boil until the mixture is *dark golden. It takes a few minutes, just err on the less side, the mixture can burn quite easily.

    Quickly, Quickly. 

    Turn off heat, quickly and lightly whisk in your bicarb ... it's a barely a mix through, this is to make sure it doesn't deflate.

    Quickly pour into prepared mould (careful it's HOT), leave the mould in place until cool. 

    Once cool it's pops straight out of the silicone mould, if you used the baking paper in a bowl un-mould and peel away paper.

    Tap or cut with large knife into *pieces. 

    Gently melt your chocolate in a bowl over hot water. Start dipping your pieces into chocolate and then into toppings of choice such as freeze dried strawberry pieces.  Place on rack to set.

    At this stage serve, I served mine in a "grab piece pile" with espresso for a late night pick me up. Or freeze the pieces in a single layer in a freezer container or freezer bag until needed. Keep some unchocolate dipped for those who like it plain, use leftover crushed honeycomb in coconut yoghurt, mixed in with granola, for hokey pokey ice cream, cookies, slices, cakes and plated desserts. 

    This is a freshly made piece, the top photo shows the slight darkening on freezing and defrosting... both lots tasted the same. My step son didn't mind the salt sprinkle, but his girlfriend Emer and I thought it was too salty with the increased bicarbonate.  

    Notes:

    *I can't stress enough the mixture is hot, remove pets and small children from the work area whilst making. 

    *Troubleshoot, don't over whisk once bicarbonate is added for a light honeycomb. Don't cook to long to prevent burning. 

    *Pieces... the small shattered pieces can be mixed into tempered chocolate and moulded into love hearts, skulls, frogs or whatever you like for honeycomb crunch chocolates.

    *there is no candy thermometer used in this recipe, the sugar mixture is brownish due to the syrups your aiming for "browner" without burning. 

    Happy baking  and confectionery making :) 

    You might be interested in an also vegan 2010 version of honeycomb with less bicaronate that results in a lighter colour and harder finish. 

    Sunday
    Mar122017

    Liège Waffles

                                                  Mini Liège waffle dipped in melted chocolate

    Join me on Facebook

    Liège waffle: brioche based waffle with pearl sugar, rumoured to have been invented during the 18th century by the chef to the Prince-Bishop of Liège.  

    Haven't had a burger in anything but a brioche bun in the last decade? This waffle is for you and all your brioche loving friends. Belgium has many varieties of waffles but today is the "Liège", brioche dough cooked in a waffle maker with pearl sugar. 

    Antonin Carême. 1784-1833 

    Early versions of what is now the Liège waffle were a brioche base with crushed block sugar on top as a garnish; then a nod to Antonin Carême, the famous Parisian chef has several waffle recipes with crushed/pearl sugar. However, a full recipe for the gaufre de liège (liège waffle) wasn't published until quite late in 1921.

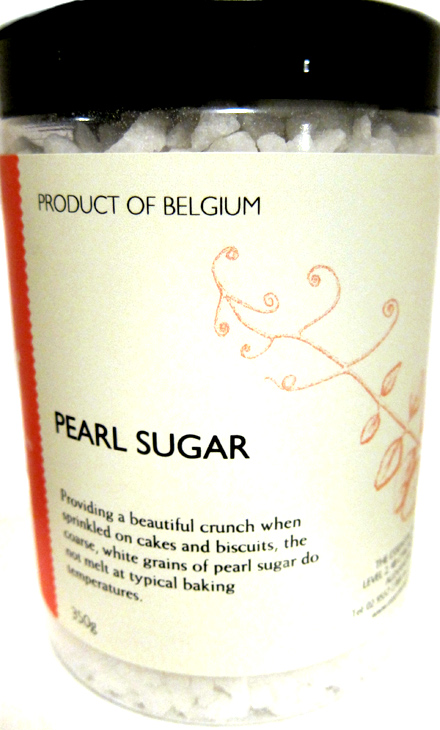
    For today's recipe you will need pearl sugar. 

    Pearl Sugar a beet sugar compressed into uneven nuggets. 

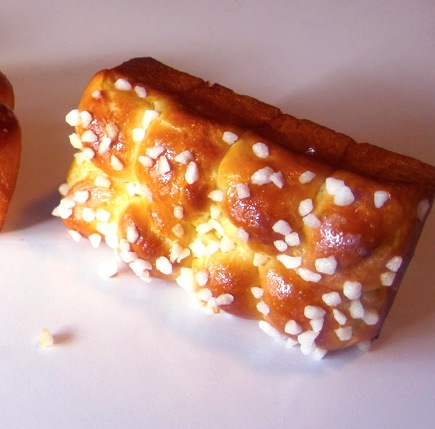
    Pearl sugar is paired most frequently with brioche, like these mini loaves I baked previously. The pearl sugar even though it has been baked keeps it's shape. 


    Baking along with a talented group of bakers that are a part of ABC (Avid Baker's Challenge), this month was the 'Liège Waffles' from Smitten Kitten

    The ingredients and changes I made to this months recipe in bold.... 

    1/2 cup (120 ml) milk, whole is ideal (replaced whole milk with water, milk, particularly whole milk makes dough heavier
    1/4 cup (60 ml) water
    2 tablespoons raw sugar, brown sugar or honey (used golden syrup to build to the caramel/burnt sugar flavour, in Australia our tablespoons are larger so I used 1 1/2 tablespoons) 
    1 packet (7 grams or 2 1/2 teaspoons) active dry yeast ( I used instant yeast same weight, in changing yeast the method also changed) 
    2 large eggs, ideally at room temperature
    2 teaspoons vanilla extract
    3 2/3 cups (460 grams) all-purpose flour, divided (plain flour for Australians)
    1 teaspoon coarse or kosher salt (I used Maldon) 
    14 tablespoons (200 grams or 7 ounces) unsalted butter, softened
    1 1/3 cups pearl sugar (cut the sugar amount, scooped out a half a cup of pearl sugar and sprinkled on top of scoops of the dough rather than incorporating into the dough)

    flour mixture with golden syrup and water

    The method I had to change because of using instant yeast. All the flour and instant yeast were whisked together, then the salt whisked through, water and golden syrup added. Popped the bowl onto the kitchen aid and using the dough hook and speed 2 until I had a rough dough.

    rough dough

    Eggs were added in, then well softened  butter added a spoonful at a time  still using the dough hook until incorporated. Well softened butter means the butter holds it's shape but if you touch it ever so lightly it will smear . Seven minutes mixing on 2 and it's all done. 

    not as silky as typical brioche dough, it's firm. 

    I should have cut down the flour measurement somewhat, not keen on the tight texture. More fluid or less flour would have been good to improve the hydration in dough. There is a couple of rises at this stage. For the full original recipe and method see Smitten Kitten.  

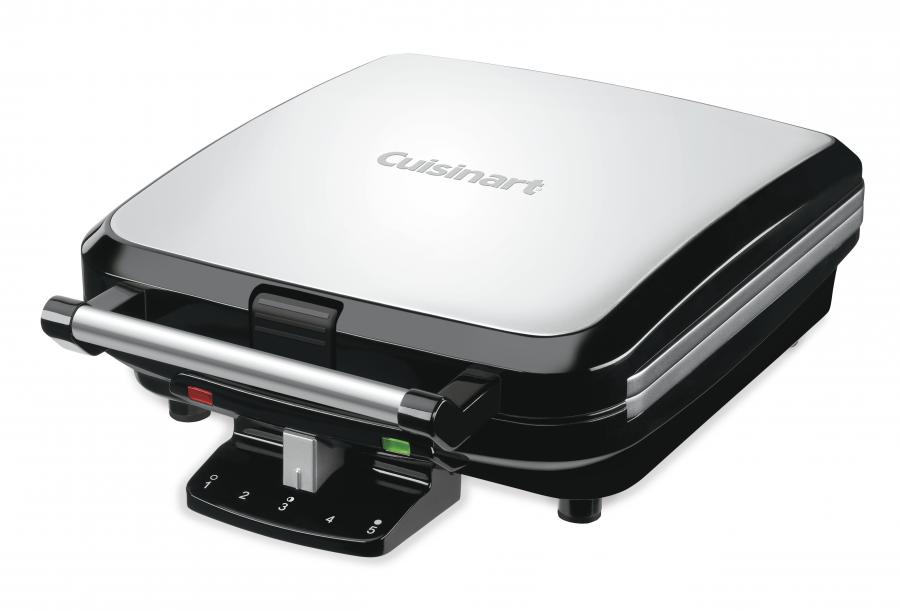
    You'll need to have your waffle iron ready and pre heated, stove top or electric, the deeper Belgian waffle makers are the perfect choice but recipe will work in standard waffle makers too. Mine is the 'Cuisinart 4 Slice Belgium Waffle Maker'.

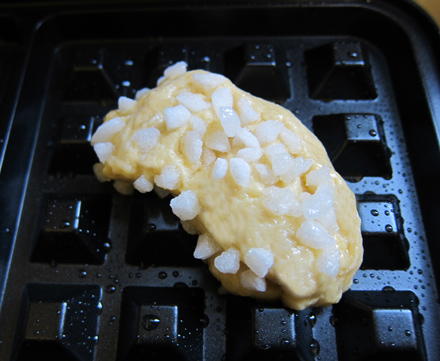
    Here is a scoop of waffle mixture... literally just used a dessert spoon and scooped spoonfuls of room temperature brioche dough onto oiled waffle maker. My shapes weren't really the traditional oval, more of a plump round oval (there is so such a thing!!) shape. They took 4 minutes on setting 2 to cook. 

    Why oiled when it's non stick? Always oil your non stick cookware if the recipe contains a high sugar content or low fat mixture like sponge. Using the pearl sugar with oiled waffle plates meant clean up was a breeze. I made 28 waffles all up in this sizing.

    Youtube clip from 'The Hostel Girl' blog she is in europe talking and eating waffles. 

    Liège waffles are a street food, food truck food, something you would grab at a market as you were walking around. Usually eaten plain they can also be plated with a chocolate sauce. They are meant to be eaten warm and immediately, you may wish to half recipe. They don't keep well and you will have to reheat in microwave and wrapped in oven to freshen them. Brioche does freeze well, but because of the sugar topping you will get sugar weeping/stickiness on defrosting. 


    Lets have a look inside... yep, it's brioche, fluffy plus crisp and crunchy due to the pearl sugar and waffle iron. The pearl sugar topping has almost totally smashed and melted. They are more substantial than a standard waffle, they are enriched bread and are not meant for giant stacks with lots of toppings. Although you could if you wanted to, maybe you like brioche and whipped cream and chocolate and cherries on top.  

    Mine were served with cups of melted chocolate and strawberries for dipping, great with coffee but would be fabulous with champagne for a celebratory brunch. Do you make a wickedly good hot chocolate? Hot chocolate to sip on or dip the waffles in would be great too. Spice with the traditional cinnamon, or try a dash of cardamom or saffron to spice things up. Consider serving with berries to provide an acid component to clean palate and don't be afraid to keep a bit of your favorite enriched dough aside when baking and try it out in your waffle maker. 

    Happy Baking :) 

    You might also be interested in Caramel Stoopwafel cupcakes

    or make a fondant 50 shades of Grey cupcake

    Monday
    Feb062017

    The Browniest Cookies 

                                        the browniest cookies

    Join me on Facebook 


    Baking along with a talented group of bakers that are a part of ABC (Avid Baker's Challenge), this month is the 'Browniest Cookies' from Smitten Kitten. 

    Like all brownies it's easy to put together, chocolate is melted with butter and sugars whisked in.

    White sugar to creates the brownie crust and brown sugar to keep the cookies soft. 

    Eggs, vanilla, baking soda and salt are whisked in next, followed by sifted cocoa powder. 


    Flour is stirred in followed by chocolate chunks. I divided mixture in half and added half cup of fresh raspberries to the batter.  Both batters were then refrigerated. 

    The recipe calls for the batter to be scooped, I rolled in smaller 25 gram balls and slid the trays into the freezer for 15 minutes to insure they would keep their shape. 

    Resulting cookies are fudgy, with a thin crisp crust, definetly chocolately but did polarise the testers with the flavour.  They aren't overly sweet tasting cookies, but it was the touch of bitterness they bring with so much cocoa powder and unsweetened chocolate that some weren't keen on.  

    I drizzled melted chocolate on the raspberry ones and added love heart sprinkles for Valentines Day.  

    Tiny cookies won't crinkle as much due to chilling and the short bake time... about 6-7 seven minutes.

    The recipe today is similar to Martha Stewart's 'Chocolate Crackle' type cookies that we have made every Christmas for over a decade. The other Martha Stewart cookies that are brownie/crinkle like are the 'Outrageous Chocolate Cookie' we also make for holidays. 

    my step son made these brownie cookies for high school food tech in 2009   

    Today's cookies are good, but won't replace the Martha Stewart cookies in our Christmas repertoire. 

    Like a full cocoa flavoured cookie? get the full recipe for today's bake from Smitten Kitten 'The Browniest Cookies' 

    Happy Baking :) 

    You might also be interested in making Eric the Valentines Emu

    Thursday
    Sep172015

    Spider Egg Tins

                                 chocolate "spider eggs" in tins

    A quick and fun "craft" idea for Halloween but also great for any of your gothic themed dinners. Not in a gothic dinner party time of life? children will like designing labels and filling the tins.  

    Give these chocolate filled spider tins out as favours, use them for place setting markers or passed around after dinner with coffee. 

    You need small metal tins with lids (craft stores). 

    A bag of rubber spiders or cockroaches if you want cockroach eggs instead (toy shops, craft shops etc). 

    Crispearls are used extensively in patisserie and chocolate work to add "crunch". 

    Small rounded candy or chocolates.  I used dark Callebaut crispearls, tiny, shiny pearls of dark chocolate with a crunchy toasted cereal centre but any small lolly or candy would do. Cocoa shelled popping candy would also work. 

    Make labels for your tins in whatever program you have from Word to Photoshop. Using clipart from the internet or your files. Print your labels on sticker paper or on plain office paper.  If you used plain office paper cut out your labels and adhere to your tins with non toxic glue.  Oh, don't forget to personalise the labels, print friends names, greetings etc.

    Use tissue paper in contrasting or matching colour to line the bottom of the tins, fill with chocolates/lollies of choice. Top with a single layer of tissue, put your spider on top of that and close the lid.  

    Happy crafting :) 

    Sunday
    Aug232015

    Woody's Black and White Brownies Rose's Alpha Bakers

    Woody's Black and White Brownies (with a touch of green) 'The Baking Bible'

    Join me on Facebook or view my Flickr gallery 

    Stuart's Brownie Review Stuart's video brownie review Flickr. 

    Little Stuart is eight years old and has autism, each week he asks me "is it chocolate yet?" This week it is chocolate!! Woody's Black and White Brownies. 

    Stuart wanted to take the brownies to school tomorrow, so the we had to veto the bourbon in the ganache topping and no nuts (nut free school).  This caused an hour or three problem as Stuart kept repeating "the recipe says bourbon" but we settled on mint largely due to Stuart loving 'Peppermint crisp' chocolate bars. :)

    peppermint crisp bar a popular chocolate bar in Australia, New Zealand and South Africa... often used in desserts. 

    Chocolate and butter were melted in a double boiler and scraped into the mixing bowl of the stand mixer.

    Cocoa and sugar were added and mixed until incorporated.

    Eggs and vanilla were beaten in, the mixture became thick and glossy.

    Cream cheese was added and beaten until small bits remained and the mixture was spread evenly in the lined baking pan. I added a handful of choc chips, well just to surprise Stuart really. 

    Hmm, I wondered at this stage were you supposed to be seeing the little bits of cream cheese?

    Brownies were baked until the batter was set one inch from the edge.

    Next was making the white chocolate custard base that would be a compontent of the white chocolate buttercream. I used small callettes so I didn't have to cut chocolate into pieces.

    I had never made a custard from melted white chocolate and butter until this recipe, interesting technique. 

    White chocolate and butter are melted over a double boiler.

    Whisked eggs are added and cooked until slightly thickened (you have custard), it's then strained and cooled.

    white chocolate custard ready to be cooled

    Butter is whipped until creamy, custard gradually mixed in. Beaten to stiff peaks form and covered and popped away for a couple of hours. 

    Frosting is them rebeaten briefly and vanilla added.

    Time to spread frosting on cooled brownie base. 

    Next up "dark chocolate ganache glaze", cream and chocolate are melted together (there is bourbon in this bit if you are using) and ganache is spread on frosting. I sprinkled the crushed peppermint crisp chocolate bars on top at this stage. 

    The brownies are back to fridge now to chill at least one hour before unmoulding and slicing.

    Straight from the fridge the texture is like this. The brownies are much easier to slice. Once returned to room temperature the white chocolate frosting is extremely soft and will squelch out as you bite. I'd like a firmer white layer more in line with denseness that is "a brownie". The brownie base is great, fudgy without being cloying. You can still see the little pieces of cream cheese, not sure what that is about but hey "it's good'.  

    Stuart studying his brownie, he absoloutely loved them... as did his Dad.

    How it works... now I've joined the fabulous existing alpha bakers, once a week I will post about what I have baked from Rose Levy Beranbaum's 'The Baking Bible'. This won't include the recipe due to copyright and publisher restrictions however, I will be posting how it went and photos of making/baking the gorgeous baked goods.

    Would I bake again? All the elements yes, but not together. Great tasting brownie. Great tasting white chocolate custard frosting. Just not the two together.  

    Would I change anything? Yes, I would make the brownie base alone and top with ganache. Maybe incorporate the cream cheese fully because it's not visually appealing.

    The Baking Bible available from Amazon and all discerning book retailers. 

    You might also be interested in chocolate twirly swirly decorations 

    Monday
    Jun222015

    Double Damage Oblivion chocolate cake Rose's Alpha Bakers

                Double Damage Oblivion chocolate cake 'The Baking Bible'

    Join me on Facebook

    Renowned chocolate cake lovers, the single dad with his eight year old autistic son picked up the Double Damage Oblivion cake that I baked from Rose Levy Beranbaum's 'The Baking Bible' today ... I just got the review back "You've got a good cake here".

    The guys review contradicts my opinion of the cake and once again illustrates different people have different likes and dislikes and it all comes down to personal preference and knowing your audience. 

    Today's bake calls for baking two different cakes, starting with the Chocolate Oblivion by first melting chocolate and butter together over a pot of hot water.

    Then with a long handled whisk, eggs were beaten over a pan of simmering until warm, before being beaten in a mixer until light and billowy. 

    The whipped eggs are folded into the chocolate mixture. 

    The tin was a springform, greased a third of the way up and base lined with baking paper. 

    The sides and base of tin were double wrapped in aluminum foil and the cake baked in a water bath until set but still wobbly in the centre. Then the cake was covered and popped in the refrigerator overnight.

    Cake two is the Deep Chocolate Passion. You can tell we are up to the second part of a recipe because I forgot to take photos :P

    A cake tin with greased bottom only, is then lined with baking paper. Cocoa and boiling water is beaten until smooth the cooled. Oil and eggs are added to the cooled mixture and beaten until smooth and shiny. Flour is added an resulting batter spread evenly into the tin and baked.

    Oh my... this next part made me nervous, after running a flat knife around the edge of the hot baked cake you have to turn out the hot cake!! Yep, nervous for no reason the cake came out easily and it was time to peel the away the baking paper and reverse cake so the top is ummm, on the "top".  

    Dang, don't take photos of the paper liner when your hot cake is the wrong way around on the rack... you will get this effect "a cross hatch cake".

    There is ganache; yes you make ganache and spread it on your chocolate oblivion, which is topped with the bottom layer of deep chocolate passion cake... then reversed... more ganache on the now top of oblivion and then the final layer of cake is laid on top.  

    Now you will see your chocolate oblivion layer needs trimming to be the same size as your cake... once you have trimmed, a hot knife is run around cake until you have a smooth and shiny finish. 

    Sprinkle sifted cocoa powder and eat!

    Here is the inside texture of cake, all the layers look super moist but what I found was it ate "dry", after a mouthful you felt like you needed a drink, second mouthful more drink, third mouthful maybe I'll just drink my coffee. The chocolate oblivion layer tasted like a ganache truffle but doesn't have the melt in mouth truffle feel.  

    Would I bake again? Not sure, there is other Rose's chocolate cakes I like more. 

    Would I change anything?  There was an option to use jam rather than ganache to join the layers but either way if I baked again I would have preferred the cake to be syruped. A coffee liqueur syrup, or orange or perhaps chambord would have been nice. A thin water gel or berry gel layer would be good too. 

    How it works... now I've joined the fabulous existing alpha bakers, once a week I will post about what I have baked from Rose Levy Beranbaum's 'The Baking Bible'. This won't include the recipe due to copyright and publisher restrictions however, I will be posting how it went and photos of making/baking the gorgeous baked goods.

    Happy Baking :) 


    Award winning author Rose Levy Beranbaum's The Baking Bible is available from Amazon and other good book stores worldwide.  

    You might also be interested in Baci chocolate Ice-cream recipe

    Monday
    May182015

    Double Chocolate Oriolos Rose's Alpha Bakers

                                                           double chocolate oriolos

    Hmm, two surprises with my second bake as an alpha baker from Rose Levy Beranbaum's 'The Baking Bible'. One: why is this cookie entitled "double chocolate" when the "chocolate" comes in one form from cocoa? Two: Never would I have guessed that such an unassuming cookie could be so feather light in texture.  

    The light texture of the double chocolate oriolos cookie is bordering on ethereal, it disappears in a cloud of buttery cocoaness (not a word but should be)... pair with milk or better still an icy cold kahlua milk shake. 

    Three:  ok I didn't mention a three... but I skinned my walnuts today, now this might not rock your boat but for me it was an "ahhh haaaa" moment. Many times I've skinned hazelnuts by roasting in the oven and rubbing the heated nuts between a clean tea towel to the remove the brown skin, but I had never thought of doing it with walnuts until I read Rose's recipe. The bitterness: it stops the bitterness you sometimes get when baking with walnuts. 

    That's how the recipe starts, skinning your walnuts. 

    Cubed chilled butter is processed through cocoa, walnut, sugar mixture until absorbed. 

    The resulting dough was divided into three parts. Chilling is an important step in this recipe to ensure your cookies keep their shape.  

    Working with one disc of dough at the time and keeping the remainder chilled, I divided and rolled 12gram balls of dough. On your lined baking sheet you press each ball with a flat bottomed glass/tumbler that has been sprayed with cooking spray and dipped in granulated sugar.  

    Brush away any excess sugar on your tray with a soft brush before going into to bake.

    Yes, they might look unassuming but these cookies are a taste/texture treat. I made a double batch as I promised step son Dan that I will make him bourbon pecan butter balls with a pulversied batch of these cookies. 

    Would I bake again?: Yes

    Would I make any changes?: Goodness, maybe a pinch of salt to accentuate cocoa flavour... but I think if you are looking for a plain cocoa biscuit/cookie these are pretty perfect as they are.

    How it works; now I've joined the fabulous existing alpha bakers, once a week I will post about what I have baked from Rose Levy Beranbaum's 'The Baking Bible'. This won't include the recipe due to copyright and publisher restrictions however, I will be posting how it went and photos of making/baking the gorgeous baked goods.

     The Baking Bible

    Happy Baking :) 

    Liquorice Lovers!! here is your ice-cream recipe

    Pink drizzle isomalt how to... isomalt drizzles pretty and versatile sugar finish. 
    Thursday
    Oct162014

    Half a Grasshopper Pie

                                                   Half a Grasshopper Pie

    Join me on Facebook. 

    Grasshopper Cocktail: The drink reputedly originated at Tujague's in the French Quarter New Orleans. The cocktail contains equal amounts of creme de menthe and white creme de cacao with added cream and shaken with ice.

    You start with the thought "I'm going to make Nigella Lawson's Grasshopper pie", that was until you realise you don't have and can't get some of the ingredients.... which brings us to today's recipe a "half a grasshopper pie".

    I thought I did, I thought I did... have whie creme de cacao. I didn't. We don't have Bourbon biscuits here but I'm Australian so dark chocolate Tims Tams it was. 

    Tim Tams: chocolate coated and chocolate cream filled biscuits (cookies) popular in Australia, use the equivalent in you country i.e. chocolate coated oreos. 

    We also don't have the mini white marshmallows Nigella uses here so I thought white soft eating marshmallows will do. Three supermarkets later I cannot buy white marshmallows, I can buy fruit swirled, chocolate dipped, pink and white mixed but no "white". 

    Yep, this is why I found myself separating pink from white marshmallows. I've since found out Aldi in Australia has white eating marshmallows... dang I should have asked my all knowing friend Jacinta first! 

    Half a Grasshopper Pie recipe

    1 loose bottomed 25x5 cm (10x2 inch) fluted tart tin

    300g grams (10.5oz) of chocolate coated cream biscuits (approx one and half packs of dark chocolate Tim Tams) 

    50g (1.75oz) of dark chocolate (I used Lindt 70%)

    50g (1.75oz) softened butter

    200g (7oz) grams soft white eating marshmallows (cut in half or quarters depending on size)

    2tsp of pure vanilla extract/essence

    80ml (2.7 fluid ozs) green creme de methe 

    125ml (4.22 fluid ozs) milk

    375ml (12.7 fluid ozs) thickened cream

    few drops of green food colouring

    *optional vanilla whipped cream, fresh mint and chocolate curls to serve


    oiled scissor blades make short work of cutting marshmallows 

    Process the chocolate biscuits (cookies) with the chocolate in a food processor until it's a rough crumb, add the butter and pulse until it just comes together. 

    Base processing finished and ready to press into shell. 

    Using the back of a spoon or your hands press the crumbs evenly around the base and sides of fluted tart tin. Make sure you press firmly, particularly around the edges coming up the sides. Refrigerate the base. 

    Put the cut marshmallows with the milk in a small saucepan, *over low heat. Once the milk starts to foam around the edges, remove from heat and stir marshmallows to completely melt in. Pour into a heat proof bowl, stir in the creme de menthe, vanilla and green food colouring if using. Set aside to cool. 

    Whisk the cream until soft peak stage (it will hold it's shape but drop gently off a spoon), add cooled marshmallow mixture. Whisk until combined but not over beaten. 

    Pour mixture into chilled crust. Spread lightly to fill shell evenly, create a few swirls or smoother finish... whatever you prefer.

    Refrigerate pie a minimum of four hours, use a plastic dome lid or aluminium foil to create a dome over the pie. You don't want the surface to be touched.

    When ready to serve either top with crushed chocolate biscuits (cookies) or as I did with a dollop of vanilla white cream, chocolate curls and a fresh mint leaf. 

    * Trouble shooting: gentle, gentle heat melting marshmallows if the mixture boils the marshmallows don't reset. 

    * a delicate texture similar to a Sara Lee Bavarian dessert, this pie needs to be refrigerated... it will collapse if left in a warm place. 

    Was the pie worth it? Absolutely!!  Happy Baking :) 

    You might also be interested in Ode to Bounty Bar cupcakes   

    Tuesday
    Nov052013

    Chocolate Soil 


    crystallised chocolate soil 

    Join me on Facebook or view my Flickr Gallery

    A two ingredient chocolate soil, I'll give you all the dirt today (ok couldn't resist) on how make it with the least amount of cleaning up.  

    With chocolate soil you can add crunch and texture to a plated dessert, make pot plant cupcakes, set up a garden scene for your cake or perhaps just sprinkle on your favourite ice-cream. 

    Flavour it up; you can use a flavoured dark chocolate i.e. blueberry, orange, mint etc for flavoured soil or add your own flavour by stirring in cinnamon, ginger, chilli flakes, a drop or two of peppermint oil or whatever takes your fancy. 

    We are aren't going to use a *candy thermometer, we are going to do this by eye... a photo will act as your guide. 

    Here we go...

    Chocolate Soil 

    Ingredients

    100g (3.5OZ) Caster Sugar

    75g (2.6OZ) Dark Chocolate roughly chopped (even if you don't usually like 70% dark chocolate, I would recommend using it here because your are adding sugar to counteract the bitterness)

    Tools.... a wire whisk and a baking tray lined with non stick paper ready for you to tip your completed soil on. 

    Method

    On you stove top in a small to medium saucepan add the caster sugar, gently pour in 2 tablespoons of cold water. We are being gentle so we don't splash sugar crystals on the side of the pan.

    Turn on your heat to high and you are going to just let it do it's thing without stirring, the sugar will dissolve and bubble and boil until you see "golden brown edges". 

    the center of the boiling sugar is still clear, the edges have changed to golden brown. 

    have your roughly chopped chocolate ready to go

    Immediately remove saucepan from the heat and all at once whisk in the chocolate, along with any flavouring if using. Don't forget to whisk around the edges. Whisk until all the chocolate is coated, this doesn't take long ... a couple of minutes.

    it starts to look like "soil" almost instantly 

    Yep, you're done, it's finished and ready to poured onto your non stick paper prepared baking tray to cool.

    finished chocolate soil

    Once cool, store in an airtight container for up to a week, or freeze up to a month.

    *I've adapted this recipe from Heston Blumenthal's chocolate soil... halved the sugar and made it a simpler soil. His recipe has many more elements and is part of his wickedly delicious tiramisu recipe. Check out Hestons tiramisu on SBS food

    Clean up tips: Remember how we cleaned up our sugar work saucepans? It's the same today, fill your saucepan with water, bring to the boil, empty the water out and wash as per usual. Clean your whisk the same way, boiling water will remove any stuck on crystallised chocolate.

    *really want to, need to, use a candy thermometer... 135 cel or 275 F. 

    Happy Baking :) 

    You might also like to make fast bubble sugar decorations/toppers.

    Make quick and easy faux gingerbread mushrooms

    You've made the soil now make the dust... Nutella dust 

    a change from chocolate? Make a fondant gold fish! 

    Saturday
    Oct192013

    Chocolate Tia Maria Fridge Cake 

    last of the chocolate coffee liqueur fridge (ice box) cake

    Join me on Facebook

    Oh, have you tried replacing some of the cream in your ganache for plain Greek yoghurt?

    Even if yoghurt isn't in your top 500 foods, once added to ganache a little bit of magic occurs. Well, ok not "magic" (I'm trying to sell you on the idea because I like it so much), but rather the yoghurt has a two fold effect of lightening the texture of the ganache and adding an acid component that cleans the palate. 

    I like a ratio of 50% cream to 50% Greek yoghurt. The yoghurt ganache can be made with white, milk and dark chocolate. Think white chocolate yoghurt ganache with strained passion fruit puree for truffles or dark chocolate yoghurt ganache sauce with profiteroles or for your berries and waffles. What follows is the basic ratio/method that you can use in your existing recipes, plus a retro fridge cake laced with Tia Maria that the my step son Daniel declared was so nice "I could eat this everyday". 

    Chocolate Tia Maria Refrigerator Cake

    Ingredients

    Sponge fingers come with different amounts of biscuits depending on the brand... from 250g to 400g but the following recipe makes plenty of ganache, in fact you might have some over to top a cupcake or two. 


    I x packet of savoiardi/sponge finger biscuits

    125 ml (quarter of a cup) of very strong brewed black coffee  (you can make up instant if you don't have shots of expresso handy) 

    1/4 cup caster sugar (superfine) 

    3 tablespoons of coffee liqueur (add more coffee if you want to avoid the alcohol) 

    1 tsp of pure vanilla extract/essence

    150g  (5oz)  milk chocolate, roughly chopped

    150g  (5oz) dark chocolate, roughly chopped

    250 ml (one cup) thickened cream (whipping cream)

    250 ml (one cup) plain thick Greek yoghurt

    Place the sugar and coffee in a saucepan, bring to a rapid boil and boil one minute or until sugar is dissolved. Remove from heat. Stir in Tia Maria and vanilla extract. Set aside. 

    Melt the chocolate with half the cream in a heat proof bowl over pan a simmering water. Remove from heat and stir through the remaining cream and yoghurt. Refrigerate until the ganache is thick enough to spread. 

    Divide up your sponge fingers, I made my cake by laying six sponge fingers side by side and allowed another 12 sponge fingers to create two layers on top. *This size will give you leftover ganache, if you are using a larger packet of biscuits you will use all the ganache. 

    Spread some of the chocolate ganache onto your cake platter to secure the first row of sponge fingers. 

    Start to build the cake by dipping biscuits in the coffee/tia maria solution, lay six across the bottom, top with ganache, dip another six biscuits lay those on top of the base layer, top with ganache and lay final layer of dipped biscuits on top. Use remaining ganache to cover the sides and top of cake. 

    Chill for 4-6 hours. 

    Optional: decorate with your choice of chocolate curls, grated chocolate, chocolate coated coffee beans or crushed choc/coffee candy bars. 

    adapted from no bake Irish gateau Hamyln all colour cookbook: 200 chocolate recipes 

     Happy Baking :)

    You might also interested in no bake Tia Maria Treats

    Or perhaps you have been hankering to make a Chinese dragon