Navigation
SEARCH
This form does not yet contain any fields.

    Entries in red (49)

    Thursday
    Mar152018

    Beetroot Orange Chocolate Chip Hot Cross Buns

                           beetroot orange chocolate chip hot cross buns

    Join me on Facebook 


    Make me smile they do (say I sounding a bit too much like Yoda), I love a chenille chick almost as much as I love a warm hot cross bun on Good Friday. 

    This years hot cross bun flavour is beetroot (beet) with a touch of orange and lots of chocolate chips!! Served warm with a scoop of chocolate ice-cream and you have a delicious fun Easter dessert. 

    I've been trying to preserve the colour in beetroot baking for years, here is a failed example from 2010 where brightly coloured cookie dough is piped, ending up with non descript brown. 

    Beetroot fresh or dried in baking is highly susceptible to rising ph levels caused by baking powder or heat, ph level over 7 and you will get a beige to brown result. I had previously got a slight colour with yeast baking but not pink/beet reddish shade I was after. 

    I remembered that the Vitamin C used in high school as a bread improver also preserved colour so I gave it a whirl and "success" I got pink buns!

    I used *dried beetroot powder for the flavour and colour and *ascorbic acid powder for the vitamin C element. 

    The resulting beet flavour isn't "beetroot-y", but rather it tastes more like berry and pairs beautifully with chocolate. 

    Beetroot Orange Chocolate Chip Hot Cross Buns (makes 14 buns)

    Ingredients 

    for the bun dough

    350ml full fat milk

    50g  butter 

    1 lightly beaten room temperature egg

    470g white bread flour

    30g  dried beetroot powder

    75g caster sugar (superfine)

    7g sachet of instant yeast

    1/2 tsp Ascorbic Acid

    1tsp salt

    zest of one orange

    150g choc chips

    for the cross

    75g plain flour (all purpose)

    for the sugar glaze 

    1/3 cup water

    2 tablespoons of sugar

    Method

    In a small saucepan bring the milk to the boil, remove from heat and add the butter. Leave until just warm.

    Put the bread flour, beetroot powder, caster sugar, yeast, ascorbic acid and orange zest in a bowl. Whisk to combine, add salt and whisk again. 

    Transfer bowl to you mixer with dough hook attached. 

    Pour in you warm milk mixture, then add beaten egg. Mix on on low (setting 2 on KitchenAid) for 5 minutes or until dough is smooth and elastic.

    Transfer dough to an oiled bowl and cover. Pop the dough in a warm place for an hour to rise until it's doubled in size.

    Take your dough out of bowl and lay in on a non stick mat, roll or pat out to form a rectangle.

    Sprinkle half the choc chips over one half of the dough, fold the other half of dough over to cover choc chips and roll again. 

    Repeat with remaining choc chips. 

    Form the dough into a ball or roll and put it back in your oiled bowl to rise another hour in a warm place. 

    Have a baking tray ready lined with non stick paper. 

    Working with a few pieces at a time break pieces of dough the off, keeping the rest covered. I weighed my pieces to be 75 grams each. 

    Squash each piece into a round with the palm of your hand, fold the edges to the centre, flip over and smooth into a ball. 

    Repeat until you have buns evenly spaced on your tray, cover tray loosely with oiled plastic wrap. Allow to rise for the final time for one hour. 

    Preheat oven to 220C (210 fan).

    Make your cross mixture by placing flour in small bowl and adding enough water to form a pipeable paste. Transfer mixture to a piping bag fitted with a round writing tip or fill ziplock bag and snip one of the bottom corners.

    Once the final rise is done, pipe a cross on each bun. 

    Bake in preheated oven for 20 mins on the middle shelf. As you won't be able to see if they are golden due to pink colouring, I have allowed for tester buns and you will still end up with a complete dozen...a bakers "snack" we could say. 

    For the glaze, stir the sugar and water together heat stirring until it starts to simmer, simmer a couple of minutes and then remove from heat. 
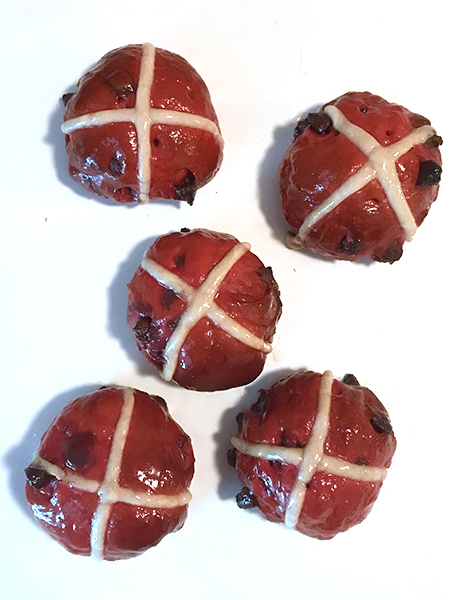
    Brush the hot glaze over the buns. 

    Buns are best served warm on the day. 

    I served mine filled with scoops of chocolate ice-cream but do try toasted with a smear of chocolate hazelnut spread too. 

    *Ascorbic Acid (Vitamin C) from chef supply stores, health food stores and pharmacies. 

    *Beetroot powder is available from chef supply stores and selected supermarkets. In Australia I use Melbourne Food Depot or Herbie's brands. 

    Other uses for beetroot powder: apart from changing up a plain hummus or tzatziki you can...

    add it straight to white chocolate... I love this for the berry/tingly flavour it brings, balancing the sweetness of the white. Stir in 1 teaspoon of sifted beetroot powder for every 100g (3.5oz) of tempered white chocolate, mould, make bark/shards as per usual. 

    Use as a natural colourant for you icing and frosting. 

    Or love a bit of drama? Try adding beetroot powder to your mayo. 

    Happy Baking :) 

    You might also be interested in Candied Beetroot Slices 

    Or prefer and bunny shaped egg

    Saturday
    Jan202018

    Milo Panna Cotta

                               milo panna cotta with milo cereal rubble

    Join me on Facebook

    Ahhhh a food "earworm" ....

    When I opened the tin of biscuit crumbs in last weeks post I thought "just like a Milo tin" and that's all it took for Milo, Milo, Milo, Milo to be stuck in my head. 

    "Solved" with a trip to the supermarket where I bought myself a tin of Milo and a brand of gelatine sheets I hadn't tried before... all came together as today's Milo panna cotta. We have loved Milo here in Oz since it was first launched in 1934 at the Sydney Royal Easter Show, brainchild of Australian Thomas Mayne. 

    Milo /ˈmaɪloʊ/ is a chocolate and malt powder that is mixed with hot or cold water or milk to produce a beverage popular mainly in Australia and New Zealand and some other parts of the world. wikipedia

    'Milo' takes it name from Milo Of Croton a 6th century BC champion wrestler. Milo products to this day have sport related themes. 

    Apart from the drinking powder, Milo comes in other products too like premix, ice-cream and the cereal I'm using today for the topping adding part of the much needed textural crunch. 

    Lets start with gelatine leaves that are the setting agent in our panna cotta.

    New to leaves? Leaves are used for a smoother mouth feel and/or a clearer finish. There is no gelatine after taste either. Great product for panna cotta. Somewhat confusing bloom strength grading system from bronze to titanium. Bloom strength is how firm your jelly (Jello) will be. 

    I usually buy gold or occasionally titanium gelatine leaves from chef supply stores. I was happy to see gelatine leaves in the supermarket but surprised when I purchased it's not marked on pack what strength the leaves are. Checking McKenzies online I found out 'McKenzie’s Gelatine powder has bloom strength of 210 – 240 g (Platinum strength). McK Gelatine leaves have a bloom strength of 220 – 250g (also Platinum strength).'

    Oh. That was my though "Oh" there may have been a slight expletive following that. Just a little suprised but I love McKenzies, it's the brand of baking powder and soda I use. 

    McKenzies have a recipe for panna cotta with 6 gelatine leaves on their site. That's too much for our panna cottas so I made two batches with far less gelatine, one with 3 leaves and one with two... now I'd prefer two or less but for no fail getting the little ones out of the ramekins lets go with three where you still get a nice wobble particularly on the moulded ones. 

    Panna cotta is easy, it's the same as making homemade jelly or Jello just with dairy for the liquid. This recipe makes four 125 ml serves (four 1/2 cups) or eight 1/4 cups. Set in glasses or in ramekins to turn out.

    Ingredients Panna Cotta

    250ml of double cream

    250ml of milk (I use 2% because that's all I had)

    I tsp of pure vanilla extract

    15 grams of sugar

    60 grams of Milo powder

    3 platinum gelatine leaves

    Fresh raspberries for top

    milo cereal, lightly crushed cocoa nibs and freeze dried raspberries to top panna cotta

    Ingredients for Chocolate Rubble 

    Chocolate flake breakfast cereal (I used Milo cereal)

    Cocoa nibs, broken roughly

    Freeze dried raspberries 

    Optional extra toppings

    Chocolate sauce

    Berry sauce

    Vanilla whipped cream with Milo powder on top

    Method 

    Soak three *gelatine leaves in a bowl with three cups of cold water for 5 to 10 minutes. After that time you should be ready to use, remove leaves from bowl and squeeze out excess water. 

    Put the cream, milk, sugar, vanilla into saucepan and heat until almost boiling but not... you know you can see teeny bubbles starting to form around edge of pan. 

    Quickly add the milo powder and whisk to completely dissolve. 

    gelatine leaves with water squeezed out

    Swap the whisk for spoon you don't want to add extra air/bubbles at this stage.

    Remove saucepan from heat and add the soaked gelatine leaves that you have squeezed the water from. 

    Stir with spoon for at least 3 minutes, even when you think it's okay after one minute the *three minutes stirring ensures the gelatine is fully incorporated. 

    Divide the mixture between the glasses or ramekins you are using. 

    Leave to cool, then refridgerate (covered) for six to 24 hours. 

    unmoulded from 1/4 cup ramekin Milo panna cotta

    inside texture 

    You want to serve your panna cotta chilled but not "fridge cold", leave glasses at room temperature for 10 minutes before topping and serving. To unmould panna cotta, dip the base/sides of each ramekin quickly into hot water and gently turn out. 

    Top with chocolate rubble and fresh raspberries, don't worry if you don't have all matching glasses the same amount of rubble/raspberries will tie the dessert theme together. 

    Use to optional sauces or whipped cream as desired. 

    Notes: 

    * don't have Milo available in your supermarket, look out for it in your asian grocery store.

    * if on the off chance after adding your gelatine and stirring 3 minutes you have a little gelatine undissolved in your mix you can put your saucepan on a gentle heat, stirring until it's melted. 

    * you can omit the sugar completely if you don't have a sweet tooth, there is sugar already in the Milo. 

    Happy Baking :) 

    Wednesday
    Apr122017

    Cauliflower Cheese

                                                         cauliflower cheese

    Join me on Facebook

    I laughed out loud when I saw that this months ABC baker's challenge was cauliflower cheese, you forget we don't all have the same food experiences. To me cauliflower cheese is bog standard but lovely, old school cooking, something that could still be part of your Sunday roast or you have a distant memory of your gran's. 

    Cauliflower cheese is served mainly as a side dish, paired with a roast dinner or another protein. Cauliflower in Australia now is more often seen in curries, stuffed in flat breads like Gobi ke Parathe (YUM!!), salads, roasted, stir fries, soups, as a faux pizza base or the popular cauliflower rice but there is still a place for the classic cauliflower cheese in your repertoire. 

    supermarkets and fruit/veg shops carry the already chopped cauliflower for quick low carb cooking. 

    Baking along with a talented group of bakers that are a part of ABC (Avid Baker's Challenge), this month was 'Cauliflower Cheese' from Smitten Kitchen

    I've made the basic cauliflower cheese in individual portions with a couple of small changes to Smitten Kitchen's recipe. I also include a wasabi variation and a gluten free cauliflower and cheese soup recipe.  

    The first printed version of cauliflower cheese is in the 1861 publication of 'Beeton's Book of Household Mangement'. Where hot white sauce (Mrs. Beeton uses a sauce blanche) is poured over the cooked cauliflower, topped with grated parmesan, bread crumbs and then put under the griller (broiler/salamander) until bubbling and golden.

    The cheese sauce for the cauliflower cheese today is a Béchamel (white sauce), a sauce that is Italian in origin but now is probably more well known as one of the French mother sauces. Béchamel is the base to other sauces, add cheese like we are today and it's "Mornay sauce".

    I made buckets (literally) of Béchamel decades ago when working in seafood retail/catering, some became mornay sauce, used in seafood crepes, seafood pies, seafood bakes and goodness proving it was a long time ago seafood "vol au vents". 

    Start by preparing your cauliflower by cutting it into florets and either steaming them or boiling them. I cooked them to the "cooked but still holding shape stage", as I didn't bake the dish further as Smitten Kitchen did. 

    cauliflower florets ready for steaming

    Whilst the cauliflower was steaming, butter was melted and flour added and stirred together until flour is cooked off, 2 to 3 minutes to make the white roux.

    Milk is added and stirred continuously until thickened and hot. Grated mature cheddar cheese (tasty) was stirred in then.

    *I upped the flour used to 40 grams and reduced the butter to 50 grams. I reduced the cheese too, Smitten Kitchen uses 155 grams, I used 75 grams to be added to the sauce and 25 grams to be sprinkled on top and I used 2 cups (500ml) of 2% milk. I prefer to make the sauce thicker because you can always thin it with a little warm milk but not visa versa.  

    Time to add the seasonings. 

    Coleman's mustard strong enough to "put hairs on your chest"as nan would say.

    I added a large teaspoon of prepared English mustard, a grate of fresh nutmeg and a shake of white pepper for the seasoning. Taste the sauce and adjust the seasoning to personal taste. 

    Cauliflower was arranged in 4 separate ramekins, then topped with the sauce, sprinkled with grated cheese and put under a hot grill (we say "grill" in Australia... it's broiler or salamander elsewhere) to gratin. Serve when bubbly and golden. 

    Change up your cheese or veg

    Change your cheese for another strong tasting cheese (be careful if using a blue cheese, you could end up with a gray coloured sauce) or if using a milder cheese pump up the flavour with more mustard or chilli and the like. Use broccoli or cauliflower and broccoli instead of plain cauli, or how about potatoes or sweet potatoes for a change? Mornay sauce matches most vegetables, adjust seasonings accordingly and if your not going for a baked or gratin finish then add a crispy finishing touch. 

    I used a wasabi cheddar for an alternative version of cauliflower cheese that I'll be serving with fish this Easter. A ittle wasabi paste was added for an extra kick. Wasabi cheddar cheese was swapped out for the mature cheddar and wasabi paste used instead of the mustard, nutmeg and white pepper. Pour the hot sauce over your cooked cauliflower, I topped with butter browned panko crumbs and wasabi sesame seeds. 

    wasabi paste

    wasabi sesame seeds 


    Ooops, I was supposed to use the black bowls my "gee this is such a yellow sauce" thought carried onto the bowls.

    Gluten free Cauliflower Cheese soup

    A simple pureed veg soup is a nice gluten free addition to your Easter feast. 

    Ingredients

    1 medium cauliflower, cut into florets

    1 large leek or 2 medium onions, diced

    2 stick of celery diced

    I medium potato, peeled and diced 

    1.5 litres of salt reduced vegetable or chicken stock

    200 grams of grated matured cheddar cheese

    2 tablespoons olive oil 

    English mustard

    fresh nutmeg

    salt and pepper

    optional extra cheese for garnish

    Method

    In a large pot over heat the olive oil over a medium heat, and add all the cut vegetables. Stir and place a lid partially over pot, continue to cook for ten minutes. Stirring occasionally to prevent catching. 

    Add the stock and bring to the boil, reduce the heat then and simmer until veggies are soft. 

    Remove pan from heat, add the grated cheese and heaped teaspoon of English mustard and a light grating of nutmeg. Puree the soup in pot with a stick blender. If soup is too thick, thin with a little boiling water. Taste the soup, add salt and pepper to suit you and your family being mindful of what garnishes, if any, you are using. Serve the soup piping hot with extra crumbled or grated cheese and grated nutmeg. 

    Happy Baking :)  

    You might be interested in a quick and easy peach verrine 

    or make some agar agar jelly pearls

    Sunday
    Mar122017

    Liège Waffles

                                                  Mini Liège waffle dipped in melted chocolate

    Join me on Facebook

    Liège waffle: brioche based waffle with pearl sugar, rumoured to have been invented during the 18th century by the chef to the Prince-Bishop of Liège.  

    Haven't had a burger in anything but a brioche bun in the last decade? This waffle is for you and all your brioche loving friends. Belgium has many varieties of waffles but today is the "Liège", brioche dough cooked in a waffle maker with pearl sugar. 

    Antonin Carême. 1784-1833 

    Early versions of what is now the Liège waffle were a brioche base with crushed block sugar on top as a garnish; then a nod to Antonin Carême, the famous Parisian chef has several waffle recipes with crushed/pearl sugar. However, a full recipe for the gaufre de liège (liège waffle) wasn't published until quite late in 1921.

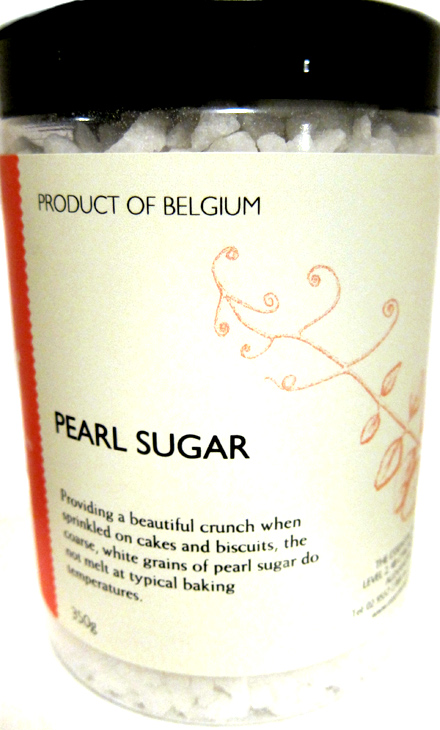
    For today's recipe you will need pearl sugar. 

    Pearl Sugar a beet sugar compressed into uneven nuggets. 

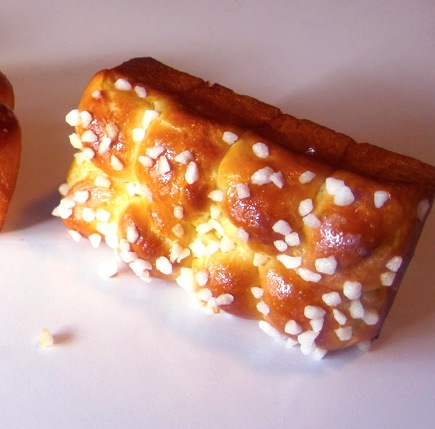
    Pearl sugar is paired most frequently with brioche, like these mini loaves I baked previously. The pearl sugar even though it has been baked keeps it's shape. 


    Baking along with a talented group of bakers that are a part of ABC (Avid Baker's Challenge), this month was the 'Liège Waffles' from Smitten Kitten

    The ingredients and changes I made to this months recipe in bold.... 

    1/2 cup (120 ml) milk, whole is ideal (replaced whole milk with water, milk, particularly whole milk makes dough heavier
    1/4 cup (60 ml) water
    2 tablespoons raw sugar, brown sugar or honey (used golden syrup to build to the caramel/burnt sugar flavour, in Australia our tablespoons are larger so I used 1 1/2 tablespoons) 
    1 packet (7 grams or 2 1/2 teaspoons) active dry yeast ( I used instant yeast same weight, in changing yeast the method also changed) 
    2 large eggs, ideally at room temperature
    2 teaspoons vanilla extract
    3 2/3 cups (460 grams) all-purpose flour, divided (plain flour for Australians)
    1 teaspoon coarse or kosher salt (I used Maldon) 
    14 tablespoons (200 grams or 7 ounces) unsalted butter, softened
    1 1/3 cups pearl sugar (cut the sugar amount, scooped out a half a cup of pearl sugar and sprinkled on top of scoops of the dough rather than incorporating into the dough)

    flour mixture with golden syrup and water

    The method I had to change because of using instant yeast. All the flour and instant yeast were whisked together, then the salt whisked through, water and golden syrup added. Popped the bowl onto the kitchen aid and using the dough hook and speed 2 until I had a rough dough.

    rough dough

    Eggs were added in, then well softened  butter added a spoonful at a time  still using the dough hook until incorporated. Well softened butter means the butter holds it's shape but if you touch it ever so lightly it will smear . Seven minutes mixing on 2 and it's all done. 

    not as silky as typical brioche dough, it's firm. 

    I should have cut down the flour measurement somewhat, not keen on the tight texture. More fluid or less flour would have been good to improve the hydration in dough. There is a couple of rises at this stage. For the full original recipe and method see Smitten Kitten.  

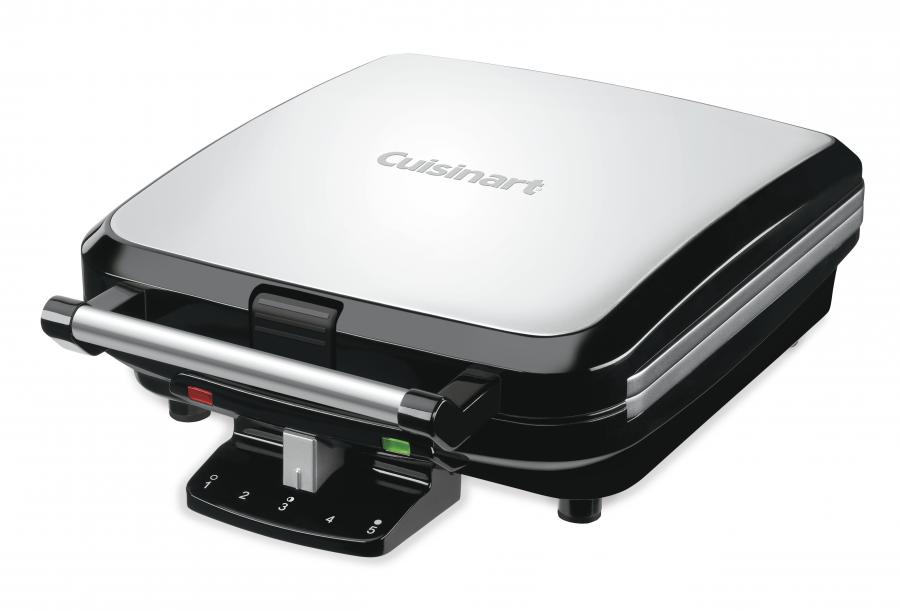
    You'll need to have your waffle iron ready and pre heated, stove top or electric, the deeper Belgian waffle makers are the perfect choice but recipe will work in standard waffle makers too. Mine is the 'Cuisinart 4 Slice Belgium Waffle Maker'.

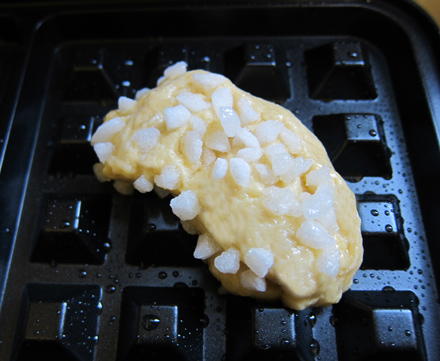
    Here is a scoop of waffle mixture... literally just used a dessert spoon and scooped spoonfuls of room temperature brioche dough onto oiled waffle maker. My shapes weren't really the traditional oval, more of a plump round oval (there is so such a thing!!) shape. They took 4 minutes on setting 2 to cook. 

    Why oiled when it's non stick? Always oil your non stick cookware if the recipe contains a high sugar content or low fat mixture like sponge. Using the pearl sugar with oiled waffle plates meant clean up was a breeze. I made 28 waffles all up in this sizing.

    Youtube clip from 'The Hostel Girl' blog she is in europe talking and eating waffles. 

    Liège waffles are a street food, food truck food, something you would grab at a market as you were walking around. Usually eaten plain they can also be plated with a chocolate sauce. They are meant to be eaten warm and immediately, you may wish to half recipe. They don't keep well and you will have to reheat in microwave and wrapped in oven to freshen them. Brioche does freeze well, but because of the sugar topping you will get sugar weeping/stickiness on defrosting. 


    Lets have a look inside... yep, it's brioche, fluffy plus crisp and crunchy due to the pearl sugar and waffle iron. The pearl sugar topping has almost totally smashed and melted. They are more substantial than a standard waffle, they are enriched bread and are not meant for giant stacks with lots of toppings. Although you could if you wanted to, maybe you like brioche and whipped cream and chocolate and cherries on top.  

    Mine were served with cups of melted chocolate and strawberries for dipping, great with coffee but would be fabulous with champagne for a celebratory brunch. Do you make a wickedly good hot chocolate? Hot chocolate to sip on or dip the waffles in would be great too. Spice with the traditional cinnamon, or try a dash of cardamom or saffron to spice things up. Consider serving with berries to provide an acid component to clean palate and don't be afraid to keep a bit of your favorite enriched dough aside when baking and try it out in your waffle maker. 

    Happy Baking :) 

    You might also be interested in Caramel Stoopwafel cupcakes

    or make a fondant 50 shades of Grey cupcake

    Monday
    Feb062017

    The Browniest Cookies 

                                        the browniest cookies

    Join me on Facebook 


    Baking along with a talented group of bakers that are a part of ABC (Avid Baker's Challenge), this month is the 'Browniest Cookies' from Smitten Kitten. 

    Like all brownies it's easy to put together, chocolate is melted with butter and sugars whisked in.

    White sugar to creates the brownie crust and brown sugar to keep the cookies soft. 

    Eggs, vanilla, baking soda and salt are whisked in next, followed by sifted cocoa powder. 


    Flour is stirred in followed by chocolate chunks. I divided mixture in half and added half cup of fresh raspberries to the batter.  Both batters were then refrigerated. 

    The recipe calls for the batter to be scooped, I rolled in smaller 25 gram balls and slid the trays into the freezer for 15 minutes to insure they would keep their shape. 

    Resulting cookies are fudgy, with a thin crisp crust, definetly chocolately but did polarise the testers with the flavour.  They aren't overly sweet tasting cookies, but it was the touch of bitterness they bring with so much cocoa powder and unsweetened chocolate that some weren't keen on.  

    I drizzled melted chocolate on the raspberry ones and added love heart sprinkles for Valentines Day.  

    Tiny cookies won't crinkle as much due to chilling and the short bake time... about 6-7 seven minutes.

    The recipe today is similar to Martha Stewart's 'Chocolate Crackle' type cookies that we have made every Christmas for over a decade. The other Martha Stewart cookies that are brownie/crinkle like are the 'Outrageous Chocolate Cookie' we also make for holidays. 

    my step son made these brownie cookies for high school food tech in 2009   

    Today's cookies are good, but won't replace the Martha Stewart cookies in our Christmas repertoire. 

    Like a full cocoa flavoured cookie? get the full recipe for today's bake from Smitten Kitten 'The Browniest Cookies' 

    Happy Baking :) 

    You might also be interested in making Eric the Valentines Emu

    Friday
    Feb032017

    Year of the Rooster cupcake

                                           year of the rooster cupcake

    Join me on Facebook

    After the Monkey and before the Dog, every twelve years comes the Rooster. 

    Year of the Rooster .... 1933, 1945, 1957, 1969, 1981, 1993, 2005, 2017, and 2029.

    I find the Chinese horoscope so confusing! It is the year of the rooster, the fire rooster or the female fire chicken. The chicken puzzles me, a chook is not a rooster. I decided to go with the Rooster like the ones you see as Chinese prints adorning restaurants and my Dad's nursing home was rather fond of them too. 

    If your in Melbourne the Chinese New Year festival runs to the 12th of February at Crown Casino, lots of fun and celebratory goings on around town. 

    Making a Rooster.... 

    I made a simple shape from a 50% white modelling chocolate, 50% fondant. Toothpicks mark the leg holes.

    I cut feather shapes from orange fondant for around the neck and marked a centre line. Marked the body with crescent shapes. 

    Black fondant was rolled super thin (add some cmc if necessary) and cut into longer feather shapes. The shapes are then shredded along the edges. 

    The pieces were attached to the body with a light touch of water. Here I am starting to attach the comb and playing with placement of tail feathers. 

    Gold leaf was applied to cupcake with a brush small brush, lifting on small pieces and laying them on pre dampened surface. 

    The finished dry rooster was shaded in petal lustre dusts, gold, red and blue. Attached to the cupcake with toothpick legs for easy removal. 

    Happy Chinese, Lunar, Spring Festival time :) 

    You might also like Chinese chicken wings 

    Or back to year of the Dragon

    Sunday
    Jan222017

    Olive Bread: Rose's Bread Bible Bakers


                                                  Olive bread 'The Bread Bible'

    Join me on Facebook

    I love an olive baguette, stands to reason I was looking forward to baking Rose's olive bread. 

    Started with making a 'biga' (an Italian pre-ferment), it's easy, combine flour, a little instant yeast, a tad of optional malt powder with room temperature water.

    Stirred until smooth and it comes away from the side of the bowl.

    Placed in an oiled two cup container and covered for six hours, it's ready to use at this point or pop in fridge for up to three days. Mine was refrigerated for two days.

    Ready for the mixer now (instructions are also included for hand and food processor mixing in 'The Bread Bible'). Flour, more yeast, biga are mixed together with water until a rough dough forms.

    Rough dough mixed

    After a short covered rest, salt is added and the dough is returned to the mixer to be kneaded until smooth.

    Dough is covered and given a short time to relax before the olives are added. 

    chopped kalamata olives mixed with a little flour

    Dough is allowed to rise now until doubled in size. Shaped in a banneton or colander lined with a tea towel... and this the stage there is a slight hiccup, ok LARGE hiccup. 

    I go to preheat the oven and the electrics were out, I could light the gas with a match but I can't run the oven without the fan. 

    I stayed calm... ha ha no I didn't I had tears running down my face despite self talking to myself to "toughen up". I went and punched down the partially risen shaped loaf and froze the dough. 

    Oh the fuse box!! Apparently you are supposed the check the fuse box outside, which I did the next day. Even though the switch marked oven was on there was a random unmarked switch down... yep, oven back on YAY!

    Soooo, I defrosted the dough and baked it off in a batard (torpedo) loaf shape because it was faster. 

    Hmmm, I thought the dough didn't look right defrosted and reshaped, though apart from not getting as much crust as I expect I would have gotten without freezing... all was good, delicious in fact. Well flavoured, moist, light but with just enough bite in the texture. 

    Now the tomatoes... Nanna loved a grilled tomato and always made me grilled tomatoes on toast for breakfast, I liked them but like fresh too so I went a bit "Ottolenghi" and caramelised half the tomatoes in a pan, keeping the other half raw. Mixed together they top my olive toast. With a lemon olive dressing, baby basil and rough cut herbs, the best ever Sunday brunch on a hot summers day.

    Happy Baking :) 

    Today has been one of the 'Rose's Bread Bible Bakers' bakes where a group of fabulous bakers get together and bake from the pages of 'The Bread Bible'.

    The Bread Bible by Rose Levy Beranbaum is available from Amazon and all discerning book stores.  

    You might also like Little Lemon and Lime Lamingtons Australia Day January 26th.   

    Wednesday
    Jan042017

    "Levy's" Real Jewish Rye Bread: Rose's Bread Bible Bakers

    "Levy's" Real Jewish Rye Bread 'The Bread Bible'

    Join me on Facebook

    Rose speaks of in 'The Bread Bible' that she likes rye bread 'studded with constellations of caraway seeds' and apparently I do too!! 

    Ahh that moment your loaf of bread is so awesomely "perfect" and you are so excited and then realise it's hard to get people enthusiastic over a loaf of bread, but "dang" this was my perfect loaf, turning the corner, light bulb type moment in bread making.  

    It started with me making a sponge (a starter), bread flour, rye flour, instant yeast, sugar, barley malt syrup and warm water all go in bowl.

    Then it's mixed until it forms a smooth batter bubbly with air.

    Ok, we are up to whisking the remainder of the bread flour with more instant yeast, caraway seeds and salt. The flour mixture was gently spooned over the sponge and covered with plastic wrap for night in the fridge.

    Next morning there was much bubbling coming through the flour blank and after coming back to room temperature I used the kitchen aid (there is instructions for hand mixing) to knead.  

    The resulting dough was placed in a raising container and allowed to rise for a couple of hours. Once risen the dough was shaped into a rectangle and given a business letter turn before going off for another rise.

    I'd already decided I wouldn't use the cloche to bake the bread as another bread bible baker mentioned the loaf was large and I too wanted smaller slices so a batard loaf seemed right. 

    Almost all went wrong at this point as I was following Rose's excellent video on how to shape a batard (torpedo) loaf when I realised my loaf was too long for the baking sheet. I did the thing known as "emergency squashing the ends", which you shouldn't do, but do pre measure your baking sheet.  

    *note my dough was dimpled because it's a rye bread, ditto I didn't spritz with water... and I have started with squashing the ends in this photo ha ha!

    Into my preheated (hot) oven, I placed my loaf on a silpat lined baking tray onto the already heated baking tray in the oven. Ice cubes were added to another tray in the bottom of the oven to create steam. 

    TAAA DAAA!! Ok don't judge it's acutally a dodgy phone pic.. with a ruler next to it to show the length, this is my life I'm sending out photos of my bread to friends.

    And the interior, it wouldn't be a message to my friends if I didn't include "and look at the inside!!" pic.

    I am seriously happy with this texture and flavour of this bread, well seasoned it's a just eat alone bread and made wonderful sandwiches but I thought I'd show you one of the things I do with the "close to the end" bits.

    I make "salad crisps" from bits of homemade bread. Slice as thinly as you can, it's ok if you get odd shaped pieces. Lay out your thin bread slicees on a lined baking tray and either brush lightly with a neutral oil (didn't want to interfere with caraway flavour) or spray with cooking oil and bake in a hot oven for 10 to 15 minutes until golden brown and crisp. Sprinkle with sea salt is desired. Perfect to add a textural element to a salad of fresh pickled red radishes, smoked salmon, avocado and some assorted "leaves". 

    Happy Baking :) 

    Today has been one of the 'Rose's Bread Bible Bakers' bakes where a group of fabulous bakers get together and bake from the pages of 'The Bread Bible'.

    The Bread Bibleby Rose Levy Beranbaum is available from Amazon and all discerning book stores. 

    You might also be interested in a little bit of retro with Honey Joy Cupcakes

    Saturday
    Dec102016

    King Parrot

    the king parrot

    Awww, I'm loving this wild King Parrot that has taken to "visiting" the decking outside my kitchen each day... brightens the baking morning :) 

    Saturday
    Dec032016

    Faux Gingerbread Mushrooms 

    faux gingerbread mushrooms, gold dusted ferrero rocher balls and chocolate shards. 

    Join me on Facebook

    You're planning on making a Bûche de Noël (Yule log) for your Christmas centre piece? Add some quick and easy forest---y charm with faux gingerbread mushrooms and gold dusted chocolates.  

    You will need Pfeffernüsse, the small spiced gingerbread cookie. I've used store bought but you could use homemade. 

    Put a little melted white chocolate on the back of a cookie, using a skewer drag through the white chocolate from outside edge inwards to create the mushrooms "gills", remove any excess chocolate from the centre with the end of the skewer. Put the cookie to one side to dry and repeat. 


    Once the chocolate is dry, with a small brush dust cocoa powder or brown cake dust (I used both) to colour and shade your mushroom cookies. 

    Roll a piece of marzipan (or modelling chocolate, or fondant) into a snake shake and cut lengths for stems. Attach stems with a tiny bit of white chocolate, allow to dry and add shading colour if needed.  All done :) 

    Add a golden touch to your truffles or bought chocolates...

    I've use ferrero rocher balls.... unwrap your chocolates and using a soft brush dust your chocolates with gold cake decorating/food dust.  

    Chocolate shards for surrounds: Spread tempered chocolate on a piece of non stick baking paper. Roll it up whilst still melted and pop in fridge to set, unroll and it will break into shards ready to use. 


    I went with a sprinkling of crisp freeze dried raspberry pieces for colour and a burst of flavour, they are a last minute addition as they soften fairly quickly when exposed to air. We used fresh blackberries and tiny fresh strawberries with last years cake. 

    Cacao nibs (often sold as cocoa nibs) are a nice addition for a more adult palate, crunch and a little bitter. 

    Happy baking, don't forget the Christmas bling :)