Navigation
SEARCH
This form does not yet contain any fields.

    Entries in yellow (18)

    Thursday
    Jan112018

    Golden Gaytime "The Crumbs"

                                        golden gaytime "the crumbs'

    Join me on Facebook

    'It's hard to have a Gaytime on your own' 

    Streets ice-cream advertising slogan

    First released in 1959 a Golden Gaytime is an ice-cream centre, choc dipped and biscuit crumbed on a stick.

    The flavour most identifiable with a Golden Gaytime is toffee and vanilla, although it was originally Strawberry Shortcake, Cassata Roma (I would have like to try that one!), Raspberry Rough and Turkish Delight before the 1970's saw the Golden Gaytime actually become a bit more golden with it's now iconic toffee/vanilla combo. 

    Now days it's available in what most of think as original toffee/vanilla, on sticks, in tubs and as an ice-cream sandwich. Plus new flavours like Pina Colada, Choc Mint, Cappucino and Unicorn. 

    And now for the "crumbs" the smart marketing department at Streets released limited edition tins of the crumbs that coat the ice-cream. Yep, a tin of crumbs. 

    Open the tin and as expected "crumbs". Guess what I put in the Christmas stocking this year along with the *limited release vegemite! 

    For Aussies this is the taste of Golden Gaytime, especially when you pair it with vanilla, toffee and a bit of milk chocolate. 

    Think choc dipping cubes of toffee swirled vanilla cheesecake and topping with the crumbs, invent a cocktail and toffee dip the rim of a cocktail glass and dip into the crumbs, swirl toffee into vanilla yogurt and sprinkle on the crumbs... few choc flakes too if you are starting the New Year living dangerously. 

    Any patisserie application where you would use Paillete Feuilletine flakes for crunch. 

    My first try using them was coating the inside of a choux buns with milk chocolate, a scoop of store bought vanilla ice-cream and a good drizzle of toffee with the crumbs on top. 

    I scrapped my usual toffee sauce, I love it but it belongs in a sticky date pud not summery ice-cream. Ended up going with a butterscotch sauce from Taste where I used golden syrup replace some of the sugar. It's a quickie to avoid hot days in kitchen over summer.

    Butterscotch... moving towards toffee sauce. 

    Ingredients

    2/3 cups of pouring cream

    1/2 cup of packed brown sugar

    1/4 cup of golden syrup (it can be maple or honey... each adds a hint of that flavour)

    2 1/2 tablespoons of cubed butter

    2 teaspoons of vanilla 

    Method

    Place all the ingredients in a saucepan. Stir over medium heat for 3 - 5 minutes until well combined.

    Watch for toffee rising up in pot, don't be tempted to multi task you don't want the toffee covered stove. Keep stirring to prevent catching. 

    Increase heat and bring to boil, once boiling reduce heat to low and cook uncovered, stirring often until sauce thickens slightly. Takes about 5 minutes. 

    Once cooked the bubbles subside and you have your sauce.

    Set aside to cool for a couple of hours. Serve at room temperature... swirling it over your creation... top with crumbs. 


    This sauce keeps in an airtight jar in the fridge for a week or so. It does set firmer in fridge so bring to room temperature before serving.

    *the tins of crumbs were a limited Christmas release... if you missed out try the end of this year or give Streets a call and see if a bakery near you can supply you with any from a bulk lot. 

    Happy Baking :) 

    Wednesday
    Apr122017

    Cauliflower Cheese

                                                         cauliflower cheese

    Join me on Facebook

    I laughed out loud when I saw that this months ABC baker's challenge was cauliflower cheese, you forget we don't all have the same food experiences. To me cauliflower cheese is bog standard but lovely, old school cooking, something that could still be part of your Sunday roast or you have a distant memory of your gran's. 

    Cauliflower cheese is served mainly as a side dish, paired with a roast dinner or another protein. Cauliflower in Australia now is more often seen in curries, stuffed in flat breads like Gobi ke Parathe (YUM!!), salads, roasted, stir fries, soups, as a faux pizza base or the popular cauliflower rice but there is still a place for the classic cauliflower cheese in your repertoire. 

    supermarkets and fruit/veg shops carry the already chopped cauliflower for quick low carb cooking. 

    Baking along with a talented group of bakers that are a part of ABC (Avid Baker's Challenge), this month was 'Cauliflower Cheese' from Smitten Kitchen

    I've made the basic cauliflower cheese in individual portions with a couple of small changes to Smitten Kitchen's recipe. I also include a wasabi variation and a gluten free cauliflower and cheese soup recipe.  

    The first printed version of cauliflower cheese is in the 1861 publication of 'Beeton's Book of Household Mangement'. Where hot white sauce (Mrs. Beeton uses a sauce blanche) is poured over the cooked cauliflower, topped with grated parmesan, bread crumbs and then put under the griller (broiler/salamander) until bubbling and golden.

    The cheese sauce for the cauliflower cheese today is a Béchamel (white sauce), a sauce that is Italian in origin but now is probably more well known as one of the French mother sauces. Béchamel is the base to other sauces, add cheese like we are today and it's "Mornay sauce".

    I made buckets (literally) of Béchamel decades ago when working in seafood retail/catering, some became mornay sauce, used in seafood crepes, seafood pies, seafood bakes and goodness proving it was a long time ago seafood "vol au vents". 

    Start by preparing your cauliflower by cutting it into florets and either steaming them or boiling them. I cooked them to the "cooked but still holding shape stage", as I didn't bake the dish further as Smitten Kitchen did. 

    cauliflower florets ready for steaming

    Whilst the cauliflower was steaming, butter was melted and flour added and stirred together until flour is cooked off, 2 to 3 minutes to make the white roux.

    Milk is added and stirred continuously until thickened and hot. Grated mature cheddar cheese (tasty) was stirred in then.

    *I upped the flour used to 40 grams and reduced the butter to 50 grams. I reduced the cheese too, Smitten Kitchen uses 155 grams, I used 75 grams to be added to the sauce and 25 grams to be sprinkled on top and I used 2 cups (500ml) of 2% milk. I prefer to make the sauce thicker because you can always thin it with a little warm milk but not visa versa.  

    Time to add the seasonings. 

    Coleman's mustard strong enough to "put hairs on your chest"as nan would say.

    I added a large teaspoon of prepared English mustard, a grate of fresh nutmeg and a shake of white pepper for the seasoning. Taste the sauce and adjust the seasoning to personal taste. 

    Cauliflower was arranged in 4 separate ramekins, then topped with the sauce, sprinkled with grated cheese and put under a hot grill (we say "grill" in Australia... it's broiler or salamander elsewhere) to gratin. Serve when bubbly and golden. 

    Change up your cheese or veg

    Change your cheese for another strong tasting cheese (be careful if using a blue cheese, you could end up with a gray coloured sauce) or if using a milder cheese pump up the flavour with more mustard or chilli and the like. Use broccoli or cauliflower and broccoli instead of plain cauli, or how about potatoes or sweet potatoes for a change? Mornay sauce matches most vegetables, adjust seasonings accordingly and if your not going for a baked or gratin finish then add a crispy finishing touch. 

    I used a wasabi cheddar for an alternative version of cauliflower cheese that I'll be serving with fish this Easter. A ittle wasabi paste was added for an extra kick. Wasabi cheddar cheese was swapped out for the mature cheddar and wasabi paste used instead of the mustard, nutmeg and white pepper. Pour the hot sauce over your cooked cauliflower, I topped with butter browned panko crumbs and wasabi sesame seeds. 

    wasabi paste

    wasabi sesame seeds 


    Ooops, I was supposed to use the black bowls my "gee this is such a yellow sauce" thought carried onto the bowls.

    Gluten free Cauliflower Cheese soup

    A simple pureed veg soup is a nice gluten free addition to your Easter feast. 

    Ingredients

    1 medium cauliflower, cut into florets

    1 large leek or 2 medium onions, diced

    2 stick of celery diced

    I medium potato, peeled and diced 

    1.5 litres of salt reduced vegetable or chicken stock

    200 grams of grated matured cheddar cheese

    2 tablespoons olive oil 

    English mustard

    fresh nutmeg

    salt and pepper

    optional extra cheese for garnish

    Method

    In a large pot over heat the olive oil over a medium heat, and add all the cut vegetables. Stir and place a lid partially over pot, continue to cook for ten minutes. Stirring occasionally to prevent catching. 

    Add the stock and bring to the boil, reduce the heat then and simmer until veggies are soft. 

    Remove pan from heat, add the grated cheese and heaped teaspoon of English mustard and a light grating of nutmeg. Puree the soup in pot with a stick blender. If soup is too thick, thin with a little boiling water. Taste the soup, add salt and pepper to suit you and your family being mindful of what garnishes, if any, you are using. Serve the soup piping hot with extra crumbled or grated cheese and grated nutmeg. 

    Happy Baking :)  

    You might be interested in a quick and easy peach verrine 

    or make some agar agar jelly pearls

    Saturday
    Oct032015

    The Monkey's Paw cupcake

                                                             'The Monkey's Paw' cupcake

    Join me on Facebook

    "The first man had his three wishes, yes," was the reply. "I don't know what the first two were, but the third was for death. That's how I got the paw."                          W. W. Jacobs 'The Monkey's Paw'

    The Monkey's Paw: Ahhh haaaa my step son Dan and I love this tale, a supernatural/horror story by W. W. Jacobs first published in England in 1902. 

    In the short story, three wishes are granted to the owner of the monkey's paw, but the wishes come with an enormous price for interfering with fate

    And proving yet again I've watched too many episodes of 'The Simpsons'...'Treehouse of Horror 2' season three, episode seven. 'The Monkeys Paw' :)

    The Monkey's Paw itself is described in the short story as "it's just an ordinary little paw, dried to a mummy."

    Ok, lets make a little mummified paw.

    I went with 50% fondant / 50% white modelling chocolate... I used "orange" just so the demo photos are clearer, that or I was thinking of Bart's shirt.  You could use 100% dark modellling chocolate and do away with colours. 

    Started with a ball

    Squished the ball on one side and roughly sliced my monkey "fingers" into the rounded opposite side. 

    Shaped my paw into what I thought I mummified monkeys paw would look like. I mainly used the toothpick to apply the details. 

    The wrist was trimmed at this stage and I added a jagged cuff cut from rolled 50/50 mixture. 

    After the paws were dry, I used a black food pen to mark out features then dusted with a little nutkin brown petal dust and finished with dogwood brown petal dust.  If you used 100% dark modelling chocolate, a brush of cocoa and drinking chocolate will add interest without have to add colourings.  

    Thread a toothpick into the palms of the paws and attach to your fondant or frosted cupcakes. 

    Happy Baking :) 

    You might also be interested in making a 'Catrina' for Day of the Dead.  

    Sunday
    Jul192015

    Kourambiethes Rose's Alpha Bakers

    Kourambiethes (Greek Biscuits) 'The Baking Bible'

    Join me on Facebook

    Aristotle wore an icing sugar moustache. 

    With a portly build and chubby hands, I was trying not to stare at the child sized more like a four year old than the eighteen month year old his parents professed him to be. That's how it began, my first after school job babysitting Aristotle in the back of the Greek delicatessen. 

    It was pre Christmas rush, time for freshly baked Kourambiethes. Trays of snowy white crescents and clove dotted balls drifted past, aromas of spiced oranges and roses trailing in the air... then again, it could have been Aristotle's breath!

    Today's bake from 'The Baking Bible' is Kourambiethes (Greek biscuits/cookies), a light shorbread usually made with the Greek brandy Metaxa in the recipe (orange juice if going alcohol free), with or without nuts these are always delicious and never more so than Rose's recipe that uses whipped clarified butter.  

    The recipe starts with clarifying the butter. Lots of butter!!

    Cubed butter is melted.

    Foam can be skimmed off the top of melted butter as your going if desired, using a spoon or a small slotted spoon being careful not to remove too much of the butter.

    Butter is strained through the muslin to remove all milk solids. 

    Chilled clarified butter is unmoulded ready to be chopped, transferred to a mixing bowl with icing sugar.

    My butter weight was short, perhaps due the ummm, zillion (or at least six) folds I made in the muslin. I had to melt more butter to strain to make up weight. I used food safe muslin, using food safe muslin rather than fabric from a fabric store ensures no chemicals unsafe for human consumption are used.

    Oh, better toast the almonds... these are what Australian's call slivered almonds this may differ in other countries, but it's what I toasted and then chopped.

    toasted chopped almonds

    Ten minutes mixing and you have a white fluffy butter mixture, egg yolks, brandy, vanilla are added before the chopped toasted almonds are mixed in and finally the flour and baking powder.

    After chilling the biscuit mixture is shaped into balls (I made the traditional crescent shapes too).

    Often garnished with a whole clove, you see these cookies at Christmas time and Pascha (Greek Easter), though I have had them at Greek Weddings too. 

    Keeping with tradition, I added a whole clove to the center of the round cookies. Despite the "tooth ache drops" smell when you open your cloves pack it won't taste like that once baked, what you get is a lovely touch of spice and a gentle spice aroma. 

    Wish you could taste these, the texture is so light and airy! Don't forget to remove your clove :)

    Would I bake again? Yes, love the light airy texture the clarified butter brings.

    Would I change anything? Yes, I like stronger flavours so I would add either rose water, orange water and orange zest. Salt... I'd add salt, all a bit sweet. Spices; would be nice with nutmeg, cardamom or experiment with teas and coffee. Break with tradition and change the nuts, have a peanut Greek biscuit, pipe on chocolate or perhaps top warm pistachio biscuits with freeze dried cherry dust. 

    How it works... now I've joined the fabulous existing alpha bakers, once a month I will post about what I have baked from Rose Levy Beranbaum's 'The Baking Bible'. This won't include the recipe due to copyright and publisher restrictions however, I will be posting how it went and photos of making/baking the gorgeous baked goods.

    The Baking Bible available from Amazon and all discerning book retailers. 

    You never know when you will need to make a fondant toe... a Cinderella stepsister toe cupcake

    Tuesday
    Jun302015

    Sugar, Sugar … White Sugar Chart

                                   Love bite 'The Simpsons' cupcake

    Join me on Facebook

    Years have gone by since I last saw an episode of 'The Simpsons', yet I nevertheless felt a sense of melancholia at the news Season 27 will see Marge and Homer legally separate... but hopefully it won't be for long. 

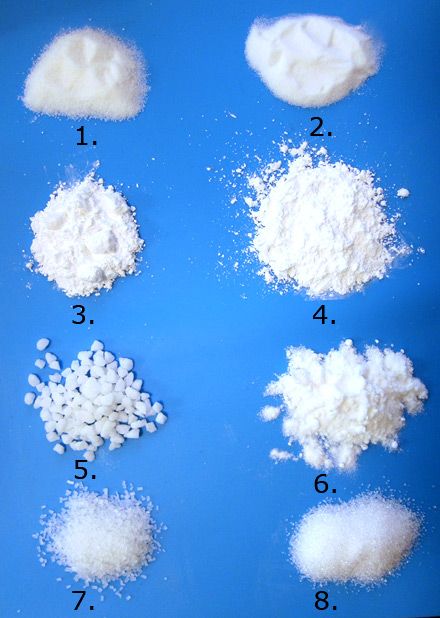
    Homer made me think of donuts, donuts made me think of icing and icing made me think of white sugar... so here we are a white sugar chart.

    1. White sugar (granulated) 2. Caster/Castor (superfine) 3. Pure icing sugar (pure confectioners sugar) 4. Icing sugar mixture (confectioners sugar with corn starch) 5. Pearl sugar (sugar nibs, hail sugar) 6. Snow sugar (snow powder) 7. &  8. Sanding sugar 

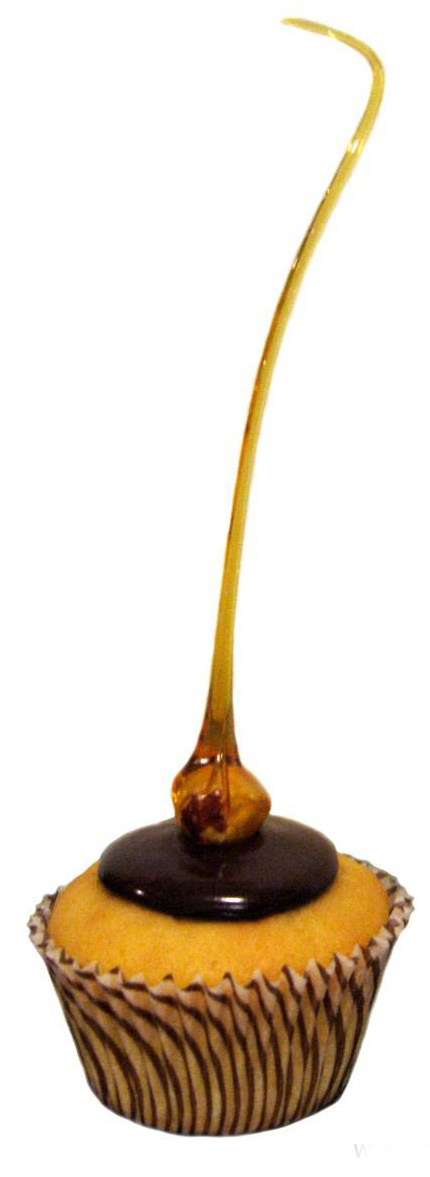
    1. White sugar (granulated), the most commonly used and versatile sugar of the bunch and in a pinch you can process granulated sugar into caster or icing sugar. White granulated is the sugar that you will use in much of your cake baking. With an approximate granule size of 0.5mm (0.19 inch) white sugar is the perfect size to aerate you cake batters. Use it to make toffee/pulled sugar work, caramel, cookies, confectionary and to sweeten your latte when you have decorating fatigue! 

    white sugar is used to make dropped sugar work (how to make toffee toppers here

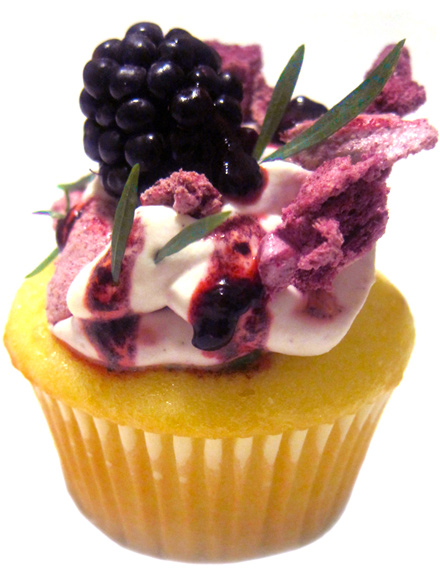
    2. Caster sugar (superfine), is a used extensively in UK, Australian, New Zealand baking. With an approximate granule size of 0.35 (0.13 inch) it's what you use when you need your sugar to dissolve quickly, don't want to develop a sugar crust or need to dissolve in a cold liquid such as cocktails or punch. Using caster sugar in pavlovas will prevent the weeping that can occur with undissolved sugar crystals. 

    caster sugar is used in the blackberry bash meringue (recipe here)

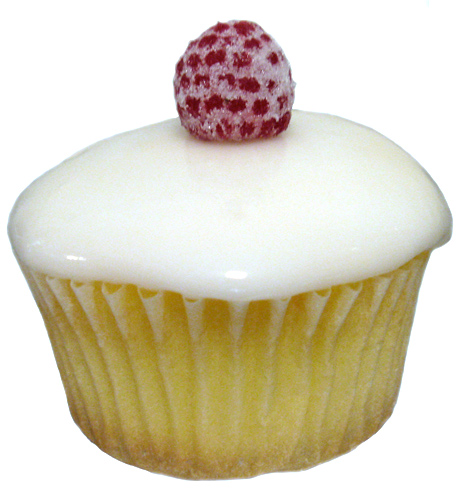
    3. Pure icing sugar (pure confectioners sugar). I use this the most in cake decorating, it's what I use to make my icings, for dusting, piping and for rolling fondant out on. Pure icing sugar is granulated white sugar ground to a powder, it has no additives so is perfect for royal icing work, and sets to a firm finish when making a heated glace icing. It is however "lumpy" without the additives to separate the tiny granules and will always need to be sifted.

    glace icing like I used today in the Love bite cupcake and this raspberry cupcake (recipe here)

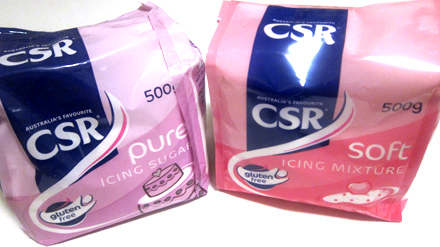
    4. Icing sugar mixture (confectioners sugar). Hate sifting or have young cake decorating kids? This is the icing mixture for you with no lumps, fuss or need for sifting. Soft icing sugar mixture is comprised of 96% cane sugar and 4% tapioca or maize starch in Australia. You cannot use icing sugar mixture for royal icing work as the starches can develop mould. The starches also inhibit "setting" that you get with heated pure icing sugar. 

    pure icing sugar and soft icing mixture

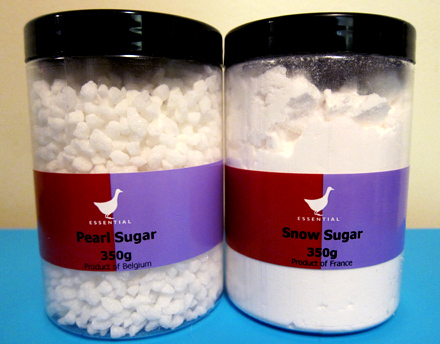
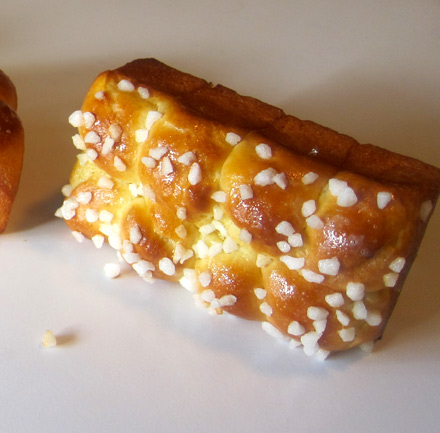
    5. Pearl sugar (nibs, hail sugar), is a popular European sugar. Pearl sugar is resistant to melting so you will see it used topping brioches, choquettes and yeasted buns. My step son Daniel and I love this sugar for it's crunch and the touch of sweetness that it adds without being overly sweet. 

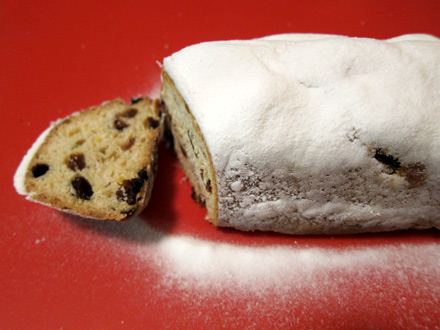
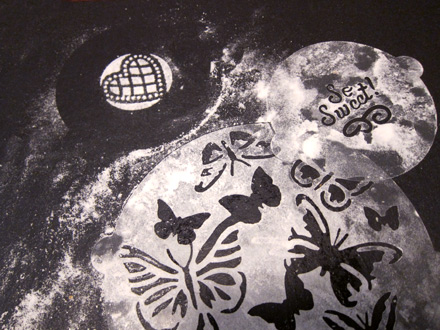
    6. Snow sugar (snow powder, everlasting sugar). Another popular European sugar, snow sugar is the sugar you use at Christmas for your stollens, snowy Christmas cookies and the like. Shipping your aunt a batch of cookies? snow sugar will ensure they will be as white and snowy as when you packed them. Perfect for stencilling too as your pattern won't disappear. Ingredients in snow sugar differ a little brand to brand, the one I use has a little cornstarch, dextrose and vegetable fat added to pure icing sugar.  It has a less sweet mouth feel than icing sugar alone. 


    pearl sugar used in recent brioche post 

    snow sugar is perfect for Christmas stollens and stencilled sugar designs

    7. and 8. Sanding sugar, coarse white sugar available in different grades. With a sparkly finish, sanding sugar is used for decorating cakes, cookies and sprinkled on raw shortbreads/butter cookies before baking. Sanding sugar comes in a wide range of colours to suit any occassion including Halloween!! 

    black sanding sugar glistens on Halloween cupcake

    Happy Baking :)  

    Friday
    Mar202015

    Come on get Happy Partridge Family cupcakes

                                                  come on get happy partridge family cupcakes

    Join me on Facebook 

    Ear worm: An earworm, sometimes known as a brainworm, is a catchy piece of music that continually repeats through a person's mind after it is no longer playing  wikipedia 

    Isn't it the worst thing (ok not the worst thing, but come with me here) when a song or jingle gets stuck in your head. 

    I saw a bright yellow fluffy Easter chick in a half shell at the supermarket, that made me think of The Partridge Family opening credits, which led me to singing in my head 'C'mon get Happy' for the rest of the day. I didn't know all the lyrics so it was "Hello world dah duh dah GET HAPPY" :D  

    Having a 70's theme party? Or perhaps you mum still has her David Cassidy posters and you want to make her some partridges...   

    fondant coloured with blue, yellow and red

    Trivia; the artwork on the partridge family bus was inspired by the work of Piet Mondrian a dutch artist 1872-1944 

    Start with brightly colouring your fondant, I've used Americolor gel pastes today: electric blue, yellow, pink, purple, red red for the fondant and bright white for the toothpicks I used for the legs. A black food marker was used for the eyes. 

    My partridges shaped from white fondant are "chubby" because I thought it was cuter. 

    I started with this shape and pulled the top over to one side. Insert half a white food colour painted toothpick for each leg on the small partridges. 

    toothpicks painted with white food colour... make sure people know there is toothpicks in these cakes

    Roll out your pre coloured fondant, cut into tear drop shapes (for the large bird I used a round cutter and trimmed to shape). Dampen the back of your partridges and apply coloured fondant shapes. Draw eyes on with a black food marker. Insert the birds into prepared cakes. Roll a small piece of white fondant into a snake shape, cut small pieces off to make birds feet. Apply feet by slightly dampening ends and pressing on base of legs, use a spare tooth pick to secure the feet in place.  

    All done except for song 'C'mon get Happy'  

    and Happy Baking :)  

    Chocolate Hot Cross buns anyone? Recipe here

    Planting an Easter garden you will need quick chocoalte soil 

    Wednesday
    Sep252013

    A Trip to the Moon Halloween Cupcake

    A Trip to the Moon (French: Voyage dans la Lune)

    A Trip to the Moon (French: Voyage dans la Lune), is a 1902 French silent film directed by Georges Méliès. It was named one of the 100 greatest films of the 20th century by The Village Voice, ranking at #84, and in 2002 it became the first work designated as a UNESCO World Heritage film.  Wikipedia

    Sweating modelling chocolate today, but first a bit on 'A Trip to the Moon'. It was fantastic a hand coloured print of the short silent film was found in the 1990's and fully restored in the 2000's, however for me it did lose a little of it's "innocence" once I saw the blood coming from the moons eye. My parents are to blame of course. Mum told me it was "dripping cheese" coming from the moon... and I believed it ;) 

    black and white still of the iconic moon

    colour still of the moon 

    And you can watch it now on You Tube (it's black and white... think of cheese).

    Ok on to "sweating modelling chocolate". Modelling chocolate is brilliant when you are making figures or highly detailed pieces that you need to spend more time on than fondant alone would allow. The problem is "temperature", it's fairly cool in Melbourne at the moment but already my modelling chocolate is starting to sweat/fat seperating. 

    Now you can put your modelling chocolate in the fridge to firm up again, but as the temperature rises, and rises, over summer it's a losing battle. But you can still have the benefit of a bit of extra time to sculpt by mixing it with your fondant or modelling paste. 

    sweating modelling chocolate (sorry for the phone photos... bit of colour glitch)

    I thought "hmmm, might be ok?"

    But no, scrapped that and mixed fondant, a little CMC powder, modelling chocolate just till the sweating disappeared. 

    In the height of summer I use 50/50 fondant and white modelling chocolate... you can adjust the amounts to the weather conditions where you are. 

    Here you can see I still made a lot changes to moon after this point, the modelling chocolate content allowed me to work longer without the surface crusting. The mixture is soft and malleable. 

    I use this recipe, though any modelling chocolate recipe would suffice. 

    Have fun sculpting and happy baking :) 

    You might also like Swamp Zombie!!

    Wednesday
    Nov282012

    Gingerbread Custard Ice-Cream 

                 you'll fall for gingerbread custard ice-cream

    Join me on Facebook

    If you haven't been raised with packet custard (or at least the cartons of pre made custard in the supermarket dairy case) you'll wonder what I'm waffling on about... but, but, but, even though it's not in the least bit "cheffy" there is something about the flavour that satisfies your inner child.

    And that is what I'm going for today, by using a traditional custard ice-cream technique combined with packet custard and crumbled gingerbread men.

    *custard powder; is a sweetened flavoured cornflour product that when milk is added and heated to correct temperature it becomes a custard sauce. Also used in baking, particularly shortbread type biscuits (cookies).

    custard powder

    Gingerbread Custard ice-cream

    Ingredients
    2 cup (500ml) whole milk (one cup for the packet custard, one cup for the traditional custard)
    A pinch of salt
    3/4 cup (150g) sugar
    2 tablespoons of custard powder
    1 tsp pure vanilla extract
    1 cup (250ml) heavy cream
    4 large egg yolks
    1/4 to 1/3 cup of crushed up gingerbread men
    Method 
    1. Make the packet custard mixture by placing the custard powder into a small saucepan with a 1/4 cup of the milk to form a smooth paste. Gradually add 3/4 cup of milk and stirring constantly bring to the boil. Reduce heat and simmer for 2 minutes. It will be very thick.
    smooth paste stage; you can see from the colour why you end up with a yellow ice-cream!

    2. Make the traditional custard by heating the milk, salt, and sugar in a saucepan until small bubbles appear around the side of the saucepan. Remove from heat, stir through vanilla extract. 
    3. To make the ice cream, set up an ice bath by placing a 2-quart (2l) bowl in a larger bowl partially filled with ice and water. Place the made up packet custard in the bowl and place a strainer over the bowl.
    4. In a separate bowl, stir together the egg yolks. Gradually pour some of the milk into the yolks, whisking constantly as you pour. Scrape the warmed yolks and milk back into the saucepan.
    5. Cook over low heat, stirring constantly and scraping the bottom with a heat-resistant spatula, until the custard thickens enough to coat the spatula.
    6. Strain the custard into the prepared packet custard. Stir over the ice until cool, add the vanilla extract, then refrigerate to chill thoroughly.
    7. Freeze the custard in your ice cream maker according to the manufacturer's instructions. Stir through crushed gingerbread and freeze in an airtight container overnight to allow the ice-cream to 'ripen' and flavours to fully develop. 
    Homemade ice-cream is firmer than store bought and can be difficult to scoop, remove ice-cream from freezer and place in refrigerator 20 minutes before serving to aid "scoopability".
    We served it here with a warm toffee sauce, I thought it would great with fresh poached or roasted peaches... try omitting the gingerbread and pairing the custard ice-cream with your favourite dessert.
    Happy Baking :)
    You may also be interested in Mini Chocolate Cake Christmas Puddings
    Thursday
    Oct182012

    Adriano Zumbo Packet Mix Macaron and Brownie Review

    Adriano Zumbo Salted Caramel and Passionfruit Macaron mixes, plus chocolate brownie mix

    Join me on Facebook

    We love Adriano Zumbo here in Australia, the Sydney based patissier has been proclaimed the king of macarons by those far and wide that have tasted his perfectly pretty, often exciting macarons and pastry creations. 

    Now we can have a little bit of Zumbo at home with the release of Adriano Zumbo packet baking mixes. 

    I usually bake from scratch and I don't have that much experience using packet mixes so I called in a "non baking friend" to try out the macaron mixes.

    First a look at in what's in the box:


    In the Salted Caramel Macaron box (pictured) there is Caramel meringue mix, Almond meal mix, and Caramel filling sachet. Two piping bags are included, one for the macaron and one for the filling. Ditto the Passionfruit but passionfruit flavoured and the brownies contain the batter mix and choc chunks.

    There is a template ring so you can mark out your circles on your baking paper. You can also go to the website and download a template sheet if you, ummm "can't find a pencil??" Seriously, a lot of thought and time has gone into developing these products, from the funky packaging to video web links to help you along the way and as for the macarons lets see what a self professed non-baker can do.

    I was surprised how quickly my friend was able to use an electric hand mixer make the meringue (with cold water), sift/fold and pulse in the almond meal and then piped perfect macaron circles (I did ask about their piping technique and they said "I do watch MasterChef") and baked the following...

    Goodness, how perfect are these shells!!

    Here they are Passionfruit complete with filling and the caramel....

    I know you will be tempted to eat them straight away (and they do taste great), but do try saving them overnight to end up with the squidgy authentic macaron experience.

    Still not feeling confident baking macs... you always scan the side of the macaron mix box to watch videos.

    Alternatively head over to Zumbo Baking where you will find helpful videos to assist you in your baking.

    More of a chocolate fan? The Adriano Zumbo range includes, chocolate brownie and choc mud mirror cake (couldn't get this one for the review). 

    A quick look at the brownies... you will have this mix together in a couple of minutes... hand mix with a spoon, pour into a lined tray and viola see what you get! Served warm with ice-cream for your next family get together.

    Dark and delicious chocolate brownies from the Adriano Zumbo Chocolate Brownie Mix

    Happy Baking :) 

    You might also be interested in liquorice ice-cream

    or Bundy Banana cupcakes with toffee toppers

    Saturday
    Oct062012

    Hard Boiled Egg Moulds

    Bet you've always thought "If only my hard boiled egg was shaped like a bunny"... now you can! With the help of an egg press.

    Whether destined for your bento box to ward off the afternoon blues at the office or as a healthy snack for the kids on the weekend, these are fun to make and sooooo cute! 

    The only tricky bit is peeling a hot hard boiled egg, but once it's peeled put your egg in your bunny or bear mould; press down and clip. You then put the whole mould into a bowl of cold water in the refrigerator for 10 minutes. Unclip your mould to your smiley bunny. Good for animal shaped sushi rice too.

    These make fabulous cake pop moulds as well, albeit they are on the large size but a single bear for a baby shower favour in a cello bag with complimentary ribbon would make a lovely take home treat.

    If your not a foodie what about using them to press bath bombs for Christmas gifts?

    Ideal inexpensive stocking fillers, pop one, two or three in with your next Amazon order ...  Kotobuki Plastic Egg Mold, Rabbit and Bear 

    Happy Baking :)