Navigation
SEARCH
This form does not yet contain any fields.

    Entries in cupcake (71)

    Thursday
    Jun232016

    Velvet chocolate spray and sphere piping tips. 

    red velvet sprayed chocolate decorations and sphere ruffle piping. 

    Join me on Facebook

    Ahhh ha, it might not be true love but I'm certainly enamoured with the "Russian" sphere tip that produces ruffles in one vertical squeeze of your piping bag. A real time saver for cake decorators and for the piping challenged... this is your tip! 

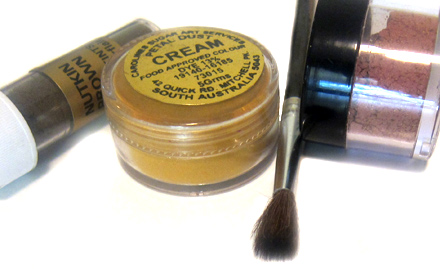
    left to right: these tips were sold as large sphere, large sphere and small sphere. I used the centre tip today, finding the wider gaps piped a more pleasing ruffle. 

    The tips are being sold as "Russian" or "Oriental" or just "Sphere" tips. There is a difference in manufacturers, the base diameters are the same in the ones I have tried but the gaps in the sphere differ in size between brands. 

    All the tips fitted standard couplers.

    Moving from a few dollars for a tip to many dollars for a can of cacao velvet spray.

    Phew, these cans are pricey if I didn't have a birthday voucher I wouldn't have purchased this product. Having it now, it's so much fun and results look fab... tastes nice too which is an oddity for red colouring. If you are running a food related business you will have access to wholesale prices and possible tax rebates depending on where you are. 

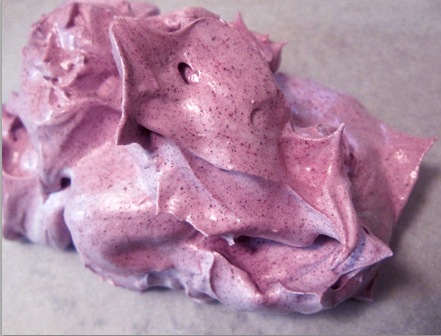
    Velvet spray is cacao butter in a can or using a compressor and spray gun. My can is a product from Belgium and contains cocoa butter, white chocolate, lecithin, flavouring and colours. Used by chefs and chocolatiers to give a smooth velvet finish to chilled chocolate, mousse, ice-cream, you will see it used often in entremets and chocolate show piece flowers. 

    Chill some chocolate... but not to point that I did here with ice starting to form... just until cold. 

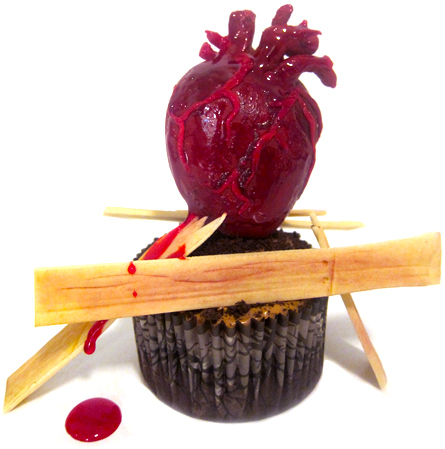
    I moulded simple chocolate hearts, piped a few chocolate squiggles and popped them in the freezer to chill.  The spray can has to be at 25 cel or warmer room for a few hours, you'll hear the ball-bearing inside the can just like spray paint when you shake it. Set up a spraying box (I just used a cardboard box lined with baking paper) to protect your benches/kitchen from a velvet coating. Hold the can 25cm above what you want to spray, place you items close together, but not touching. Spray lightly in a sweeping motion, starting just before the beginning of your item and finished just after, exactly the same way you would use a spray paint can. Repeat as necessary. 

    If the nozzle blocks it's easily removed, get it working again with a few seconds in a microwave or in hot water.

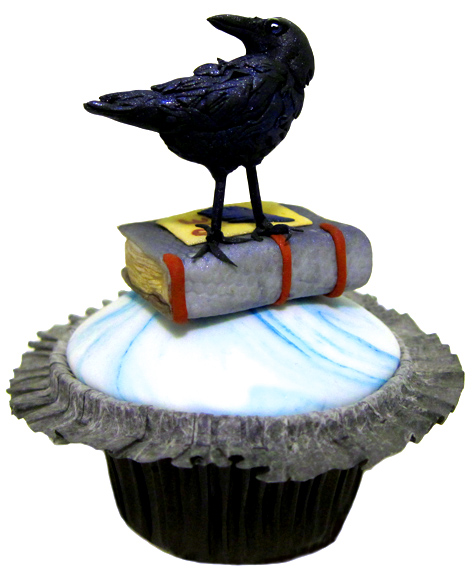
    The velvet look contrasts beautifully with tempered shiny chocolate or used alone like on today's cupcake to add visual interest.

    Use for special occasion baking, to add a luxury touch to wedding cakes and the like. I love the red for romance, Christmas and valentines day. 

    Pros:  

    Easy to use, if you can use a can of spray paint you can use velvet spray. 

    Long life, my can has and almost two year best before date.

    Convenient, just grab out the cupboard when ready to use.

    Looks brilliant on chocolate to mousse. 

    A little goes a long way.

    Cans are available in assorted colours, red, milk chocolate, white chocolate etc.

    Cons:

    Cost, it's expensive at around $50 a can in Australia for this brand. 

    Cans VS Compressor and spray gun: 

    Both ways will cost you, if you just need need velvet spray for a special occasion a can is the way to go. If it's business the compressor and spray gun has a larger initial outlay, but gives you much more versatility in colour. 

    Happy Baking :)

    Dirt or Soil? Either way it's chocolate!! 2 ingredient chocolate soil. 

    Friday
    Oct302015

    Haunted Portrait cupcake

                                        haunted portrait cupcake

    Join me on Facebook or view my Flickr cupcake and bake gallery

    I love zombies as much as the next person but when I have reached my flesh eating critter weekly limit, I like an old school movie with a haunted portrait or you're haunted by the portrait. 

    Hichcocks 'Rebecca' 

    Otto Premingers 'Laura'

    Oh, oh, oh and I love, Oscar Wilde so 'The Picture of Dorian Gray' 

    Momentarily lost my camera this week (ok a longish 27 hour panic), but "yay" I found it for the cupcake shot and "awww" didn't have it for the tutorial, ummm but I have a few dodgy badly lit phone photos... a quarter of a "yay" at least for that! Today's haunted portrait themed cupcake starts with the frame. 

    I don't use moulds much but I do like these small frame moulds. The moulds were lightly dusted with cornflour, fondant (or modelling paste) is pressed in. I put mine in the freezer for a few minutes for fast release from mould. 

    Once dry the frame was painted with copper and gold food paints, when that's dry a little black petal dust was used to bring out the details and add a vintage feel. 

    Head shaped.

    The hair is made from a base piece of fondant then spirals I made on a toothpick are attached with a dampened paint brush. 

    I started by fitting base of dress into the frame, before adding bodice, arms and head. 

    And this is about when the panic of not being able to find my camera really set in and I stopped taking pics.

    The rest is joining the bits and bobs together and colouring with petal dusts and food marker. 

    I could contemplate now whether I should make a new years resolution now about "better tutorials", but for now I might just go with.... 

    HAPPY HALLOWEEN!!!!  

    Something quick and easy for Halloween treats and mix up some Chocolate Peanut Butter Spiders

    Saturday
    Oct032015

    The Monkey's Paw cupcake

                                                             'The Monkey's Paw' cupcake

    Join me on Facebook

    "The first man had his three wishes, yes," was the reply. "I don't know what the first two were, but the third was for death. That's how I got the paw."                          W. W. Jacobs 'The Monkey's Paw'

    The Monkey's Paw: Ahhh haaaa my step son Dan and I love this tale, a supernatural/horror story by W. W. Jacobs first published in England in 1902. 

    In the short story, three wishes are granted to the owner of the monkey's paw, but the wishes come with an enormous price for interfering with fate

    And proving yet again I've watched too many episodes of 'The Simpsons'...'Treehouse of Horror 2' season three, episode seven. 'The Monkeys Paw' :)

    The Monkey's Paw itself is described in the short story as "it's just an ordinary little paw, dried to a mummy."

    Ok, lets make a little mummified paw.

    I went with 50% fondant / 50% white modelling chocolate... I used "orange" just so the demo photos are clearer, that or I was thinking of Bart's shirt.  You could use 100% dark modellling chocolate and do away with colours. 

    Started with a ball

    Squished the ball on one side and roughly sliced my monkey "fingers" into the rounded opposite side. 

    Shaped my paw into what I thought I mummified monkeys paw would look like. I mainly used the toothpick to apply the details. 

    The wrist was trimmed at this stage and I added a jagged cuff cut from rolled 50/50 mixture. 

    After the paws were dry, I used a black food pen to mark out features then dusted with a little nutkin brown petal dust and finished with dogwood brown petal dust.  If you used 100% dark modelling chocolate, a brush of cocoa and drinking chocolate will add interest without have to add colourings.  

    Thread a toothpick into the palms of the paws and attach to your fondant or frosted cupcakes. 

    Happy Baking :) 

    You might also be interested in making a 'Catrina' for Day of the Dead.  

    Monday
    Sep142015

    The Tell-Tale Heart Cupcake

                                          The Tell-Tale Heart Cupcake

    Join me on Facebook 

    "Villains!" I shrieked, "dissemble no more! I admit the deed! --tear up the planks! here, here! --It is the beating of his hideous heart!" Edgar Allan Poe

    I absolutely love 'The Tell-Tale Heart' the gothic story written in 1843 by Edgar Allan Poe!

    My step son said today it reminds him of 'The Simpsons', yes it is a much referenced tale in pop culture.

    Of course you will need fondant "floor boards" for your tell tale heart cupcakes. 

    White fondant was tinted with ivory colour gel, rolled thinly and cut into strips.  Using a toothpick and modelling tool mark out "wood grain", "nail holes" and "joins". Allow to dry.  

    With a small soft brush lightly apply brown shades of petal dust to highlight the grain. Your aiming to only highlight the grain with the darker colours so remove excess brown dust on a piece of paper towel before applying. Top with a dusting of cream or yellow petal dust. 

    When making hearts; mine are small so I've just used 50/50 white modelling chocolate and fondant. If making larger hearts consider using a lolly, chocolate, RKT or cake pop mixture inside the heart.  

    The mixture is coloured red with cake gel colour (I used no taste red for bulk of the heart and a little red red for veins). Make a heart shape, make sure you add the aorta and other arteries to the top and few veins for texture.  Allow to dry. Dust lightly with brown petal dust.  

    Assemble your cakes, I used frosted cakes with cookie crumb topping. Attach your heart to your cake with a single toothpick, lean or attach boards with frosting.

    Using cake decorating gel (coloured red if clear) and a small paint brush paint a thin coat of "blood goo" on to your hearts. The brown petal dust you used earlier will blend/smudge giving you a "meaty" look to your heart. 

    Happy baking or gothic Halloween making :) 

    In the mood for more Poe cupcake raven tutorial.  

    Monday
    Aug172015

    Tiesen Sinamon (Welsh cinnamon cake) cupcakes

    Tiesen Sinamon (Welsh cinnamon cake) cupcakes

    Join me on Facebook

    Ahhh ha ha, I love this metal Welsh dragon my step son Daniel gave me from his recent travels to Wales. 

    Wales; with a dragon on their flag, it's the birth place of my Uncle John, home of Dr. Who and according to fairy expert Janet Bord (is too such a person!!) the little folk abound in Wales.   Welsh flag

    Tiesen Sinamon is traditionally a round cinnamon cake topped with raspberry or apricot jam and spread with meringue. The cake is returned to the oven to brown the meringue. Here favourite my little one bowl cake recipe is spiced with cinnamon, filled with raspberry jam and topped with fluffy meringue (7 minute type) frosting before torching.  

    Tiesen Sinamon (Welsh cinnamon cake) cupcakes ... the one bowl method used here results in cake similar to the original Tiesen Sinamon texture. By all means substitute your go to buttercake cupcake recipe and add cinnamon if desired.  

    Preheat oven to 180C/350F 

    Line two 12 cup trays with paper liners (the small patty/fairy cake size... this a UK size, old Australia size and smaller than US cupcake)

    Ingredients

    125g butter (4.4oz) softened

    1 teaspoon vanilla extract

    2/3 cup (150g) castor sugar (superfine)

    3 eggs  room temperature

    1 1/2  cups (225g) self-raising flour

    1 1/2 tsp cinnamon 

    1/4 cup milk (60ml) room temperature

    Method

    In your mixer bowl with flat beater blade attached, beat butter, extract, sugar, eggs, sifted flour, cinnamon together & milk on low speed with an electric mixer until ingredients are just combined. Increase speed to medium & beat for 3 minutes until smooth and pale in colour.

    Drop spoonfuls of mixture into the paper liners. Bake about 20 minutes. Allow to cool in tins for 5 minutes removing to a wire rack to cool.

    Fluffy Frosting
    Makes 3 cups
    • 1 cup white sugar (granulated)
    • 4 large egg whites

    Directions
    1. In the heat-proof bowl of an electric mixer, combine sugar and egg whites. Place the bowl over a pot of gently simmering water, and whisk until the mixture feels warm to the touch and the sugar has dissolved, about 5 minutes.
    2. Return the bowl to the mixer stand. With the whisk attachment, whip on high 
    3. until cooled, about 8 minutes. Use immediately.

    *If the weather is humid, you may need to beat the frosting for an additional minute in each step to stiffen it.

    Use a good store bought raspberry jam or make your own.... Raspberry Jam recipe Traditionally raspberry jam is "loose" (wetter) than say ummm "apricot". If you prefer a firm set jam use pectin sugar as per instructions. 

    To Serve

    Cut a small hole in to the top of each cooled cake. Fill the cavities with about one teaspoon of raspberry jam, top with a blob of meringue frosting (use a star piping tip if you prefer a less rustic looking cupcake) torch with a kitchen blow torch.  

    Happy Baking :) 

    You might also be interested in Raspberry and Orange Gluten Free Friands

    Friday
    May012015

    Freeze dried fruit meringue 

    blackberry bash eton mess cupcake with freeze dried blackberry meringue and fresh tarragon 

    Join me on Facebook

    Ok, I confess. I did tell him they were lollies, my step son that is... when he was little and we were going to the city for the day I'd buy him a packet of freeze dried fruit for a treat.

    Freeze dried fruit is an awesome patisserie ingredient, with the intense flavour and natural colour of fresh real fruit and slight "fizz/sherbet" mouth feel. 

    Freeze dried fruit powders come in a plethora of fruit, veg and herbs, whole, pieces and powder. 

    You can use freeze dried fruit powders in all of your favourite frostings from buttercreams to seven minute, just add a few teaspoons of powder (or to taste) in the last minute on mixing.  

    freeze dried black berry whipped cream

    Ganache and whipped cream you betcha :) The more creamy, the more fat your mixture contains the more powder you will have to use. The resulting flavours aren't as intense as "meringue" but still add a flavour boost. 

    Macaron shells and meringues come to life with a fresh flavour burst of chosen fruit. Think pavlovas, meringue based roulades and souffles too. 

    Cookies, biscuits, cake batters, tart and pie crusts can all be flavoured/coloured with freeze dried fruit powder. I made the best ever passionfruit shortbread last Christmas thanks the to addition of freeze dried passionfruit powder. 

    Wake up your breakfast by adding freeze dried fruit powders or pieces to your homemade granola, stir through yoghurt, add to your waffle batter or add a spoonful to your smoothie. 

    One of my favourite uses for freeze dried fruit powder is just flavouring sugar. Here castor sugar/super fine is flavoured with freeze dried berry powder and used for donut coating sugar. Flavoured sugar; a few teaspoons of freeze dried fruit powder per cup of sugar, mix and then store in an airtight jar. Use as required on you tea cakes, pancakes, donuts and the like. 

    Blackberry meringue

    You can use any meringue recipe italian, french or swiss... just add powder in last, about a tablespoon for 3-4 egg whites.

    Pre heat oven to 90cel  (194F) 

    line baking tray with non stick paper

    4 egg whites are room temperature

    220g (7.75oz) caster sugar (superfine)

    I pinch of cream of tartar

    10 to 15 grams (0.35 to 0.50oz) of freeze dried blackberry powder

    Whisk egg whites with an electric mixer until soft peaks form, gradually add sugar until combined, add blackberry powder and continue to whisk until thick and glossy.

    Spread onto prepared tray and bake for one and a half to two hours. Turn oven off and leave in oven until cool about another 2 hours.  

    Bash or break pieces off to stir through chantilly (vanilla) whipped cream with fresh berries for you eton mess. Either serve in small glasses, a giant bowl or fill cored cupcakes with the mixture. 

    I used fresh tarragon to add, ummm well "freshness" and the herbal aniseed flavours compliments the blackberries beautifully. 

    Haven't used freeze fruit before? Then I would suggest you start with raspberries, whole, bits or powder or passionfruit powder. Unless you are growing your own, both these give you the most bang for you buck and they are popular too!  

    A note on colours; blackberry, blueberry and black currant all give a "purple colour range", for pink or red use raspberry, sometimes the strawberry powder whilst tasting of fresh strawberries gives you an orange colour hue.

    Pros:   intense concentrated real fruit flavour, intense natural colour, slight fizz, a little goes a long way, your not adding excess liquid to you mixes, enjoy fruit out of season. Whole freeze dried fruits can be ground to powder or broken into small bits. 

    Cons:  cost, it's not inexpensive, powders will clump, pieces soften if exposed to moisture... silica sachets recommended if you buy a larger quantity than a sachet. 

    Where to get it is going to depend on where you are located: places to look specialty supermarkets and food stores, health food stores, patisserie supplies store. Seek out local growers for supreme quality. 

    New Zealand: Fresh As this brand is available to ship to Australia and also available from gourmet grocer online  

    Australia: The Essential Ingredient Sydney, Melbourne and online    

    Tastebom has a nice range, as does Melbourne Food Depot 

    US:  Amazon  

    Happy Baking :)  

    You might also be interested in red plum fruit caviar 

    or an easy white chocolate plastique

    Saturday
    Mar282015

    Four and Twenty Blackbirds baked in a Pie cupcake

                            four and twenty blackbirds baked in a pie cupcake

    Join me on Facebook

    Ahhhh ha ha, I was so tempted to make a cupcake from the original verse from 'Sing a Song of Sixpence' ...

    Sing a Song of Sixpence,
    A bag full of Rye,
    Four and twenty Naughty Boys,
    Baked in a Pye.
    Tommy Thumbs Pretty Song Book: published in London around 1744  wikipedia

    Instead I went with the modern to version to tie in with this cute retro pie bird from Tala that my friend Jacinta gave me.

    Thanks Jacinta, I love my pie bird :) 

    Live birds inside pies were actually served as an entremet during dinners in the 1500's. An "amusement" between courses, written about in Christoforo Ji Messiaburgo's cookbook on how to prepare a banquet, 'Banchetti composizioni di vivande e apparecchio generale'.

    Today's cupcake uses simple shapes, I've made a smaller cupcake but you could use a variation of the same design in a larger cake.

    I use the heavily fondanted (that's not a word, but you know what I mean) cupcakes as place setting markers, or central cake surrounded by the eating cupcakes.

    For a nursery rhyme theme go with the other verses, perhaps golden foil wrapped chocolate coins for...

    The king was in his counting house,
    Counting out his money;

    Mini honey cakes for...

    The queen was in the parlour,
    Eating bread and honey

    Start making today's cupcake by covering your ganached or butter cream topped cupcake with a thin layer of fondant. Today I use americolor ivory for the "pastry" colour. 

    Here I was still deciding what size bird head to go with, small if you want 24 birds in the pie or larger if you want the pie bird look.  

    Make your beaks, heads, cherries, wings etc with coloured fondant. I used a black food marker for the centre of the eyes and white food colour on the tip of a tooth pick to create a highlight on the eyes. 

    Roll more ivory coloured fondant out thinly and cut a circle big enough to cover the already fondant covered cupcake. Dampen the edges of most of the round (leave a little undampened so you can lift edge if you want a bird popping it's head out). Crimp the edges. 

    Cut, snip and generally poke holes through the top layer of fondant where you want your beaks, birds etc to be. Colour fondant using petal dusts and a small soft artists brush. I used Caroline's petal dusts, in brown, egg yellow and cream.  

    Fun part now... start inserting all your little pieces. Use a dampened paintbrush, water pen or cake glue to attach your pieces. Allow to dry and you've got your self a cute little cupcake that could be part of a major theme for your baby shower or the like event. 

    Happy Baking :) 

    Trivia: Four and Twenty pies are the iconic Australian meat pie synonymous with attending a football match. 

    Prefer a more realistic black bird... learn to a make a Raven

    Butterflies more your thing, learn to make a beaded sugar butterfly 

    Sunday
    Feb012015

    Brûlée crusted Fig cupcake 

    Brûlée crusted Fig cupcake 

    Join me on Facebook

    Fresh fruit brulee crust ... yummm!

    Not too exciting if you are located in the UK but for Australian's "Yay" a range of Billingtons Sugar is available from Woolworths (at least in Victoria). The range includes the much coveted muscovado and golden caster sugar. 

    Now you can bake cake, desserts and the like from your Nigella, Jamie, Mary Berry and Paul Hollywood books without substituting ingredients. Plus the golden caster sugar makes for a fabulous brûlée crust when sprinkled on cut fresh fruit and given a quick torch. 

    Sprinkling cut fruit with *golden caster sugar and "torching" makes for a quick dessert cupcake topper.

    Whether from a kitchenware store or the hardware shop, mini blow torches make quick work of melting sugar into a caramel crust.

    Very ripe fruits only hold the brûlée for a few minutes before they start to dissolve into a lovely caramelly drizzle... perfect topper for dessert cupcakes, cheesecake or even a pavlova. My stepson (when he was old enough to wield a torch) loved making brûlée crusted banana slices to serve with vanilla ice-cream. Brûlée fruit is wickedly good on cornflakes, your porridge or morning yoghurt. 

    Today I used fresh figs, but halves of small ripe plums, or apricots, wedges of fresh peach, banana slices, orange segments and the like make a fab quick dessert. Cupcake bases that work well include almond sponge, vanilla sponge or butter cake, spiced and nut flour cakes. Ummm, something creamy for the topping is good, whipped cream, cream fraiche, a yoghurt whipped cream combo or perhaps your favourite butter cream. 

    Have your cupcakes ready and just before serving lay you pieces of fruit cut side up on a baking sheet. Sprinkle with golden caster sugar, liberally (but don't go crazy!!). Light your torch, pass the flame over the sugared fruit pieces (almost like spray painting, even sweeps) holding the tip of your torch 7-8 cm (around 3 inches) away from the sugar. You sugar will start to bubble and caramelise. All done,  just wait a few minutes before handling, sugar drips burn! Enjoy. 

    Happy Baking :)

    * can't get golden caster sugar? raw or white caster sugar work well or just plain white sugar in a pinch.  

    Ready to stretch your sugar skills? How about a toffee dipped hazelnuts or banana chips how to...

    Want to know more about brown sugar? Updated chart here 

    Thursday
    Jan292015

    Only a Time Lord knows what season it is cupcake

    'Only a Time Lord knows what season it is' Doctor Who cupcake

    Join me on Facebook

    You haven't even got time to put away your Christmas hat and it's time for Easter, well that's according to Australias major retailers. Hot Cross Buns and Easter Eggs have been on sale since January 5th. Easter Sunday is April 5th, Easter now runs a quarter of the year???

    Waiting in the queue at the supermarket... on the right of me a clearance rack of candy canes, on the left of me freshly baked hot cross buns, not forgetting the racks of foil wrapped chocolate easter eggs and the gaudy (or romantic... but it's the supermarket queue and romance isn't in the air) Valentines day cards.  

    But I did love Peter Capaldi in his first season as the Doctor in BBC's Doctor Who. So today we have a Time Lord figure. He started when I was practicing figure modelling and ended up being a center display cupcake for a Doctor Who cookie platter. 

    "Practice" it's boring I know, but it's how you get better. 

    I started with a print out of Peter Capaldi photos as the Doctor.

    Here is an earlier model of Peter Capaldi when I was toying with the idea of full caricature. The day was warm and he was still very soft and his hair is not attached as I was checking height.  I chickened out on the over blown features and went for a partial caricature... even then he had an eye removed and replaced after it looked, umm well I think the technical term would be "squiffy":) 

    You have to be fast!!! When working with fondant you have to be fast, drying time is in minutes for modelling. I used a 3 parts fondant to one part modelling chocolate to give me another 5 to 10 minutes to finish face. 

    Green: the green fondant here shows you the basic "eggish" shape most heads start with. I get ready with all the other pieces, such a nose, ears, eyebrows etc. You will have a series of wedges, beans, ovals and snake shapes. Then you start putting together and sculpting your head. I apply pieces with a small damp brush then use modelling tools and fingers to shape. You can give yourself a few more minutes by keeping pieces covered in glad wrap.

    If you don't use modelling chocolate mixed with fondant you might find yourself with the dreaded "elephant skin" as the fondant icing dries. 

    I use Bakels white fondant almost exclusively, colour with gel paste. CMC powder was mixed in the black and red fondant to firm.  

    Have fun, happy baking and do give modelling a figure a try :) 

    Proving I'm a bit of a sucker for a huge topper ... make  Eric the Valentine Emu

    or try a 'Love Caramel Cupcake' 

    Tuesday
    Oct142014

    50 Shades of Grey cupcake

    50 Shades of Grey cupcake

    Join me on Facebook... still the fastest way to have your questions answered! 

    Another Monday at the nursing home, By the Light of the Silvery Moon tinkles in the main rooms piano sing-a-long session, yet a short distance away rap in the way of Kanye West Bound 2 is blaring from one of the residents rooms. It's a 50 shades of Grey cupcake idea in the making! 

    I've been gone for almost a year, during that time my Dad has gone into a nursing home with dementia and my health has deteriorated, leading to time split between doctors, hospitals and the nursing home. It's baking and cooking that have kept me going throughout and I'm so excited to be back!! I've learnt lots of new techniques to share with you, and of course I'll have to do a Halloween cupcake or two in the next week.


    Definitely aiming for ummm "slightly" more detailed tutorials than this... but it's first day back and I'm out the swing, or is that the loop? Oh you know what I mean. The elderly lady is a "marked head" figure, roll a ball of fondant and mark out eyes, nose, mouth with a toothpick, piping tip or cake tool. This type of head is quick and useful, it can be a man, woman, baby even a dog.  

    I'm so looking forward to getting back into all things bakerrrrrryish.  

    Happy Baking :) 

    You might also be interested in Hippy Dippy using a clay gun to make hair, wool, grass etc.