Navigation
SEARCH
This form does not yet contain any fields.

    Entries in cake (7)

    Monday
    Jun222015

    Double Damage Oblivion chocolate cake Rose's Alpha Bakers

                Double Damage Oblivion chocolate cake 'The Baking Bible'

    Join me on Facebook

    Renowned chocolate cake lovers, the single dad with his eight year old autistic son picked up the Double Damage Oblivion cake that I baked from Rose Levy Beranbaum's 'The Baking Bible' today ... I just got the review back "You've got a good cake here".

    The guys review contradicts my opinion of the cake and once again illustrates different people have different likes and dislikes and it all comes down to personal preference and knowing your audience. 

    Today's bake calls for baking two different cakes, starting with the Chocolate Oblivion by first melting chocolate and butter together over a pot of hot water.

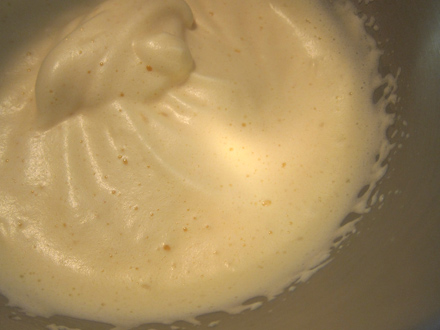
    Then with a long handled whisk, eggs were beaten over a pan of simmering until warm, before being beaten in a mixer until light and billowy. 

    The whipped eggs are folded into the chocolate mixture. 

    The tin was a springform, greased a third of the way up and base lined with baking paper. 

    The sides and base of tin were double wrapped in aluminum foil and the cake baked in a water bath until set but still wobbly in the centre. Then the cake was covered and popped in the refrigerator overnight.

    Cake two is the Deep Chocolate Passion. You can tell we are up to the second part of a recipe because I forgot to take photos :P

    A cake tin with greased bottom only, is then lined with baking paper. Cocoa and boiling water is beaten until smooth the cooled. Oil and eggs are added to the cooled mixture and beaten until smooth and shiny. Flour is added an resulting batter spread evenly into the tin and baked.

    Oh my... this next part made me nervous, after running a flat knife around the edge of the hot baked cake you have to turn out the hot cake!! Yep, nervous for no reason the cake came out easily and it was time to peel the away the baking paper and reverse cake so the top is ummm, on the "top".  

    Dang, don't take photos of the paper liner when your hot cake is the wrong way around on the rack... you will get this effect "a cross hatch cake".

    There is ganache; yes you make ganache and spread it on your chocolate oblivion, which is topped with the bottom layer of deep chocolate passion cake... then reversed... more ganache on the now top of oblivion and then the final layer of cake is laid on top.  

    Now you will see your chocolate oblivion layer needs trimming to be the same size as your cake... once you have trimmed, a hot knife is run around cake until you have a smooth and shiny finish. 

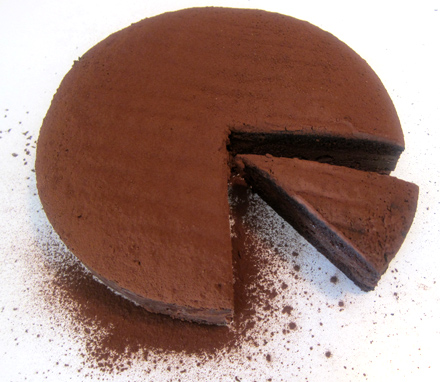
    Sprinkle sifted cocoa powder and eat!

    Here is the inside texture of cake, all the layers look super moist but what I found was it ate "dry", after a mouthful you felt like you needed a drink, second mouthful more drink, third mouthful maybe I'll just drink my coffee. The chocolate oblivion layer tasted like a ganache truffle but doesn't have the melt in mouth truffle feel.  

    Would I bake again? Not sure, there is other Rose's chocolate cakes I like more. 

    Would I change anything?  There was an option to use jam rather than ganache to join the layers but either way if I baked again I would have preferred the cake to be syruped. A coffee liqueur syrup, or orange or perhaps chambord would have been nice. A thin water gel or berry gel layer would be good too. 

    How it works... now I've joined the fabulous existing alpha bakers, once a week I will post about what I have baked from Rose Levy Beranbaum's 'The Baking Bible'. This won't include the recipe due to copyright and publisher restrictions however, I will be posting how it went and photos of making/baking the gorgeous baked goods.

    Happy Baking :) 


    Award winning author Rose Levy Beranbaum's The Baking Bible is available from Amazon and other good book stores worldwide.  

    You might also be interested in Baci chocolate Ice-cream recipe

    Monday
    Jun152015

    The Red Velvet Rose (cake) Rose's Alpha Bakers

    red velvet rose cake with raspberry sauce, served with ice-cream

    Join me on Facebook

    What's in a name? that which we call a rose
    By any other name would smell as sweet;

    Romeo and Juliet  William Shakespeare 

    I didn't have the rose bundt pan needed for today's Red Velvet Rose cake from 'The Baking Bible' bake, but I baked in anyway in the heritage bundt pan. 

    There is a few different options for this cake colour/flavour wise, at Christmas I used beetroot juice to colour and the extra cocoa option.  Colour wise the resulting cake was a non descript "brownish hue". Today I went with less cocoa and red food colour.

    Ok, I can see the appeal of red velvet for valentines, weddings or even Halloween but really "I don't get it"...it's not on my list of favorite cake varieties. 

    Today's bake started with mixing egg whites, red food colouring and vanilla to combined.

    yep nice and red

    Butter, oil and sugar were beaten to fluffy. I liked this in the recipe, the taste of butter combined with moistness oil adds to cakes. A flour mixture including a small amount of cocoa was mixed in, then the red whites were added.

    tiny amount of cocoa powder

    resulting red batter once all the ingredients were combined

    Whilst the cake was baking I was defrosting frozen raspberries to gather to juice to make a reduction.

    The reduced juice was added to raspberry pulp, sweetened and sieved to make a brushing sauce.

    This sauce has a threefold action of moistening, adding a lot of fresh flavour plus adding more colour. The sauce seeps into the cake after a short rest period. 

    Cake after it has been entirely brushed with sauce. 

    I served the cake with ice-cream wedges spinkled with freeze dried raspberries and grated chocolate. I made an extra thick raspberry sauce using the leftover sauce as a base. 

    The cake has a great light texture, I loved the raspberry sauce. The red colour I found a little "frightening.

    Yes, there has been a lack of other blog posts... oh my goodness if there is a winter bug in the air apparently I'm going to catch it!! Thanks Jacinta for the homemade soup, medicine, gift and the rest :) I'm sure that will make me feel better.      

    Happy Baking :)                                                                                                                                                                                                                      

    Would I make again? No, unless family/friend requested which is possible, it's not my kind of cake but I have a family member who loves it. 

    Would I change anything? Hmmm, don't know really red velvet by it's very nature of intense colour is difficult to flavour.

    How it works... now I've joined the fabulous existing alpha bakers, once a week I will post about what I have baked from Rose Levy Beranbaum's 'The Baking Bible'. This won't include the recipe due to copyright and publisher restrictions however, I will be posting how it went and photos of making/baking the gorgeous baked goods.

    The Baking Bible  available from Amazon and all good book stores. 


    You might also be interested in a cocktail, cupcake style with a Japanese Slipper Cupcake 

    Saturday
    Oct192013

    Chocolate Tia Maria Fridge Cake 

    last of the chocolate coffee liqueur fridge (ice box) cake

    Join me on Facebook

    Oh, have you tried replacing some of the cream in your ganache for plain Greek yoghurt?

    Even if yoghurt isn't in your top 500 foods, once added to ganache a little bit of magic occurs. Well, ok not "magic" (I'm trying to sell you on the idea because I like it so much), but rather the yoghurt has a two fold effect of lightening the texture of the ganache and adding an acid component that cleans the palate. 

    I like a ratio of 50% cream to 50% Greek yoghurt. The yoghurt ganache can be made with white, milk and dark chocolate. Think white chocolate yoghurt ganache with strained passion fruit puree for truffles or dark chocolate yoghurt ganache sauce with profiteroles or for your berries and waffles. What follows is the basic ratio/method that you can use in your existing recipes, plus a retro fridge cake laced with Tia Maria that the my step son Daniel declared was so nice "I could eat this everyday". 

    Chocolate Tia Maria Refrigerator Cake

    Ingredients

    Sponge fingers come with different amounts of biscuits depending on the brand... from 250g to 400g but the following recipe makes plenty of ganache, in fact you might have some over to top a cupcake or two. 


    I x packet of savoiardi/sponge finger biscuits

    125 ml (quarter of a cup) of very strong brewed black coffee  (you can make up instant if you don't have shots of expresso handy) 

    1/4 cup caster sugar (superfine) 

    3 tablespoons of coffee liqueur (add more coffee if you want to avoid the alcohol) 

    1 tsp of pure vanilla extract/essence

    150g  (5oz)  milk chocolate, roughly chopped

    150g  (5oz) dark chocolate, roughly chopped

    250 ml (one cup) thickened cream (whipping cream)

    250 ml (one cup) plain thick Greek yoghurt

    Place the sugar and coffee in a saucepan, bring to a rapid boil and boil one minute or until sugar is dissolved. Remove from heat. Stir in Tia Maria and vanilla extract. Set aside. 

    Melt the chocolate with half the cream in a heat proof bowl over pan a simmering water. Remove from heat and stir through the remaining cream and yoghurt. Refrigerate until the ganache is thick enough to spread. 

    Divide up your sponge fingers, I made my cake by laying six sponge fingers side by side and allowed another 12 sponge fingers to create two layers on top. *This size will give you leftover ganache, if you are using a larger packet of biscuits you will use all the ganache. 

    Spread some of the chocolate ganache onto your cake platter to secure the first row of sponge fingers. 

    Start to build the cake by dipping biscuits in the coffee/tia maria solution, lay six across the bottom, top with ganache, dip another six biscuits lay those on top of the base layer, top with ganache and lay final layer of dipped biscuits on top. Use remaining ganache to cover the sides and top of cake. 

    Chill for 4-6 hours. 

    Optional: decorate with your choice of chocolate curls, grated chocolate, chocolate coated coffee beans or crushed choc/coffee candy bars. 

    adapted from no bake Irish gateau Hamyln all colour cookbook: 200 chocolate recipes 

     Happy Baking :)

    You might also interested in no bake Tia Maria Treats

    Or perhaps you have been hankering to make a Chinese dragon  

    Monday
    Apr232012

    Little Lime Lemon Lamingtons 

                                little lime lemon lamingtons 

    Join me on Facebook

    Lemon Lamingtons??? Lamingtons are traditionally cubes of sponge cake dipped in chocolate icing and rolled in coconut, but according to the Wikipedia entry on Lamingtons 'The raspberry variety is more common in New Zealand, while a lemon variety has been encountered in Australia.' 

    Just as I was thinking "this Australian has never encountered a lemon lamington", I opened a new Australian Women's Weekly cookbook "Cakebaking" and there on page 32 is 'lemon lamingtons'. Have I missed a trend? 

    My broken ribs are still healing and in a "now we have one I baked previously" moment I whipped out a lemon buttercake from the freezer. Plus with more limes in the garden at the moment than lemons it seemed natural to make a batch of lime/lemon butter too. Put the two together and we have my version of a lemon lamington...


    bumper crop of limes in the garden this year

    Little Lime Lemon Lamingtons

    Ingredients

    1x plain lemon butter cake or sponge cake cut into cubes (I used a ruler as a cutting guide)

    1x batch of lime/lemon butter (recipe below)

    2 1/2 cups shredded or desiccated unsweentened coconut 

    desiccated and shredded coconut

    Method

    Pour your lime/lemon butter into a pie dish. Place the shredded coconut on a dinner plate. Dip cubes of cake firstly into the lime/lemon butter, then gently roll in coconut.

    You can serve them straight away, but I think they are nicer when you allow them to sit for a short while to allow the lime/lemon butter to sink into the cake a little.

    Lime Lemon Butter (Curd)

     Makes 1 1/2 cups

    Ingredients
    3 large egg yolks
    Zest of one small lime and 1/2 of one lemon
    1/4 cup of lime juice
    6 tablespoons sugar
    4 tablespoons butter, cold and diced

    Method

    Combine yolks,  zest,  juice, and sugar in a small saucepan. Whisk to combine. Set over medium heat, and stir constantly with a wooden spoon, making sure to stir sides and bottom of pan. Cook until mixture is thick enough to coat back of wooden spoon, 5 to 7 minutes.

    Remove saucepan from heat. Add the butter, one piece at a time, stirring with the wooden spoon until consistency is smooth. Strain.
    Transfer mixture to a medium bowl. Lay a sheet of plastic wrap directly on the surface of the curd to avoid a skin from forming; wrap tightly. Let cool; refrigerate until firm and chilled, at least 1 hour. Store, refrigerated in an airtight container, up to 2 days.

    Adapted from Martha Stewart's lemon curd

    Robot Tea Infuser

    My best friend and I both love our tea infuser robots, they're not super practical for everyday use as you can only use large leaf tea inside your robots stomach. But, but, but they make you smile and do look cute just hanging around.

    Happy Baking :)

    Raspberry and Tangelo fruit butter recipes Fruit butter/curd tips and storage.

    Monday
    Nov212011

    Three French Hens Cupcake


    On the third day of Christmas, 

    my true love sent to me...

    Three French hens,

    Two turtle doves,

    And a partridge in a pear tree.

    Goodness, birds were just "the gift" in the 1700's if the English carol 'The Twelve Days of Christmas' is anything to go by. As a lady in the 1700's your true love brought you geese, hens, doves, turtle doves, calling birds, swans and a partridge of course... but wait you thought at least there was jewellery?? The "golden rings" most likely referred to golden ring necked birds. But at least you also got some "leaping lords"! All the birds were eaten in era so could have been destined for the pot. 

    Whilst where here, verse four is actually "colly birds" not "calling birds" as often sung; colly birds are a smallish blackbird. French hens in the era were either the Crevecoeur, Houdans or the La Fleche breeds.

    Alternative lyrics: There is Australian versions of the song using Australian animals such as "dingo's dancing", a religious rewrite of the lyrics, though there is no documented religious link to song. I even had the pleasure of hearing a heavy metal version of the song on the weekend... unless you are a Twisted Sister fan I'd give it miss. 

    Want to make your own hens? 

    Black fondant is rolled into egg shapes then shaped into nesting chickens.

    With fondant or modelling paste use red to make wattles and combs and orange for the beaks. Black rolled out thinly is used to cut feathers from. White is rolled into small egg shapes to make the eyes and thinly rolled mauve is used to make the eyelids. Attach all pieces to hens bodies with water using a small paint brush, starting with feathers, then comb/wattle, then beak and eyes. Use a black food marker to finish the eyes. Allow to dry.

    Happy Baking and Singing :) 

    Wednesday
    Sep142011

    Debbie's Beaded Butterfly Cupcakes

                                       Debbie's  beaded butterfly cupcakes 

    Typing one handed today as I'm sporting a "butterfly injury" after dipping my hand in hot isomalt... not something I'd recommend!!! Luckily I do listen to Martha Stewart and had a bowl of cold water nearby to dip my hand in, phew judging by all the blistering it's lucky I did! 

    But bravery is my middle name (not really I cried like a baby) and I piped with one hand to finish off my cakes for today. 

    Purple butterfly cupcakes for Debbie, who is my step son Daniel's Mum :)

    Beaded Butterfly toppers

    You will need...

    rice paper butterfly printed sheet (available from cake decorating stores)

    silicone bead or drop pearl moulds (mine 'pearl drops' by First Impressions)

    isomalt sticks or pearls

    clear cake piping gel

    cake glue

    edible glitter

    food colour of choice 

    chef's gas torch

    small sharp scissors or craft knife

    paint brush used for food purposes only


    I made two batches of cakes yesterday, both used isomalt in the toppers. I was burnt with the cooked stove top isomalt (that cake later in the week) and I also used for the first time isomalt sticks. 

    Isomalt sticks are pre cooked isomalt, if it's first time you're using isomalt or you rarely do sugar work they are good option. However if you are frequent user I recommend cooking your isomalt from either powder or crystals.

    Quick and easy to prepare the stick isomalt;

    Break desired amount of sticks into pieces and place them in a microwave safe cup with a handle (I used pyrex) Melt in 15 second increments until clear and bubbles have formed. That's it, done!!

    Remove from the microwave and add colour if desired, stir the colour in with a back and forwards waving motion to prevent bubbles forming. Once all bubbles have subsided, pour carefully (it's hot!!) into moulds. 

    Allow to set and then unmould.

    If you used a silicone mould you will have small bubbles on the surface of your pieces.

    A quick pass over with a gas chef's torch will remove the bubbles and leave you with shiny pieces. If your moulded pieces are too long for the butterflies body, snap a piece off to shorten and neaten the end with the gas torch.

    Butterfly Wings;

    Lightly paint over selected butterflies with cake gel, sprinkle with edible glitter if desired. Leave overnight to dry.

    Next morning with small sharp scissors or a craft knife on a craft mat, cut out the butterflies. I cut the body ends away too.

    Gently fold butterfly and attach isomalt body with a little cake glue. Leave to dry for a few hours, support the wings by putting folded paper etc under them to create a "flying position". 

    Use finished butterflies to top you cupcakes. 

    Happy Baking or Butterfly making :) 

    Tuesday
    Aug102010

    Pearl Glaze Edible Paint

    pearl glaze by bakery crafts

    Pearl Glaze is a pre-mixed pearl lustre dust paint by Bakery Crafts. A fabulous product for cake decorators to carry with them for those emergency touch ups and for the home baker that occasionally wants to add a little shimmer to their cakes & cookies.

    Use alone to add a pearly shimmer or Pearl Glaze can also be easily coloured with any of your existing gel paste food colours allowing you to create colour palettes of choice.  

    here americolor electric pink gel paste is added to pearl glaze to create different shades of pink

    Pearl Glaze is best applied in several lights coats to your dry fondant/modelling paste/royal icing, allowing 30 minutes to dry between each coat to get the full effect. 

    Happy Baking :)

    Pearl Glaze is available from cake decorating stores and online from Cakestuff (New Zealand), Cakes Around Town (Australia) Riches and Realms Ebay store (Australia), Bakers Nook (US) Sorry UK I haven't as yet found a supplier online for you.